Templates
Add templates to an event with Create in Studio, Open File or From Gallery, then order, switch and fine-tune each one.
Templates are the experiences guests choose from: a framed photo, a strip, an AI look, a boomerang and so on. In CONTENT › Templates you add templates to the event, switch them on or off, put them in order and give each one its own settings.

Chapters (12)
Before you start
- Open the event in the Event Editor (see Events overview).
- Every template is built in a studio. How to design each kind is explained in its own article, for example Photo Studio, Collage Studio or AI Offline Studio. This article covers only adding and managing templates inside an event.
- An event needs at least one template before it can be launched.
Three ways to add a template
Open CONTENT › Templates. Three buttons sit at the top right: Create in Studio, Open File and From Gallery.
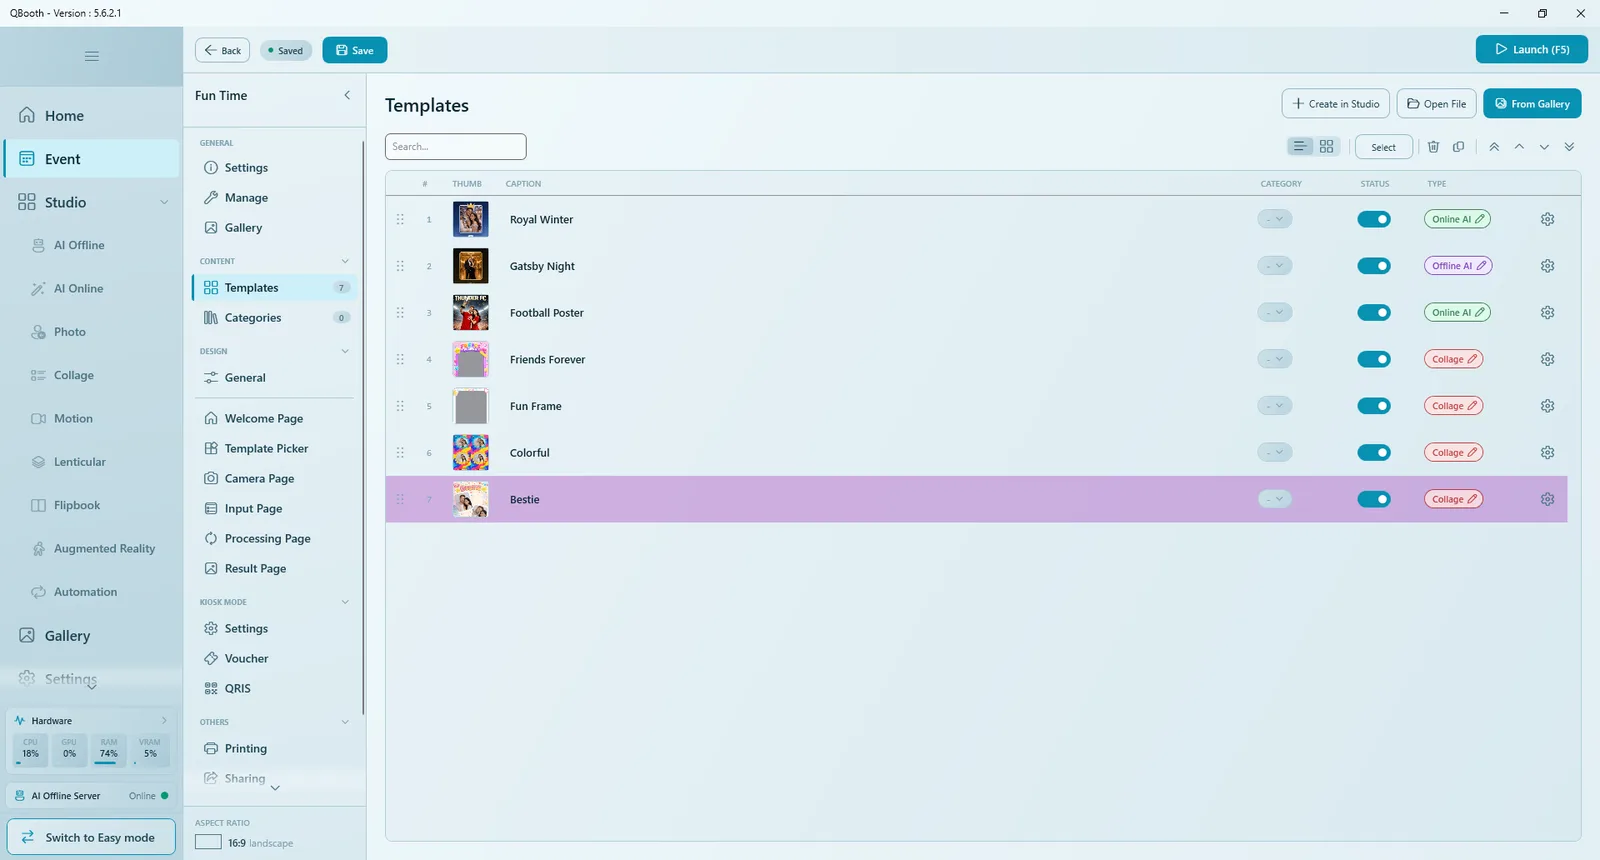
Create in Studio
Builds a new template on the spot and adds it to this event. Best for a template meant for this occasion only.
- Click Create in Studio. The Select Studio To Launch dialog opens, showing only the studios your license allows.
- Pick a studio. It opens in its own window, with the calling event's name, a large Save & Return button and Cancel at the top of the left panel.
- Design the template as usual (see the studio's article).
- Click Save & Return. The template appears as a new row in the Templates list. Cancel returns without adding anything.
- Click Save in the Event Editor.
A template made with Create in Studio is copied into the event's own folder only when the event itself is saved. After Save & Return, always click Save in the Event Editor too.
Open File
Adds template files you already have on disk, for example templates a colleague sent you.
- Click Open File. A Windows file picker opens.
- Select one or more template files (hold Ctrl to pick several).
- Click Open. Each file becomes a new row.
From Gallery
Adds templates from the Template Gallery, where you save templates you want to reuse and where ready-made templates can be downloaded.
- Click From Gallery. The Choose a Template window opens.
- Choose Local (templates on this computer) or Cloud (ready-made templates to download). Use the folders on the left, the TYPE filter and the search box to find what you need.
- Click the templates you want; several can be selected at once.
- Click Add Selected (n).
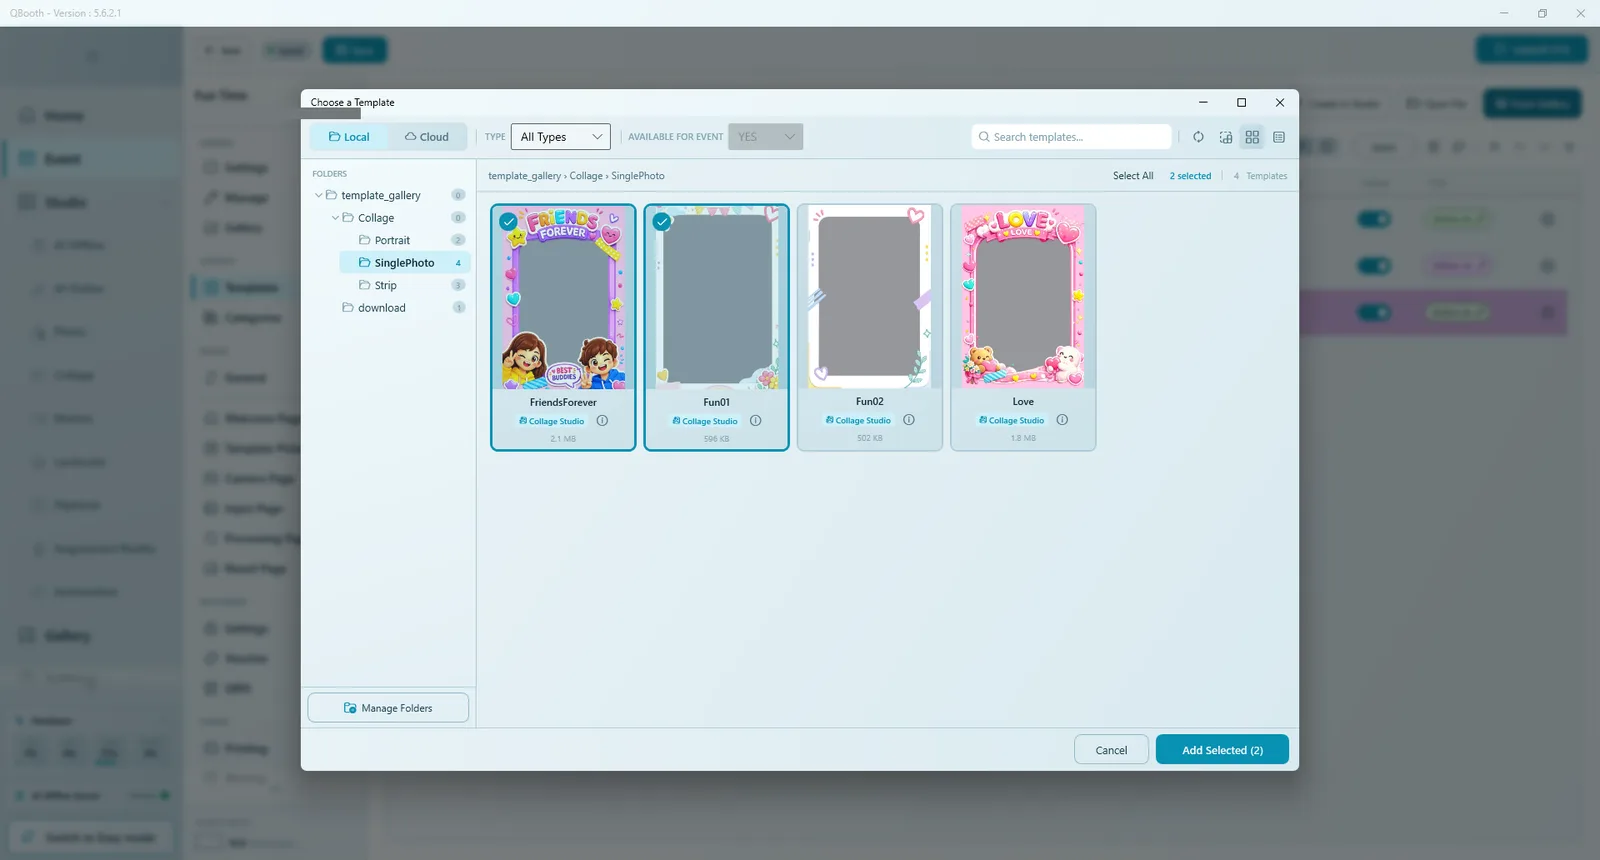
Only templates that use the guest's photo can run in an event. The gallery is already filtered to AVAILABLE FOR EVENT; templates that only create an image or video from text are skipped, because there is nowhere to put the guest's photo. A cloud template must be downloaded before it can be added.
Which way to choose?
| Situation | Use |
|---|---|
| A template only for this event | Create in Studio |
| A template you will reuse in many events | Build it from the Studio sidebar, save it to the Template Gallery, then From Gallery |
| Template files you received or keep in a folder | Open File |
| Ready-made templates | From Gallery › Cloud |
Template file types
Each studio saves its own file type. Open File accepts all of these:
| Extension | Made in |
|---|---|
.qsd | AI Offline Studio (Face Swap templates use it too) |
.qso | AI Online Studio |
.qsp | Photo Studio |
.qsc | Collage Studio |
.qsm | Motion Studio (music and assets are inside the file) |
.qsl | Lenticular Studio |
.qsf | Flipbook Studio |
.qsb | Also accepted by Open File |
The full list of Q-Booth file types is in the Reference.
The template list
| Column | What it shows or does |
|---|---|
| # | The order guests see. Drag the handle at the left of a row to move it. |
| THUMB | The template's preview picture (the cover guests see on the Template Picker). |
| CAPTION | The title guests see. Click it to edit directly in the row. |
| CATEGORY | Click the chip to choose a category from the event's list; - means none. See Categories. |
| STATUS | On/off switch. A switched-off template stays in the list but guests do not see it. |
| TYPE | The kind of template (for example Online AI, Offline AI, Collage). Click the pill to open the template in its studio and edit it. |
| Gear icon | Advanced settings for this template in this event. |
Toolbar
- Search... and the category filter (appears once the event has categories) narrow the list.
- List view / Card view switch the layout.
- Delete template and Duplicate template act on the highlighted row.
- Move to top, Move up, Move down, Move to bottom change the order.
Reordering is disabled while a search or filter is active. Clear them to move templates.
Switch templates on or off
Use the STATUS switch to hide a template for a while (for example an AI template when the internet is down) without losing its settings. Switch it on again whenever you like.
Change many templates at once
- Click Select.
- Click the rows you want to change; the counter shows how many are selected.
- Use Set Category, Set Status or the delete icon (Delete selected templates).
- Click Done.
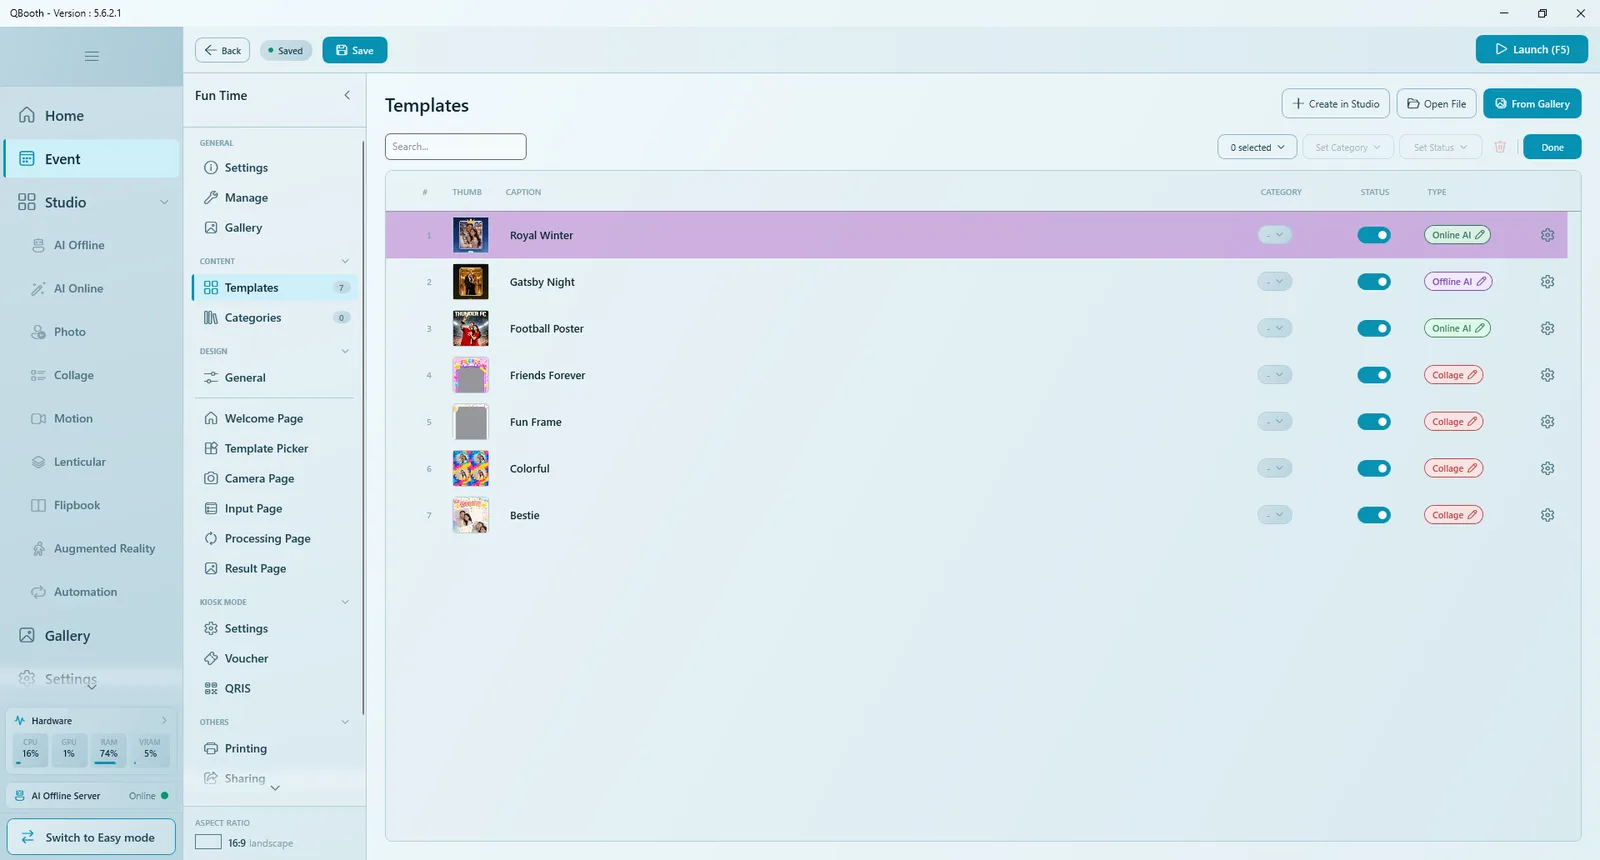
Advanced settings of a template
Click the gear icon on a row to open Edit Template. These settings apply to this template in this event only.
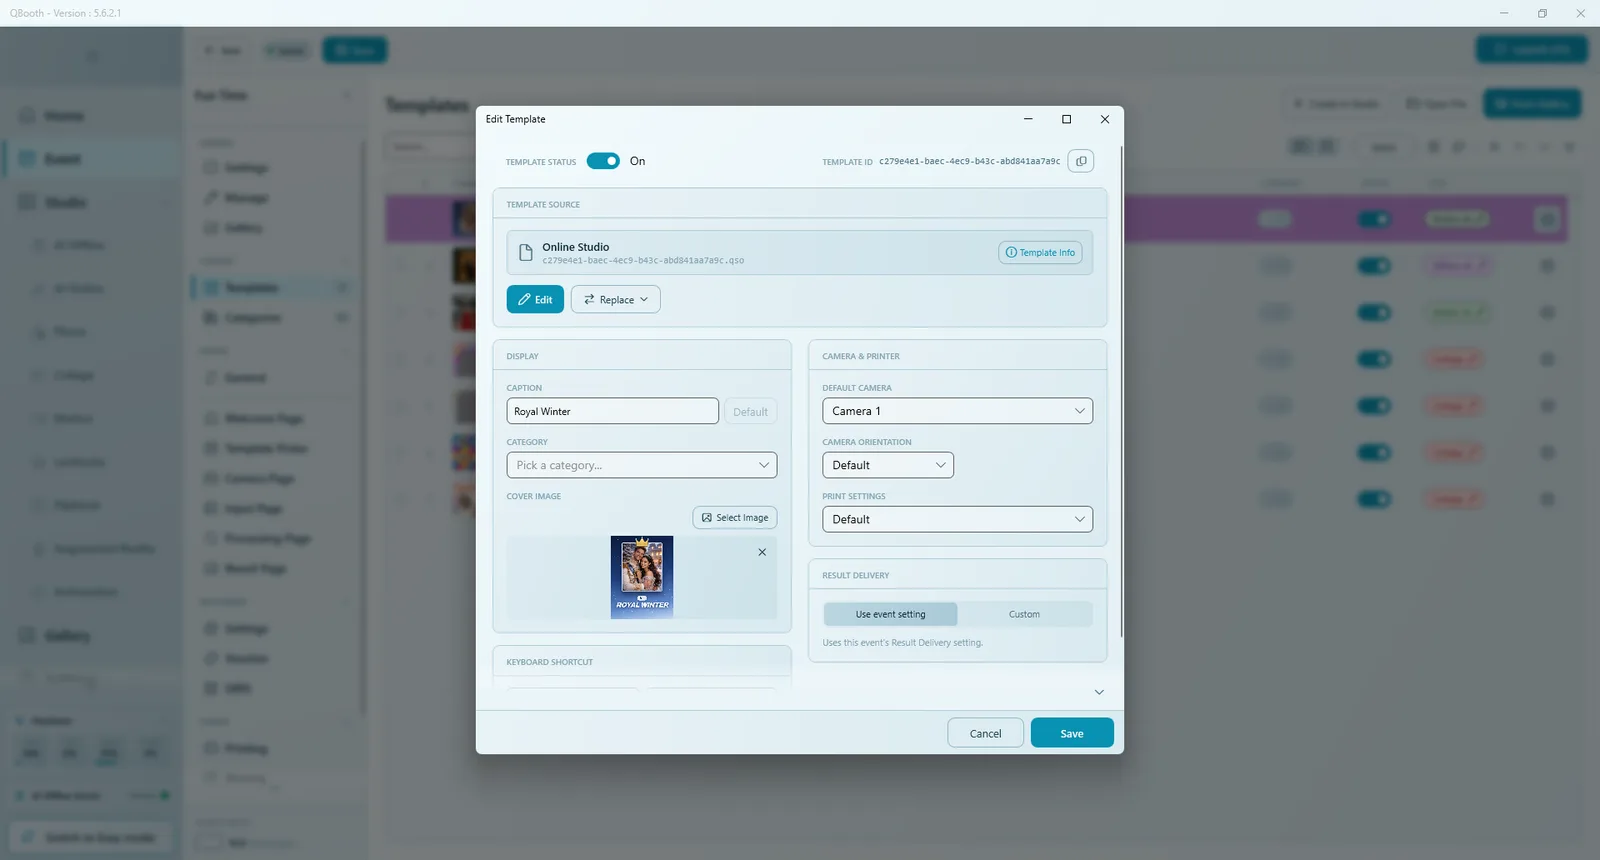
| Section | Options |
|---|---|
| TEMPLATE STATUS | On/off, the same as the list switch. |
| TEMPLATE SOURCE | The template file. Edit opens it in its studio, Replace swaps in another file, Template Info shows its details. |
| DISPLAY | CAPTION (or go back to the template's own caption), CATEGORY, and COVER IMAGE: an optional picture that replaces the template's own thumbnail on the Template Picker. |
| KEYBOARD SHORTCUT | A key that picks this template on the live Template Picker. Handy with an external button box or keyboard. |
| CAMERA & PRINTER | DEFAULT CAMERA (which camera this template uses), CAMERA ORIENTATION (how that camera is turned) and PRINT SETTINGS (its own printer). If that printer is not available during the event, printing falls back to automatic. |
| Result Delivery | Use event setting follows the event's Result Delivery; Custom sets this template's own options. |
Click Save in the dialog, then Save in the Event Editor.
Edit a template later
- Click the TYPE pill on the template's row (or the gear › Edit). The template opens in its studio.
- Make your changes and save them in the studio.
- Click Save in the Event Editor.
To use a completely different file for the same row (keeping its caption, category and settings), use Replace in Edit Template.
Tips
- Put your best seller first: guests usually pick from the first few cards.
- Use short, clear captions; long names are cut off on small cards.
- Give AI templates a cover image that shows the finished look, so guests know what they will get.
- With many templates, group them into categories.
- Test every template once with Launch (F5) before the show.
Common problems
"This template can't be used in an event."
The template does not use the guest's photo (for example a text-only AI template). Rebuild it so it takes the captured photo as its source.
"Your current license doesn't allow … templates."
That template type is not included in your license tier. See Introduction for the editions.
"The template file for this row is missing."
The file was moved or deleted before the event was saved. Use Replace in Edit Template, or add the template again with Open File or From Gallery.
I cannot drag templates into a new order.
Clear the search box and the category filter first.
A template does not appear at the booth.
Check that its STATUS is on, that its category is switched on, and that the Template Picker shows that category (see Template Picker).
Next steps
Still need help?
Our team answers on WhatsApp. Tell us your Q-Booth version and what you see on screen.