Motion Studio
Make boomerangs and video sequences with Motion Path presets, clips, transitions, background music and an overlay.
Motion Studio turns camera clips, photos and videos into one finished video, with transitions, background music and effects. Use it for boomerangs, slow-motion and speed-ramp clips, 360 and glambot videos, and longer sequences with an intro, an AI clip and an outro.

Chapters (22)
- 0:00Intro: what Motion Studio makes
- 0:27Open Motion Studio · the three panels
- 0:50Output settings
- 1:05Process and record from the camera
- 1:25The result and Share
- 1:40Motion Path: record once, many moves
- 1:57The five presets
- 2:10Motion Path Editor · save your own preset
- 2:33Animated effects
- 2:45360 videobooth
- 3:01Why a GoPro
- 3:21Connect the GoPro
- 3:43Glambot
- 4:03Adding clips · clip types
- 4:32Video Recording · image intro
- 4:49Order, duplicate, delete
- 5:00Transitions
- 5:12Background music · overlay
- 5:34An AI clip
- 5:52Save, process · the finished video
- 6:15Using it at an event
- 6:32Three things to remember
How a Motion Studio video works
- A video is a list of clips, played from top to bottom.
- Between two clips you can add a transition.
- Background music runs underneath the whole video.
- An overlay (a frame, still or animated) sits on top.
For a quick one-clip video without the studio, see Video booth in Easy Mode.
Open Motion Studio
Open Studio › Motion. A new project already has one clip: a Motion Path clip that records 10 seconds with the Classic Boomerang preset.
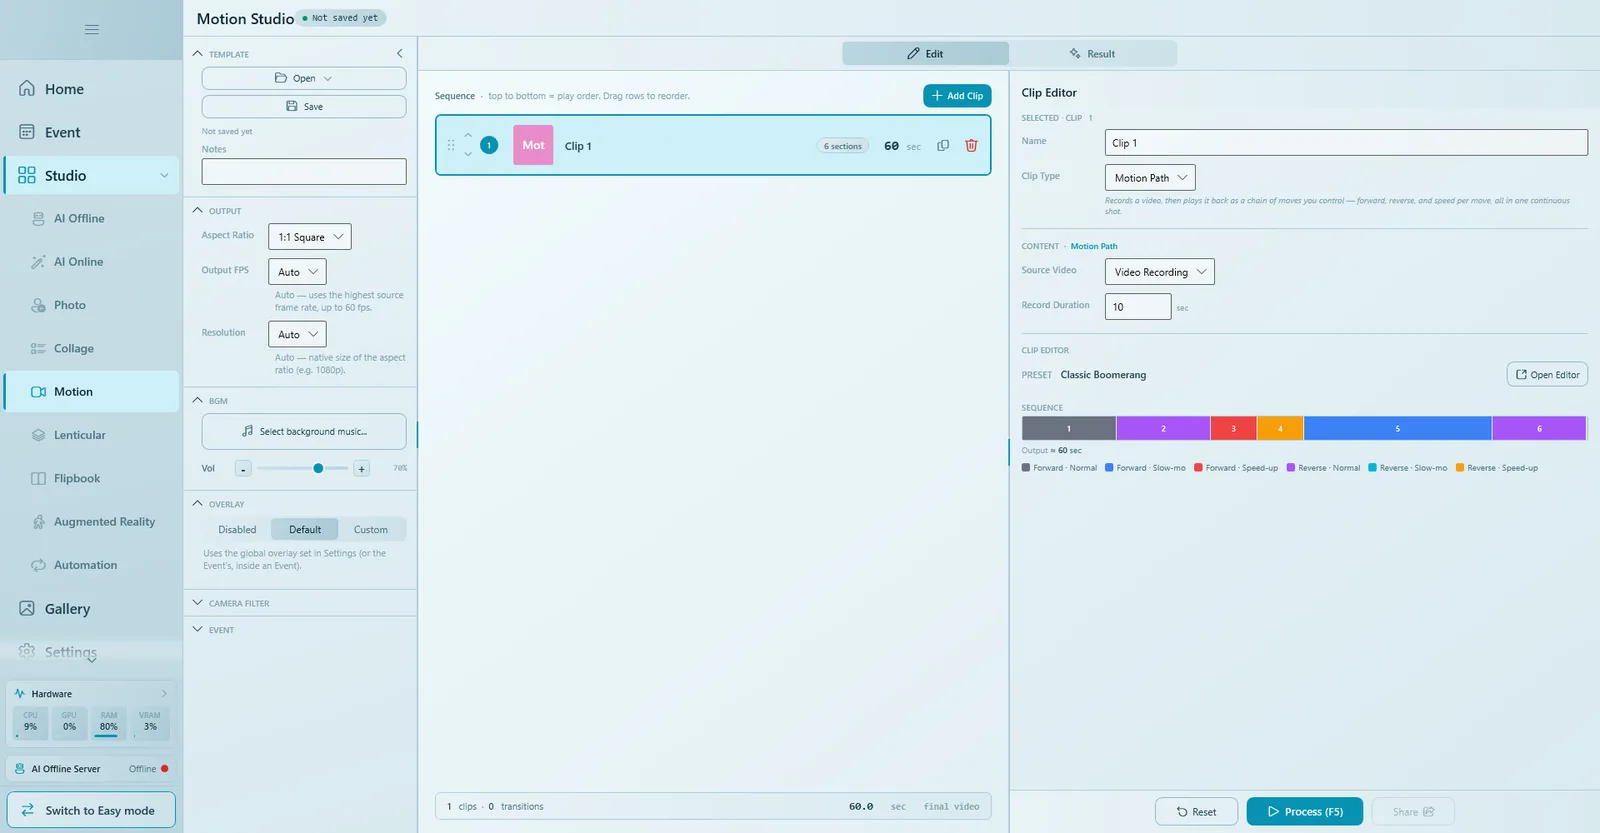
- Left: Template (Open, Save, Notes), Output, BGM, Overlay, Camera Filter, Event.
- Middle: Sequence, with Add Clip. The bottom bar shows the number of clips, the number of transitions and the length of the final video.
- Right: Clip Editor (or Transition Editor when a transition is selected), with Reset, Process (F5) and Share.
- The Edit / Result switch at the top moves between building and watching the finished video.
Output settings
| Setting | What it does |
|---|---|
| Aspect Ratio | The shape of the video: 9:16 for phones, 1:1 for social feeds, 16:9 for screens. |
| Output FPS | Auto uses the highest source frame rate, up to 60 fps. A fixed value renders every clip at that rate. |
| Resolution | Auto uses the native size of the aspect ratio (for example 1080p). It is an upper limit: sources are never enlarged beyond it. A lower value renders faster and makes a smaller file. |
Leave frame rate and resolution on Auto unless you need smaller files.
Your first video
- Choose the Aspect Ratio (for example 9:16).
- Press Process (F5). For a camera clip, the Motion Studio Input window asks for the video: click Select Video Input and choose Camera.
- Pick a countdown and record. The recording stops by itself after the record duration.
- Check the take: Retake, or OK to keep it. Then run the process.
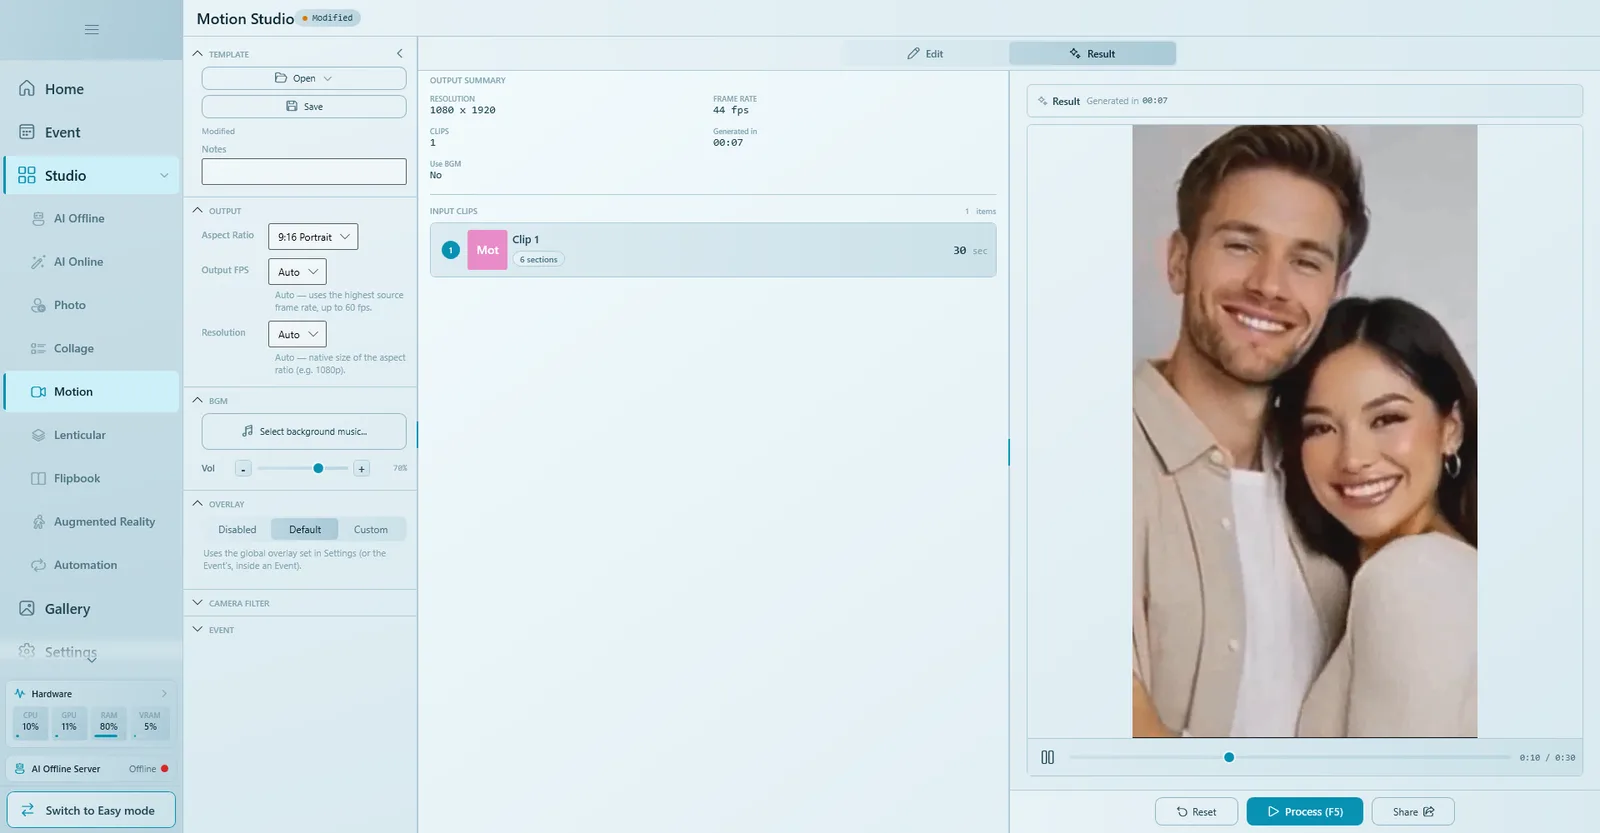
- A few seconds later the Result tab plays the finished video, with an OUTPUT SUMMARY (resolution, frame rate, clips, render time).
- Share saves the file, shows a QR code or sends it by email.
Motion Path: record once, many moves
A Motion Path clip records one take and plays it back as a chain of moves. Each move (a section) goes forward or backward, at its own speed, over part or all of the recording. This is how boomerangs, slow-motion finishes and rewinds are made.
In the Clip Editor of a Motion Path clip:
- Source Video: Video Recording (record at the booth) or Studio Template (use the video result of another studio template).
- Record Duration: the length of the take in seconds.
- PRESET and the SEQUENCE bar: each block is one section, its width is its share of the time, and its colour shows direction and speed (Forward · Normal, Forward · Slow-mo, Forward · Speed-up, Reverse · Normal, Reverse · Slow-mo, Reverse · Speed-up). The line below shows the estimated output length (for example Output ≈ 60 sec).
The five presets
| Preset | Feel |
|---|---|
| Classic Boomerang | Back and forth, the classic boomerang. |
| Hype Ramp | Starts slow and speeds up. |
| Bounce Pro | Energetic bouncing. |
| Rewind Rush | Plays mostly in reverse. |
| Showtime | Ends on a big slow-motion finish. |
The same recording gives five very different videos, so try them on a real take.
Change the moves in the Motion Path Editor
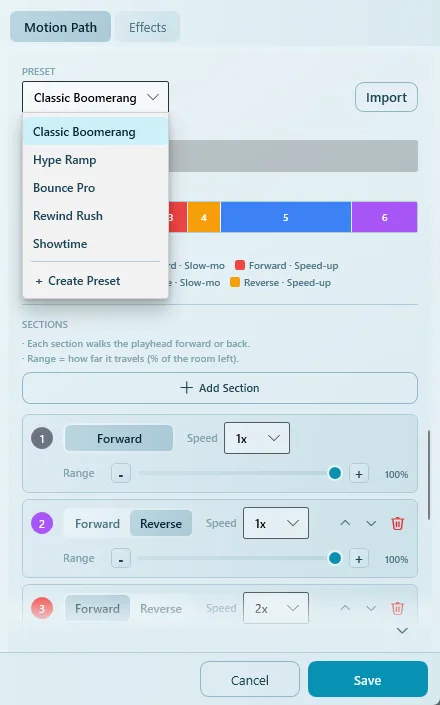
- In the Clip Editor, click Open Editor. The Motion Path Editor opens with the tabs Motion Path and Effects.
- Pick a PRESET as a starting point.
- Under SECTIONS, set each move: Forward or Reverse (the first section is always Forward), Speed (from 0.25x to 3x) and Range (how far it travels, as a % of the room left in that direction).
- Add moves with Add Section; reorder or delete them with the buttons on each row.
- Choose a preview source (Sample Video or Select Video) and click Apply & Preview. The preview renders at a reduced resolution for speed; the final video uses your Output resolution.
- Click Save to store the moves on the clip.
Happy with it? Choose Create Preset in the preset list and give it a Preset Name: it is then available for any template. Presets can also be exported and imported (Import) to share them between computers.
The sections in a preset are only a starting point. Add or remove moves freely; they join seamlessly and never run past the end of the recording.
Animated effects
In the Effects tab you can lay an animated overlay over the clip, such as gold dust, hearts or bokeh:
- Pick one from the Gallery, or Browse file… for your own transparent WebM.
- Download effect pack adds more effects.
- Set Opacity and Speed; Remove effect takes it off.
360 videobooth and glambot
Motion Path is also the engine behind a 360 videobooth (a camera arm spinning around the guests) and a glambot (a robotic arm swinging the camera past them). One preset turns a single take into slow motion, speed ramps and rewinds; Hype Ramp or Showtime give the slow-then-fast glam look. For a spinning arm, a wireless action camera that films at 120 fps or more (for example a GoPro HERO 9 or newer) keeps the slow motion smooth and nothing tangles. Connecting the camera is covered in Camera settings.
Build a longer video: clip types
Click Add Clip to put a new clip in the list, then choose its Clip Type:
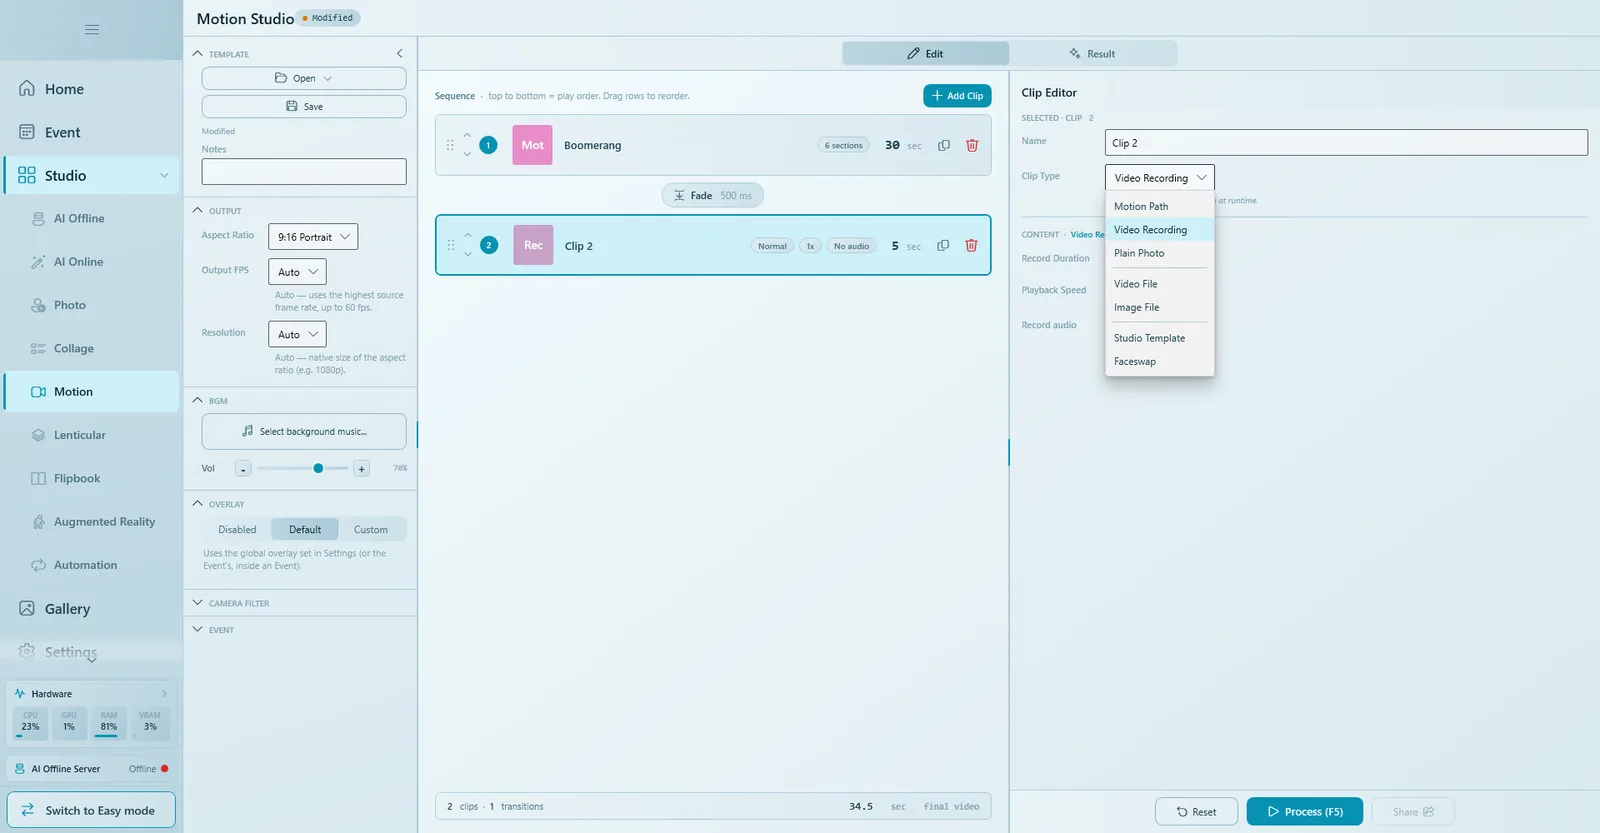
| Clip Type | What it is | Main settings |
|---|---|---|
| Motion Path | One recording played as a chain of moves (see above). | Source Video, Record Duration, preset / editor. |
| Video Recording | Records video from the camera at the event. | Record Duration, Playback Speed, Record audio. |
| Plain Photo | A photo of the guest, without AI. | Source Image. |
| Video File | A video you choose, played at its own length (an intro, a sponsor clip). | Source file. |
| Image File | A picture you choose, held on screen (for example an intro card with the event logo). | Duration, Animation, Size Mode. |
| Studio Template | Runs another studio template inside the clip, AI included (Photo Studio, AI Online, AI Offline, Face Swap). | Source template; the clip shows whether its output is an image or a video. |
| Faceswap | A photo with the face swapped onto your target picture. | Target picture, Source Image. |
Clip settings in detail
- Video Recording: set the Record Duration and the Playback Speed. Sound can only be recorded at normal speed (1x); at other speeds Record audio is switched off.
- Image File: set how long it stays on screen (Duration) and give it a gentle Animation: No animation, Zoom In, Zoom Out, Pan Left or Pan Right.
- Image File / Video File: Ask user at runtime replaces the embedded file with a fresh pick each time the template runs.
- Plain Photo / Faceswap: Input Image can be Independent (a fresh camera photo), From another clip input or From another clip result.
- Give each clip a Name so you can spot it in the sequence.
Order, duplicate, delete
Drag clips to change the order (top = first). Duplicate clip and Delete clip are on every row. A red clip still needs something, and the reason is written on it (for example No image selected).
Transitions
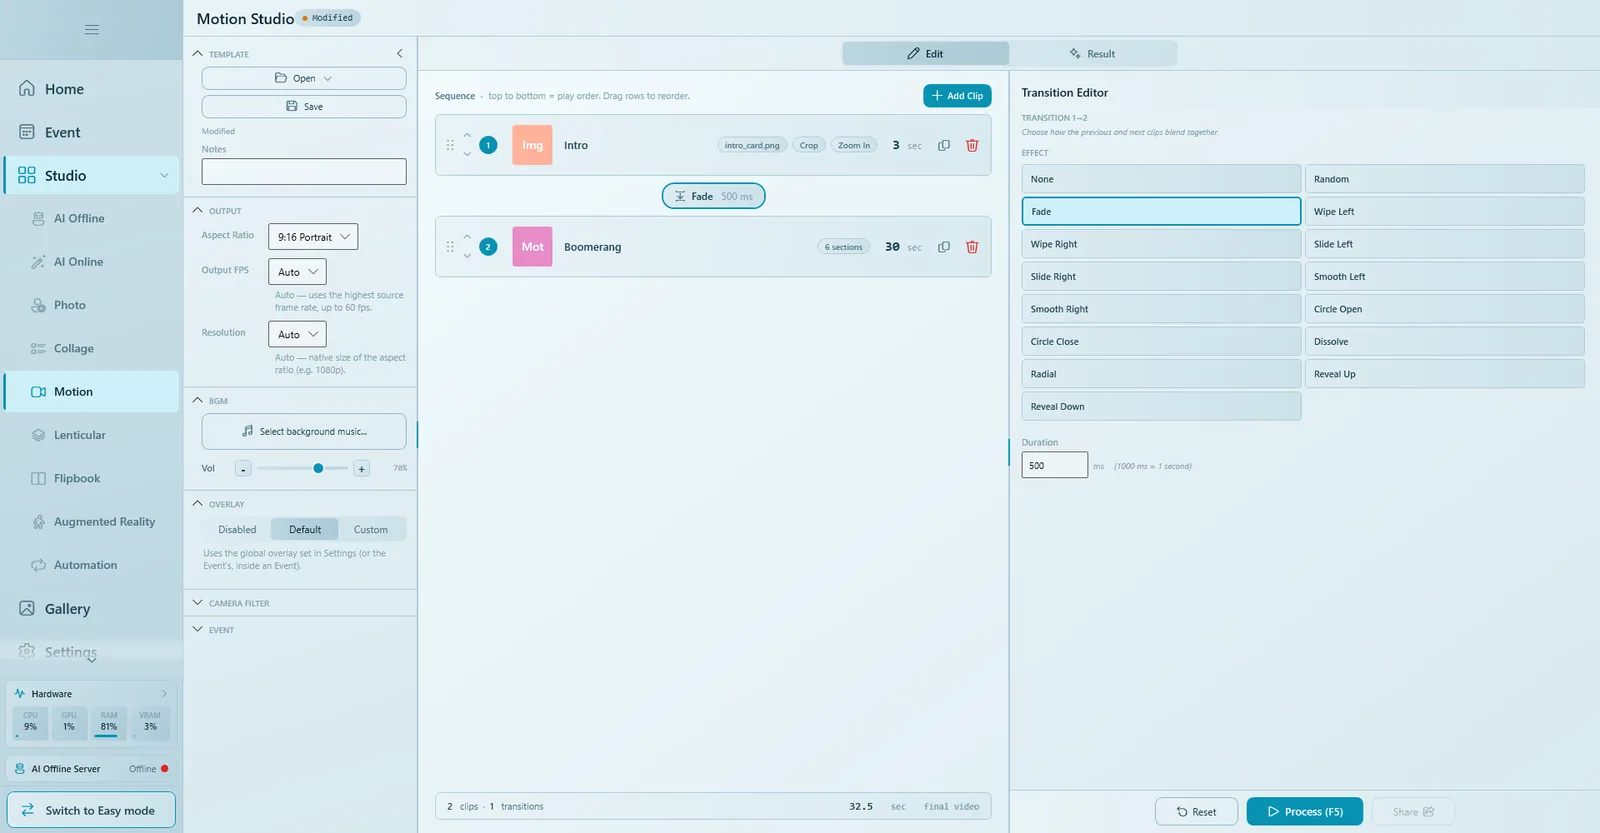
- Click the transition pill between two clips. The Transition Editor opens.
- Pick an EFFECT: None, Random, Fade, Wipe Left/Right, Slide Left/Right, Smooth Left/Right, Circle Open/Close, Dissolve, Radial, Reveal Up/Down.
- Set the Duration in milliseconds (1000 ms = 1 second).
- Optional: Apply to all transitions, or Reset to default.
A transition cannot be longer than the clips around it. Q-Booth shortens it automatically (to the shorter clip minus 0.5 seconds); if that leaves less than 0.6 seconds, it becomes a straight cut. A red warning shows when this happens.
Background music
- In BGM, click Select background music... and choose a music file.
- Use Preview / Stop to listen, and set Vol (default 70%).
The music is looped or trimmed to the length of the video automatically, so you do not need to edit the file. Remove background music takes it off.
Overlay, filter and event settings
- Overlay puts a frame over the whole video. Default uses the one from Settings (or the event's); Custom lets you pick a PNG, or a transparent WebM for an animated frame. Disabled turns it off.
- Camera Filter works as in Photo Studio.
- Under Event, add a caption and a cover image: video templates have no automatic cover.
An AI clip inside the video
A Studio Template clip can run AI Online or AI Offline. For example, the guest's photo becomes a royal winter scene and is then animated into a short video, right inside your sequence. The AI template itself is made in AI Online Studio or AI Offline Studio. When a Studio Template is the source of a Motion Path clip, it must produce a video, not an image.
Worked example: party boomerang with an intro
- Open Motion Studio and set Aspect Ratio to 9:16.
- Click Add Clip, set Clip Type to Image File, name it Intro, pick your logo card, set 3 seconds and Zoom In.
- Drag Intro above the default Motion Path clip.
- Select the Motion Path clip, name it Boomerang, set Record Duration to 5 seconds and choose the Bounce Pro preset.
- Click the transition between the two clips and choose Fade, 500 ms.
- Add music in BGM and a frame in Overlay › Custom.
- Add a caption and cover under Event, then Save.
- Press Process (F5), record a test take, and check the result.
Final processing and saving
Check the estimated length in the bar under the clip list, then press Process (F5). Every clip is recorded or loaded, joined with your transitions, and mixed with the music. Q-Booth stops with a clear message if there are no clips, a clip is incomplete, a Studio Template used as a video source produces an image, or clips feed each other in a loop.
Click Save. Motion Studio templates are saved as .qsm; the music and assets are stored inside, so the file is self-contained.
Use it at an event
Open the event's Templates and choose Open File, or Create in Studio to build it right there and come back with Save & Return. See Templates.
Tips
- Keep clips short: guests wait for the render. 5–10 seconds of recording is plenty.
- Sound only stays on clips at normal speed (1x).
- 9:16 suits phones, where most guests watch their video.
- Test the whole template on the event computer with the real camera; render time depends on the hardware.
Common problems
My transition is shorter than the value I typed.
It was shortened to fit between the clips. Make the clips longer or the transition shorter.
The recorded clip has no sound.
Record audio only works at normal playback speed (1x). Set Playback Speed to 1x if the clip needs sound.
A clip is red and Process refuses to start.
Read the reason on the clip (no image, no video, no template selected) and fill it in.
Process says the Studio Template produces an image.
A Motion Path clip needs a video source. Choose a template whose output is a video, or use a Studio Template clip on its own.
Rendering takes long.
Lower Resolution or Output FPS, shorten the recording, or use fewer clips.
Next steps
Still need help?
Our team answers on WhatsApp. Tell us your Q-Booth version and what you see on screen.