Settings: Camera
Connect a webcam, Canon DSLR or GoPro, set resolution, orientation and mirroring, frame the live view and fix common camera problems.
Q-Booth works with webcams and USB cameras, Canon DSLR/mirrorless cameras and GoPro action cameras. You connect them in Settings › Hardware, where you also set how the live view is framed for guests. Set it up once per computer, and again whenever the camera changes.
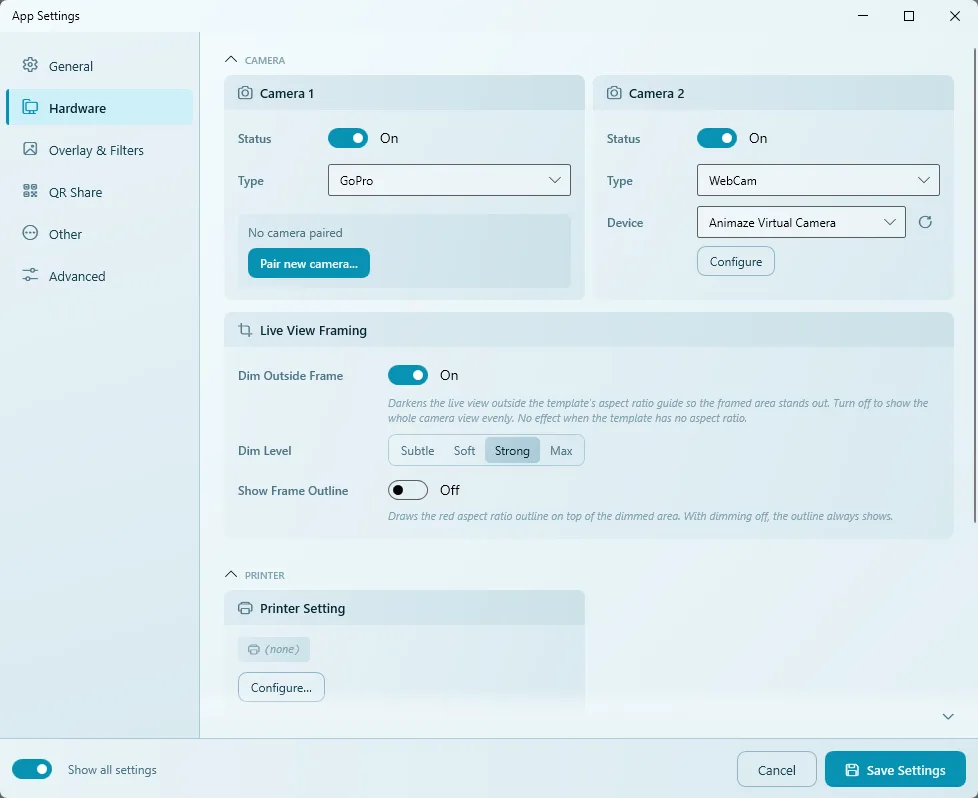
Camera 1 and Camera 2
The Hardware tab has two camera cards, Camera 1 and Camera 2. Each slot can hold a different camera type. With two cameras on, guests can swap viewpoints with the Switch Camera button on the event's Camera Page (see Page Designer). Most booths only need Camera 1.
| Field | What it does |
|---|---|
| Status | Turns that camera slot on or off. |
| Type | WebCam (any webcam, USB camera, capture card or virtual camera), Canon (Canon camera over USB) or GoPro. |
| Device | The camera to use, from the cameras Windows can see. Click the refresh icon next to it if you just plugged a camera in. (Not shown for GoPro — a GoPro is paired instead.) |
| Configure | Opens the detailed settings for that camera type, with a live preview. |
If you don't see the Camera 2 card or the Live View Framing card, turn on Show all settings at the bottom left of the window.
Which camera should I use?
| Camera | Best for | Keep in mind |
|---|---|---|
| Webcam / USB camera | Quick setups, testing, small booths, kiosks. Also capture cards and virtual cameras. | Image quality depends on the webcam. Use a good light. |
| Canon DSLR / mirrorless | The best photo quality for print, with control of ISO, aperture, shutter speed and white balance. Works with external flash. | Needs a USB cable and, for all-day events, a mains power adapter instead of the battery. |
| GoPro (HERO 9 or newer) | Video booths, 360 spinners and glambots — high frame rates for smooth slow motion, wireless, light. | Needs Bluetooth and a second Wi-Fi adapter on the PC. No live preview while shooting. |
Connect a webcam or USB camera
- Plug in the camera and open Settings › Hardware.
- On the Camera 1 card, turn Status on and set Type to WebCam.
- Choose the camera in Device. If it isn't listed, click the refresh icon.
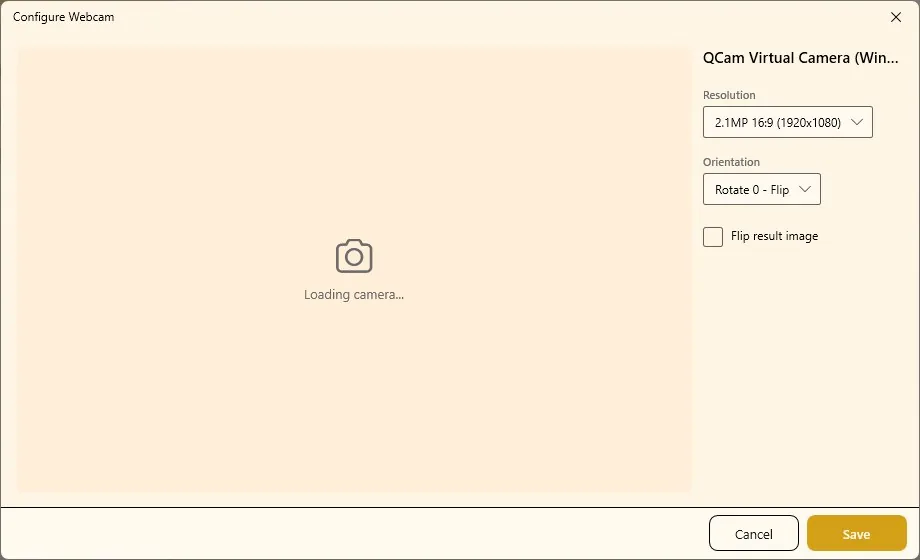
- Click Configure. The Configure Webcam window opens with a live preview.
- Choose a Resolution — normally the largest one the camera offers in the ratio you need, e.g.
2.1MP 16:9 (1920x1080). - Choose an Orientation. The preview follows immediately.
- Decide whether to tick Flip result image (see below), then click Save.
- Click Save Settings in App Settings.
| Option | What it does |
|---|---|
| Resolution | The resolutions the camera reports, e.g. 2.1MP 16:9 (1920x1080), 1.2MP 4:3 (1280x960), 0.9MP 16:9 (1280x720). |
| Orientation | Rotates the picture 0, 90, 180 or 270 degrees, each also available as a mirrored (Flip) version. Use 90/270 when the camera is mounted sideways for a portrait booth. |
| Flip result image | Mirrors the final photo too, not only the live view. |
Mirror effect: live view vs. final photo
A mirrored live view feels natural to guests — it behaves like a mirror. The final photo, however, usually should not be mirrored, otherwise text on clothes and signs reads backwards. So: choose a Flip orientation for the live view and leave Flip result image unticked. Tick it only if you really want the printed photo to be mirrored as well.
Connect a Canon DSLR or mirrorless camera
Before you start
- Set the camera's image quality to JPEG (not RAW or HEIF). Q-Booth cannot read RAW/HEIF files.
- Turn the mode dial to a creative mode (P, Av, Tv or M), not full Auto, if you want to control exposure from Q-Booth. In Auto the camera decides and Q-Booth shows Camera is in Auto mode.
- Set the camera's auto power-off to the longest time (or off) and use a mains power adapter for long events.
- If the camera is mounted in portrait, turn off Auto Rotate in the camera menu.
- Close other camera apps such as EOS Utility or Camera Connect — only one program can control the camera.
Setup
- Connect the camera with a USB cable and switch it on.
- In Settings › Hardware, turn Status on and set Type to Canon. The camera appears in Device.
- Click Configure. Q-Booth connects to the camera and shows its live view.
- Under Main Settings, set Orientation, ISO, Aperture, Shutter Speed and White Balance.
- Under Advanced Settings, choose the Capture Mode, Save Location and Save Mode.
- Click Test Capture to take a real test shot. Use Retake to try again after changing a setting.
- Click Save, then Save Settings.
Canon options
| Option | What it does |
|---|---|
| Camera Mode | Shows the mode the camera dial is set to. Which exposure settings you can change depends on it: Av mode allows aperture, Tv mode allows shutter speed, M allows both. |
| Orientation / Flip result image | Same as for a webcam. |
| ISO, Aperture, Shutter Speed | Exposure for the photo. |
| White Balance | Colour balance. Choosing colour temperature shows Color Temperature (Kelvin): 2500–10000 K in steps of 100, confirmed with Apply. Some entry-level bodies don't support Kelvin; Q-Booth then switches to Auto white balance and tells you. |
| Capture Mode | Quick Shoot — fast, direct capture (recommended). Shutter Press — simulates pressing the shutter button. Freeze Frame — saves the current live view frame without firing the shutter. |
| Save Location | Save to PC or Save to PC + Camera. The second needs a formatted SD card in the camera (or "Release shutter without card" enabled in the camera). |
| Save Mode | Notify — the camera writes the file and Q-Booth picks it up (faster, keeps the original JPEG). Direct — Q-Booth downloads and re-saves the image (smaller file, orientation applied). |
| External flash mode (stops Live View before capture) | Turn on if your external flash or studio strobe doesn't fire. |
| Live View Mode | Use Capture Settings — the live view uses the same exposure as the photo. Use Separate Settings — click Configure to give the live view its own brighter/clearer settings without changing the actual photo (useful with flash, where the photo settings look dark on screen). |
| Shoot from the camera | Turns live view off so the camera's own shutter button works — a quick way to check that the camera responds and the photo arrives in Q-Booth. |
Canon cameras can stop responding if they power off by themselves or the USB cable moves. Q-Booth limits the wait so the booth doesn't freeze — a failed shot offers a retake — but prevention is better: long auto power-off, mains power, and a cable that can't be pulled.
Pair a GoPro
What you need
- A GoPro HERO 9 or newer.
- Bluetooth on the PC — used to find the camera.
- A Wi-Fi adapter for the GoPro. The GoPro creates its own Wi-Fi network that the PC joins, so that adapter can't be used for internet at the same time. If the booth needs internet (QR upload, email, AI Online), add a second Wi-Fi adapter (USB dongle) or use a network cable.
- The GoPro Quik app on your phone closed. If a phone is connected to the camera, the PC cannot connect.
Pairing
- On the Camera 1 (or Camera 2) card, turn Status on and set Type to GoPro.
- Click Pair new camera.... Q-Booth scans for nearby cameras.
- On the camera's own screen (not your phone), open Preferences › Wireless Connections › Connect Device › GoPro Quik App. This only puts the camera in pairing mode. Keep that screen open.
- Pick your camera in the list and click Connect. Q-Booth connects over Bluetooth, turns on the camera's Wi-Fi and joins it automatically — you don't type any password.
- When pairing succeeds, click Configure on the camera card to set the capture defaults.
GoPro options
| Option | What it does |
|---|---|
| Check connection | Checks the camera is reachable; also shows battery, free SD space and Wi-Fi. |
| WiFi Adapter / Switch | Chooses which Wi-Fi adapter talks to the GoPro. Pick the spare adapter so your internet stays on the other one. |
| Capture Mode | Video or Photo. |
| Resolution, Frame rate, Aspect ratio, Orientation, Digital lens | How the camera records. For smooth slow motion in a video booth use a high frame rate such as 120. |
| Run diagnostic | Tests which resolution × aspect ratio × frame rate combinations your camera accepts (about 30 seconds). Use it if the camera rejects a setting. |
| Delete from camera SD after copying to PC | Frees the SD card. Turn off if you want the originals to stay on the GoPro as a backup. |
| Apply settings to camera | Sends the settings now, so the first guest doesn't wait for setup. |
| Test Record / Test Shot | Records a short test and downloads it. The test length only applies to this test — real events use the video length set in each template or page. |
| Remove | Forgets this camera. You need to pair again to use it. |
A GoPro has no live preview in Q-Booth while it shoots — guests see a countdown instead. How the GoPro is used in video templates is covered in Motion Studio and Video Booth.
Live View Framing
These options apply to both cameras. They help guests stand inside the part of the picture that will actually end up in the template.
| Option | What it does |
|---|---|
| Dim Outside Frame | Darkens the live view outside the template's aspect-ratio area, so the framed part stands out. Turn off to show the whole camera view evenly. Has no effect if the template has no aspect ratio. |
| Dim Level | How dark the outside area gets: Subtle, Soft, Strong (default) or Max. |
| Show Frame Outline | Draws a red outline of the aspect-ratio frame on top of the dimmed area. With dimming off, the outline is always shown. |
The default (dimming on, Strong) works well almost everywhere.
Troubleshooting
The camera preview is black, but photos are still taken.
Go to Settings › Advanced and set Live View Render Engine to CPU. Save, then reopen the camera page or camera window. See Advanced settings.
"No camera detected" / the camera is not in the Device list.
Check the cable and that the camera is on, then click the refresh icon next to Device. Close any other program that is using the camera (video call apps, EOS Utility, Camera Connect). For webcams, also check Windows Settings › Privacy & security › Camera.
Canon: "The camera sent a RAW/HEIF file".
Set the image quality in the camera menu to JPEG and try again.
Canon: the camera connection is stuck.
Close Q-Booth, switch the camera off and on, and open Q-Booth again. Then check the auto power-off setting and the power supply.
Canon: I can't change ISO, aperture or shutter speed.
The camera is in full Auto, or the dial mode doesn't allow that setting. Turn the dial to M to control everything.
GoPro: no camera found or it won't connect.
Make sure Bluetooth is on in Windows, the camera is within about 10 m and showing the pairing screen, and the GoPro Quik app on your phone is closed. If the PC can't join the camera's Wi-Fi, move the camera closer and try again, or remove the camera and pair it again.
GoPro: the PC lost its internet connection.
The Wi-Fi adapter used for the GoPro can't be used for internet. Use a second Wi-Fi adapter or a network cable, and select the spare adapter in WiFi Adapter.
The printed photo is mirrored.
Open Configure and untick Flip result image.
More fixes are collected in Troubleshooting.
Next steps
Still need help?
Our team answers on WhatsApp. Tell us your Q-Booth version and what you see on screen.