Settings: QR Share & Email
Set up and test Web QR (cloud or FTP), Local QR over Wi-Fi without internet, and email delivery via the cloud service or your own SMTP.
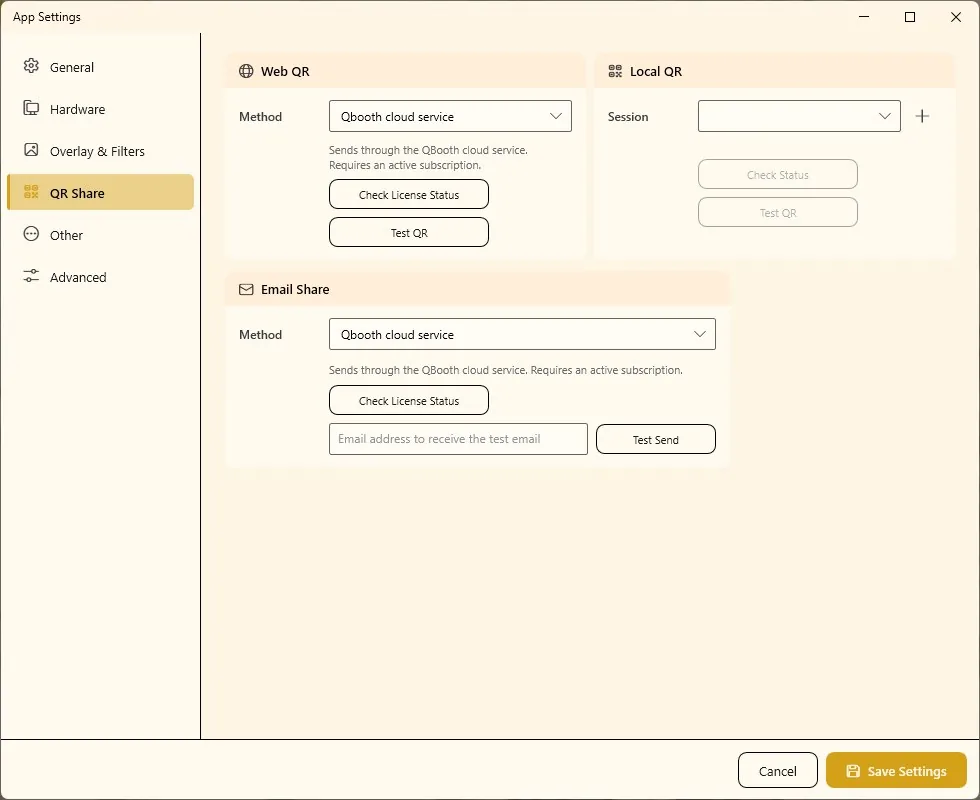
The QR Share tab sets up how guests get their photos on their phones: Web QR (scan a QR code and download over the internet), Local QR (scan and download over the booth's own Wi-Fi, no internet needed) and Email Share (receive a link by email). Each one is configured — and must be tested — separately.
Which method should I use?
| Method | How the guest gets the photo | Needs |
|---|---|---|
Web QR — Qbooth cloud service | Scans the QR, opens a web page, downloads. Works on mobile data. | Internet at the booth and an active cloud subscription. |
Web QR — FTP | Same, but the files go to your own web server. | Internet and your own FTP server + website. |
| Local QR | Scans the QR and downloads straight from the booth PC. | Guest's phone on the same Wi-Fi as the booth. No internet. |
| Email Share | Gets an email with a link to the photo. | Internet, Web QR set up, and either the cloud service or your own SMTP email account. |
Whether an event actually offers QR, email or printing to guests is chosen per event — see Sharing & Printing. This tab only provides the connections.
Web QR
Qbooth cloud service (recommended)
- Open Settings › QR Share.
- On the Web QR card, set Method to
Qbooth cloud service. - Click Check License Status. It shows whether your cloud subscription is active, with its start and end dates.
- Click Test QR. Q-Booth uploads a test image and shows the QR code. Scan it with your phone and check that the photo opens.
- Click Save Settings.
Cloud uploads are kept for about three weeks and then cleaned up automatically. Guests should download their photos soon after the event. Your subscription status is also shown on the Home page.
FTP (your own server)
Use this if you host the photos on your own website. If you don't see FTP in the list, turn on Show all settings.
- Set Method to
FTP. - Next to FTP Account, click + (Add session). The Web QR FTP Configuration window opens.
- Fill in the fields (table below) and click Test QR Upload.
- Save the account, select it in FTP Account, then click Test QR on the card and scan the code.
| Field | What to enter |
|---|---|
| Session Name | A name for this account, e.g. "My website". |
| FTP Host | The FTP server, e.g. ftp.yourdomain.com. Add a folder to upload into it, e.g. yourdomain.com/qr. |
| FTP Username / FTP Password | Your FTP login. Show reveals the password. |
| Result URL | The public web address of that folder, e.g. https://yourdomain.com/qr/. This is what goes into the QR code. |
| Timeout (seconds) | How long to wait for each upload. Default 10. |
| Enable SSL / Allow Untrusted SSL | Use an encrypted connection; allow it even if the server's certificate isn't trusted (self-signed). |
FTP Host and Result URL are not the same thing. The host is where Q-Booth uploads; the Result URL is where guests' phones download. If they don't point to the same folder, the upload succeeds but the QR shows "not found".
Local QR (no internet)
Local QR runs a small web server on the booth computer. Guests connect their phone to the same Wi-Fi, scan the QR code and download the photo directly from the booth — perfect for venues with poor or no internet. If the Local QR card is missing, turn on Show all settings.
- Connect the booth PC to the Wi-Fi network guests will use (for example your own router or hotspot).
- On the Local QR card, click + next to Session. The Local QR Configuration window opens.
- Fill in the fields below and save.
- Select the session and click Save Settings — the local server starts.
- Click Check Status. It should say Local QR server is running.
- Click Test QR, connect your phone to the same Wi-Fi and scan.
| Field | What to enter |
|---|---|
| Session Name | A name, e.g. "Booth router". |
| IP Address | The booth PC's address on that network. Q-Booth fills in the first one it finds; change it if the PC has several networks. |
| Port | Default 8000. Any free port from 1 to 65535. |
| Wi-Fi SSID / Wi-Fi Password | The network name and password guests need to join, so the QR flow can help them connect. |
If Windows asks whether to allow Q-Booth on the network, choose Allow (private network). A firewall blocking the port is the most common reason phones can't open the page.
Email Share
Email Share sends the guest an email with a link to their photo. The link comes from Web QR, so set up and test Web QR first. If the Email Share card is missing, turn on Show all settings.
| Method | How it works | Best for |
|---|---|---|
| Qbooth cloud service | Sends through the QBooth cloud service. Requires an active subscription. Nothing else to configure. | Most users. Also works at venues that block email ports. |
| Own SMTP | Sends from your own email account (Gmail, Outlook, Yahoo or any SMTP server). | Emails that must come from your own address. |
Using the cloud service
- Set Method to Qbooth cloud service.
- Click Check License Status to confirm the subscription is active.
- Type your own address in the test field and click Test Send. Check your inbox (and spam folder).
Using your own email account (SMTP)
- Set Method to Own SMTP.
- Next to SMTP Account, click + (Add session).
- Choose your Email Provider: Gmail, Outlook / Office 365, Yahoo Mail or Custom (other SMTP). For the first three, host, port and SSL are filled in for you.
- Enter From Name (what guests see, e.g. your booth name) and From Email (your full address — also the login).
- Enter the Password. For Gmail and Yahoo this must be an App Password, not your normal password (see below). Other providers use the account's normal password.
- For Custom (other SMTP), also enter SMTP Host, Port (usually 587 for STARTTLS or 465 for SSL), Use SSL/TLS (leave on unless your server says otherwise) and Username.
- Save the account and select it in SMTP Account. You can keep several accounts and switch between them.
- Enter a test address and click Test Send. Check that the email arrives and looks right.
Gmail and Yahoo require an App Password, which needs 2-Step Verification turned on in the account. Use the How to create an App Password link in the window. Free Gmail allows roughly 500 recipients per day, and the sender address is always your signed-in account.
Test everything before guests arrive
A wrong password, a mistyped URL or a venue network that blocks access only shows up when you press the test buttons. Do it at the venue, on the venue's network:
- Web QR: Check License Status (cloud) and Test QR — scan the code with a phone on mobile data.
- Local QR: Check Status and Test QR — scan with a phone on the booth Wi-Fi.
- Email: Test Send — check the inbox, including spam.
- Then run one complete guest session through to the QR or email. See the Event Checklist.
Troubleshooting
Guests scan the QR but the page doesn't open.
Web QR: run Check License Status and Test QR; check the booth's internet. With FTP, check that the Result URL points to the folder the FTP Host uploads to. Local QR: the phone must be on the same Wi-Fi as the booth, and the port (default 8000) must not be blocked by the Windows firewall.
"Local QR server is not running."
Select a session on the Local QR card and click Save Settings to start it, then check again.
The result email is not sent.
Run Test Send and read the error. With Own SMTP, many event networks block ports 587/465 — switch to Qbooth cloud service or use another internet connection. Check that you used an App Password for Gmail/Yahoo.
Emails land in spam.
Use a clear From Name and a real address you own. Sending many emails from a free personal mailbox increases the chance of spam filtering.
"No internet connection" / "The server did not respond."
Check the booth's network. If you use a GoPro, its Wi-Fi adapter can't be used for internet at the same time — see Camera settings.
Next steps
Still need help?
Our team answers on WhatsApp. Tell us your Q-Booth version and what you see on screen.