Kiosk, Payment & Vouchers
Turn an event into a self-service booth where guests start a session with a voucher code or a QRIS payment.
Kiosk Mode turns an event into a self-service booth. After a guest taps Start, they pass a gate first: they type a voucher code or pay by scanning a QRIS code. Only then does the session begin. Use it for booths that run without staff, for prepaid packages, or for paid sessions.
Chapters (8)
How it works
- The guest taps Start on the Welcome Page.
- The kiosk gate appears: a keypad for a voucher code, a QRIS payment code, or, if both are allowed, the question "How would you like to pay?"
- When the code is accepted or the payment arrives, the session starts: survey (if any), templates, camera, result.
- The Result Page returns to the start by itself after the time you set, ready for the next guest.
All of this lives in the KIOSK MODE group of the Event Editor: Settings, Voucher and QRIS.
Turn on Kiosk Mode
- Open the event and go to KIOSK MODE › Settings.
- Turn on Enable Kiosk Mode.
- Under Allowed methods, turn on Voucher, QRIS, or both.
- Under Session, set the Result page timer in seconds.
- If you use QRIS, fill in the Price per session: what a guest pays to start one session.
- Click Save.
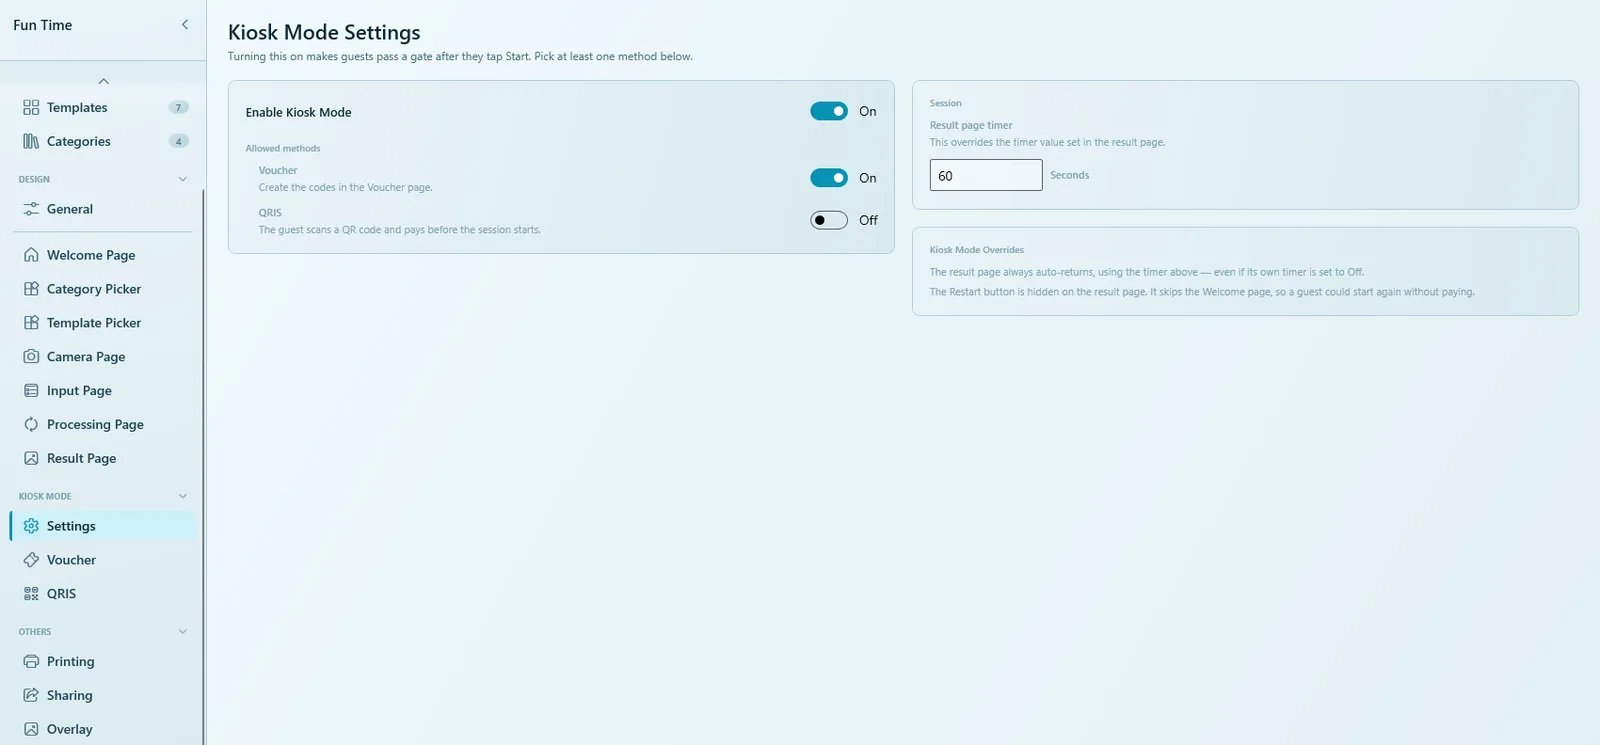
| Option | What it does |
|---|---|
| Enable Kiosk Mode | Guests must pass the gate after tapping Start. Pick at least one method; with none selected the gate does nothing and guests start as usual. |
| Voucher | Guests type a code you created on the Voucher page. |
| QRIS | The guest scans a QR code and pays before the session starts. This option only appears when the QRIS add-on is active on your license. |
| Price per session | The amount a guest pays for one session with QRIS. |
| Result page timer | How many seconds the Result Page stays before returning to the start. This overrides the timer set on the Result Page. |
What changes in Kiosk Mode
The Kiosk Mode Overrides box lists two changes that protect paid sessions:
- The Result Page always returns to the start by itself, using the timer above, even if its own timer is set to Off.
- The Restart Session button is hidden on the Result Page. It skips the Welcome Page, so a guest could otherwise start again without paying.
Vouchers
Vouchers are numeric codes that guests type at the booth to start a session. Each code works once. Hand them out as printed cards, sell them as packages, or give them to VIP guests.
Create a batch of vouchers
- Go to KIOSK MODE › Voucher. The Voucher Management page opens.
- Click Create Voucher.
- Fill in the New Voucher Batch window (see the table below).
- Click Generate Vouchers and confirm. The codes appear in the list.
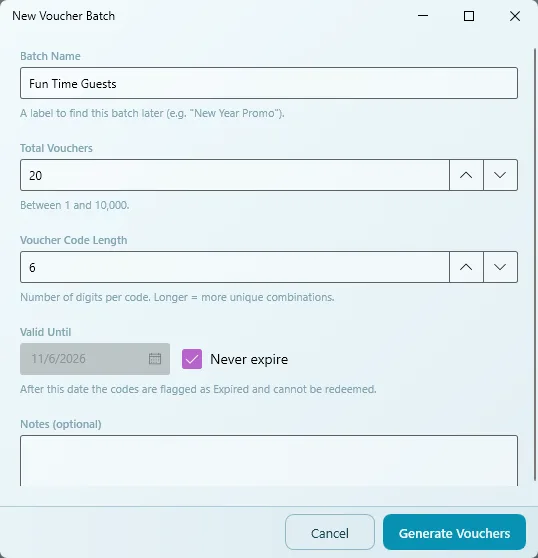
| Field | What to enter |
|---|---|
| Batch Name | A label to find this batch later, for example "VIP Guests" or "New Year Promo". |
| Total Vouchers | How many codes to make, between 1 and 10,000. |
| Voucher Code Length | Number of digits per code. Longer codes give more unique combinations and are harder to guess. If you ask for many codes with a short length, Q-Booth asks you to increase the length. |
| Valid Until / Never expire | After this date the codes are marked Expired and can no longer be used. Tick Never expire for codes without an end date. |
| Notes (optional) | Your own notes about the batch. |
The voucher list
The list shows every code with its batch, Valid Until, Status, Used Date and the Trans. Code of the session that used it. The summary line shows how many are Active, Used, Expired and Deleted.
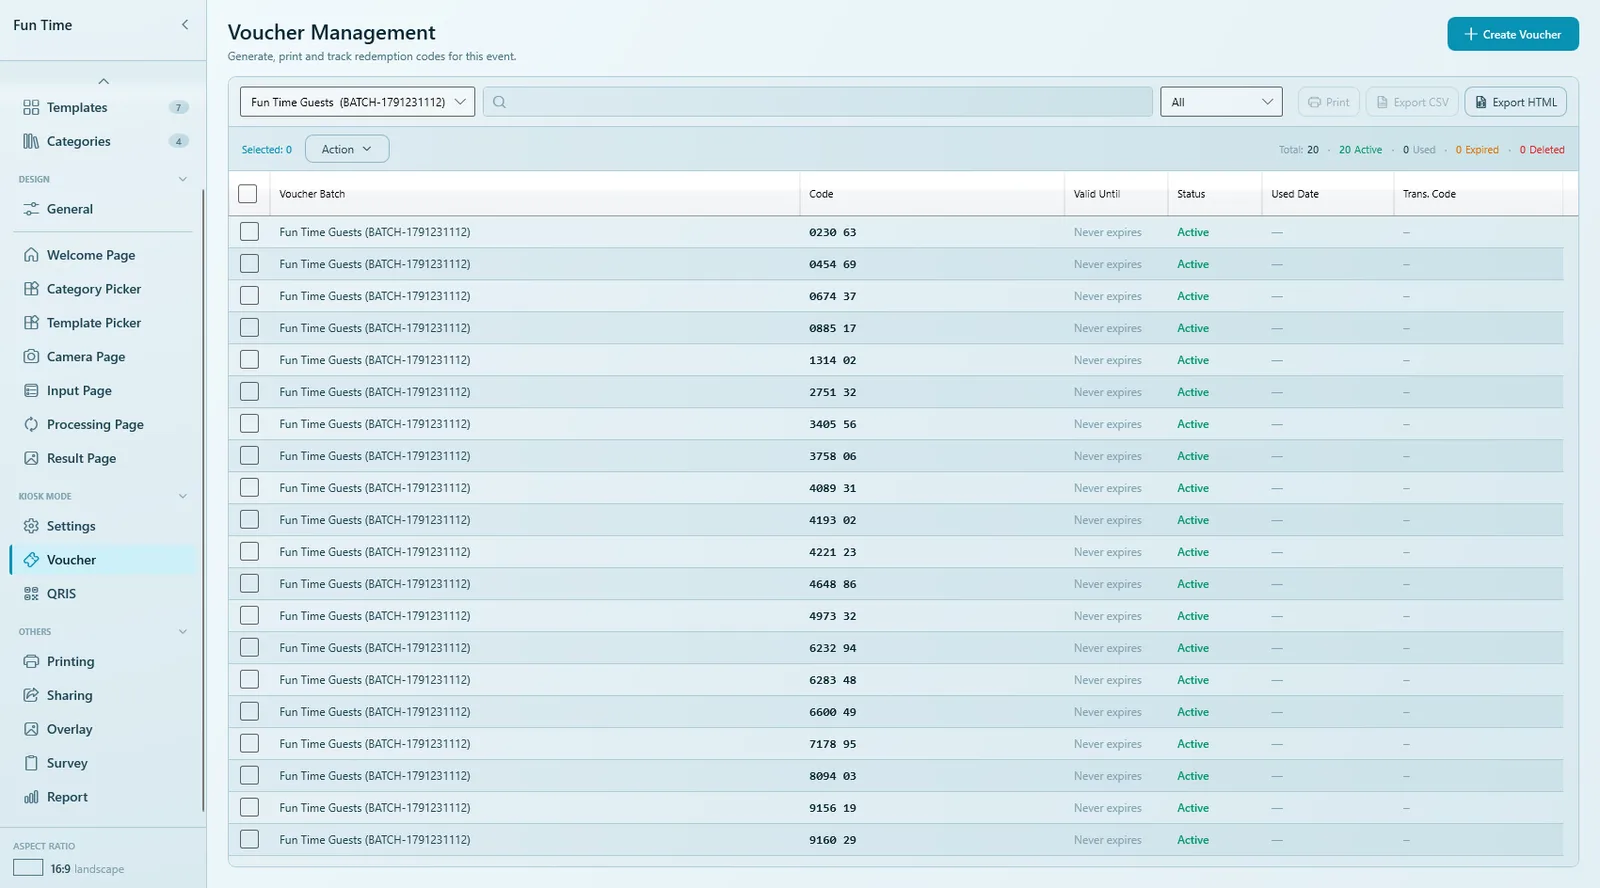
- Filter and search: pick a batch, pick a status (All, Active, Used, Expired…), or search for a code or batch name.
- Change several codes at once: tick the codes, then use Action › Set Active, Set Inactive or Delete. Used codes are skipped, and only active codes can be deleted.
- Export: Export CSV for a spreadsheet, Export HTML for a report of one batch.
Use Set Inactive to hold back codes you have not handed out yet. A guest who types an inactive code is asked to see a member of staff.
Print voucher cards
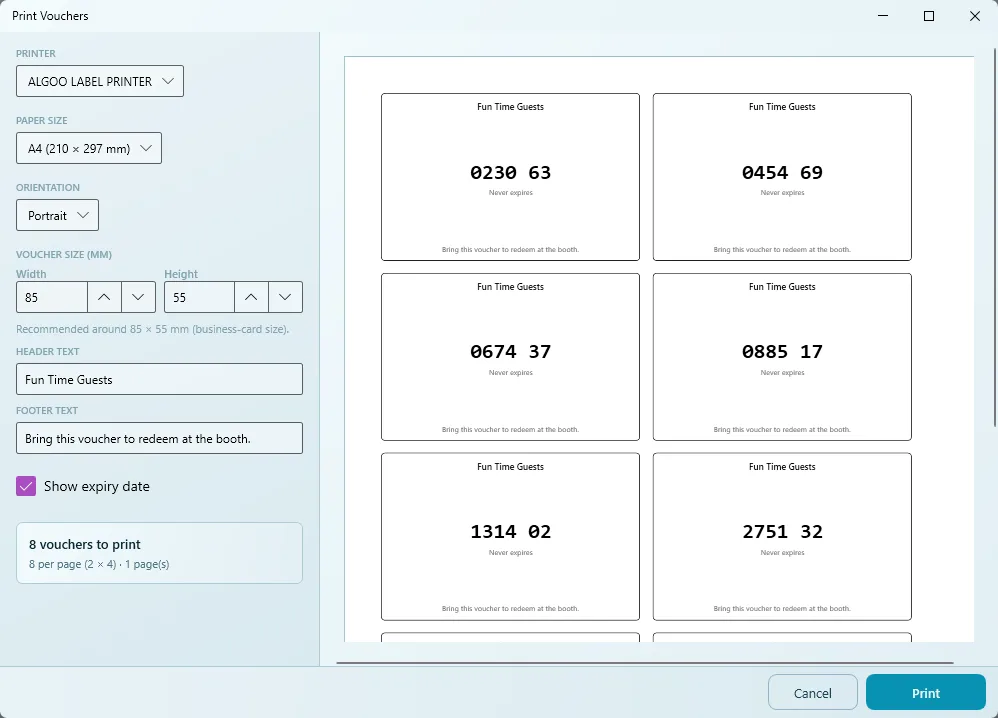
- Filter the list to one batch, or tick codes from the same batch. Printing covers one batch at a time.
- Click Print.
- In Print Vouchers, choose the PRINTER, PAPER SIZE and ORIENTATION.
- Set the VOUCHER SIZE (mm). Around 85 × 55 mm (business-card size) is recommended.
- Edit the HEADER TEXT and FOOTER TEXT, and choose whether to Show expiry date.
- Check the preview and the page count, then click Print.
Vouchers at the booth
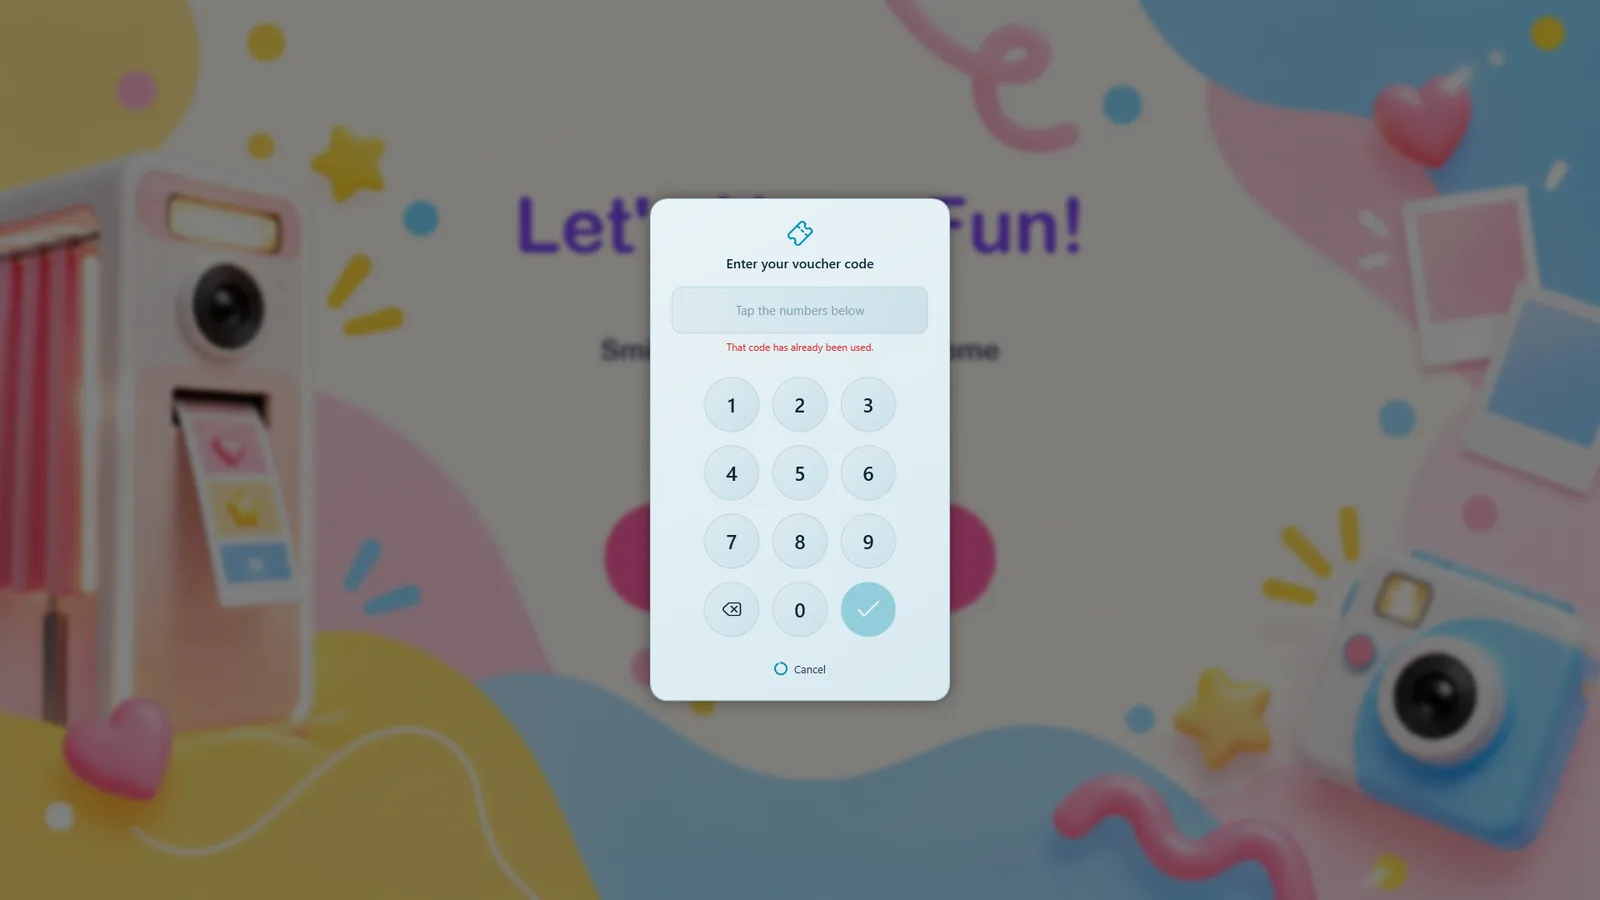
The guest taps Start, types the code on the keypad ("Enter your voucher code") and confirms with the tick. The session begins right away. If the code cannot be used, the keypad shows why:
| Message | Reason |
|---|---|
| That code isn't valid. Please check it and try again. | The code does not exist (typing mistake). |
| That code has already been used. | Each code works once. |
| That code has expired. | The Valid Until date has passed. |
| That code isn't active yet. Please ask a member of staff. | The code is set to Inactive. |
| That code is no longer valid. | The code was deleted. |
If a code used at the booth still shows Active in Voucher Management, reopen the Voucher page to refresh the list. Report › Vouchers always shows the current status.
QRIS payment
QRIS is Indonesia's national QR payment standard. With QRIS turned on, the booth shows a payment QR code for the Price per session. The guest scans it with their bank or e-wallet app, and the session starts as soon as the payment comes in. The QRIS method is only available when the QRIS add-on is active on your license.
What the guest sees
- "Scan to pay" with the QR code and a countdown ("Expires in …").
- "Waiting for payment…" while the guest pays in their app.
- "Payment received", and the session continues.
- If the code expires or cannot be created, the guest sees a message instead and no session starts.
The QRIS page
KIOSK MODE › QRIS lists the QR codes made for the selected dates, paid or not, with their Date, Amount, Status (Waiting, Paid, Expired, Cancelled, Failed), Vendor, Vendor Reference and Transaction Code.
| Figure | Meaning |
|---|---|
| Revenue | Guest payments only: what this event earned. |
| Collected | Every paid QR code, including your test payments. This is the amount the payment service will settle; check it against their statement. |
| Paid | How many guest QR codes were paid. |
| Not paid | Guest QR codes that expired or were cancelled without payment. |
| Failed | The payment service could not create a QR code; the guest saw an error, not a code. |
Test QRIS before the event
- On the QRIS page, type a small Test amount.
- Click Test. A QRIS Test window shows a real payment code.
- Pay it with your own banking or e-wallet app.
- Wait for "Payment received". The test appears in the list marked TEST; it counts in Collected but not in Revenue.
QRIS needs a working internet connection at the booth for the whole event. Test it on the venue's network, not only at home.
Kiosk figures in the report
OTHERS › Report has three kiosk views: Vouchers (every code with its status and the session that used it), QRIS Payments (every payment code) and QRIS Recap (one row per day). The KPI cards Revenue, Paid Sessions and Vouchers Used are available on the Summary. See Report.
Tips for a self-service booth
- Set a Set session print limit in Printing so each session gets a fixed number of prints.
- Turn on Require PIN to exit and the keyboard blocks in GENERAL › Settings, and keep the exit PIN somewhere safe. See Running an event.
- Choose a result timer long enough for guests to scan the QR code before the booth resets.
- Before every show: back up the event, test a full session with Launch (F5), including one voucher and (if used) one QRIS test payment.
Common problems
Guests start without entering a code.
Enable Kiosk Mode is off, or no method is selected under Allowed methods. Turn on at least one method and save.
There is no QRIS switch.
The QRIS option only appears when the QRIS add-on is active on your license.
The Restart button disappeared from the Result Page.
That is intended in Kiosk Mode: it would let a guest start again without a new voucher or payment.
Q-Booth says the voucher count is too large.
The code length is too short for that many unique codes. Increase Voucher Code Length.
The guest sees "Could not generate a payment code."
The payment service could not create a QR code. Check the internet connection, then try the Test button on the QRIS page.
Next steps
Still need help?
Our team answers on WhatsApp. Tell us your Q-Booth version and what you see on screen.