Photo Studio
Remove or change the background, add a sticker outline, a guest star, a frame and filters, and save it all as a photo template.
Photo Studio is the simplest studio in Q-Booth: one photo goes in, one finished picture comes out. Use it to remove or replace the background, turn guests into a sticker, let them pose with a "guest star", and add your frame, QR code and filter, then save it all as a template for your events.

Chapters (9)
When to use Photo Studio
- A classic photo booth where speed matters: no heavy AI transformation, results in seconds.
- Background removal or a new background without a green screen.
- Posing with a celebrity, mascot or character cut-out (Guide Image).
- A single photo with a branded frame. For several photos on one print, use Collage Studio; for face swap, use Face Swap; for AI styles, use AI Offline or AI Online.
Open Photo Studio
Open Studio › Photo. The screen has three columns:
- Left: template settings: Template (Open, Save, Notes), Aspect Ratio, Overlay, QR Overlay, Camera Filter, Event and Options.
- Middle: the effects, in three tabs: Background, Guide Image and Face Restoration.
- Right: Source Image (the test photo), Result and Compare, with Reset, Process (F5) and Share at the bottom.
Open loads a saved template; Save stores everything in one template file (.qsp).
Start with a test photo
Everything you set up is tried on a test photo. At the event, the guest's photo takes its place.
- Click the Source Image tab on the right.
- Click Select Image and choose Camera, Clipboard, Gallery or File, or simply drag a photo onto the canvas.
- To shoot one right here, use the camera: the studio camera opens with a Count Down (Off, 3s, 5s or 10s). Click Shoot, then keep the photo.
Test with a photo taken at the real venue, with the real lighting. That is the photo the template has to handle at the event.
Remove the background
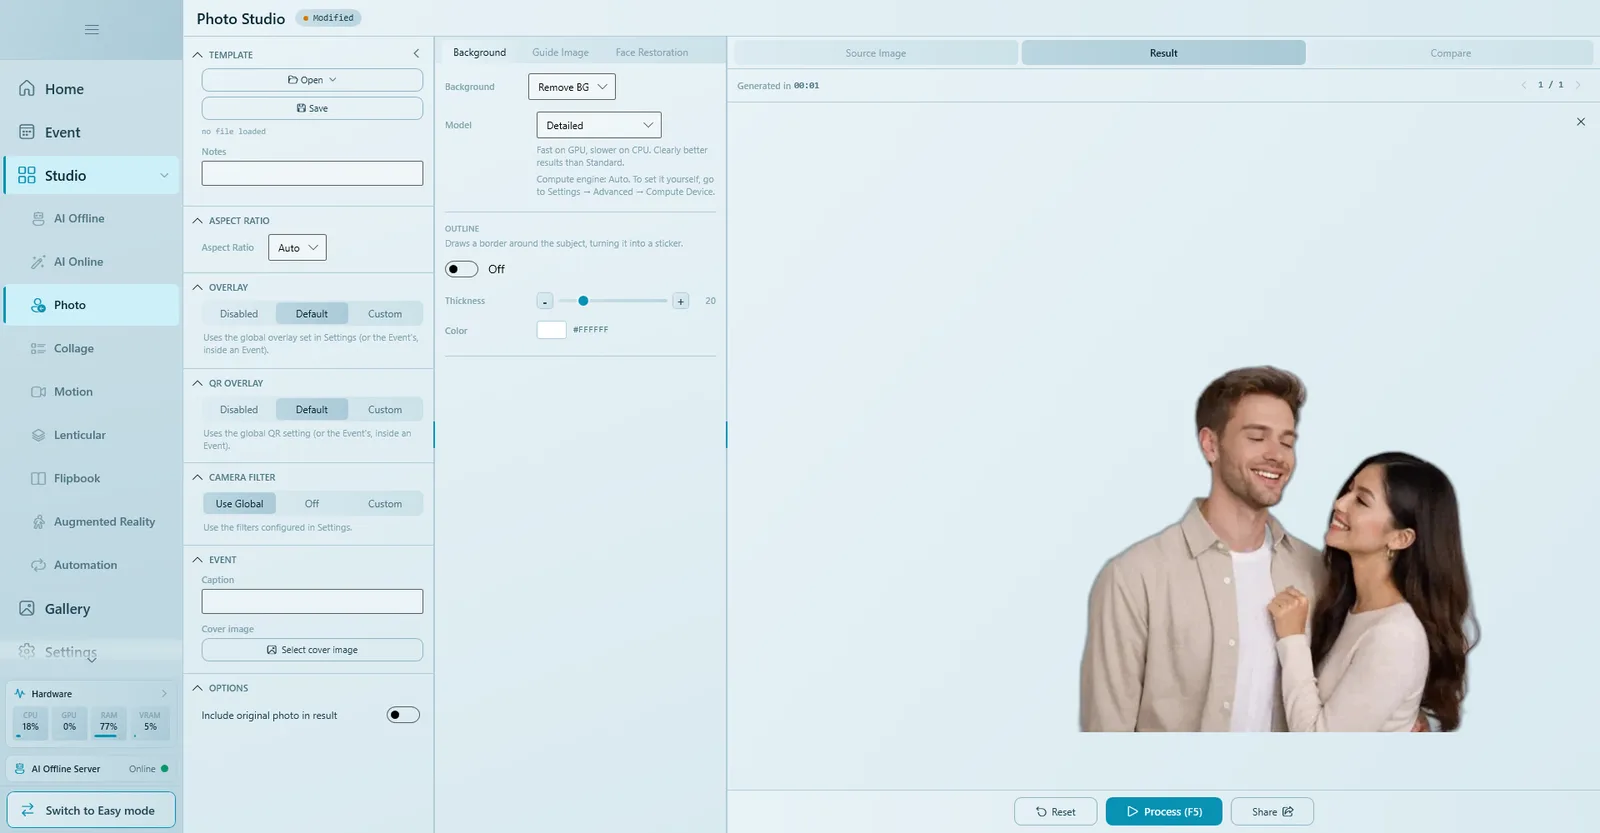
- In the middle panel, open the Background tab.
- Set Background to Remove BG.
- Choose a Model (see below).
- Press Process (F5). The cut-out appears in the Result tab.
Standard or Detailed model
| Model | What to expect |
|---|---|
| Standard | Very fast on any computer (CPU or graphics card). Parts of the photo can sometimes come out see-through. |
| Detailed | Clearly cleaner edges, especially around hair. It is downloaded once: click Download model the first time. Fast on a graphics card, slower on the CPU. |
Q-Booth chooses the compute device automatically. To set it yourself, go to Settings › Advanced › Compute Device (see Advanced settings).
Sticker outline
Outline draws a border around the people, so they look like a sticker. It works with Remove BG and Change BG.
- Turn on the Outline switch.
- Set the Thickness with the slider or the − / + buttons.
- Pick a Color (white is the classic sticker look).
- Press Process (F5) again.
Change the background
- Set Background to Change BG. A Background Image box appears.
- Click Select Image and choose your background, for example a beach at sunset.
- Press Process (F5). The people are placed on the new background.
- Open the Compare tab and drag the slider to see the original and the result side by side.
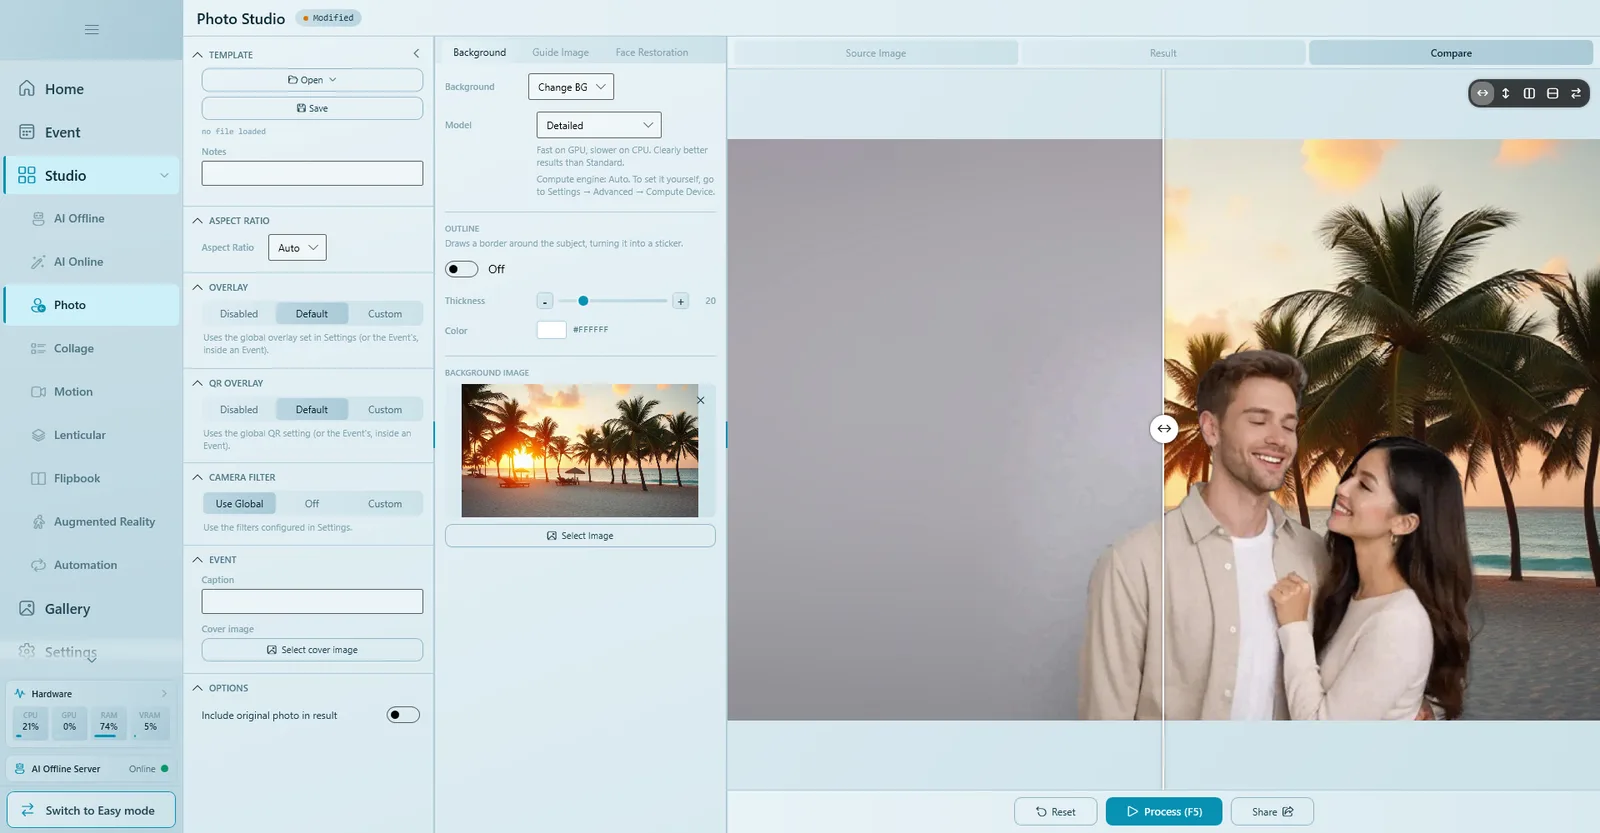
If Change BG is selected but no background image is set, Process stops and asks you to select one. The same happens when there is no source photo yet.
Use a background with the same shape as your result (for example 3:2 for a landscape 4R print), so it is not cropped in an unexpected place.
Aspect ratio
Aspect Ratio (left panel) crops the result to a fixed shape, for example 3:2 Landscape for a 4R print. Auto keeps the shape of the photo. Choose the ratio before you place a Guide Image: with Auto, the guide editor uses a 3:2 frame, so the placement may shift on a camera with another shape.
Guide Image: pose with a guest star
A Guide Image is a picture placed inside the frame: a person, an object, an outline, anything. The most popular use is a transparent PNG of a person, a "guest star", so guests can pose next to a celebrity, a mascot or a character.
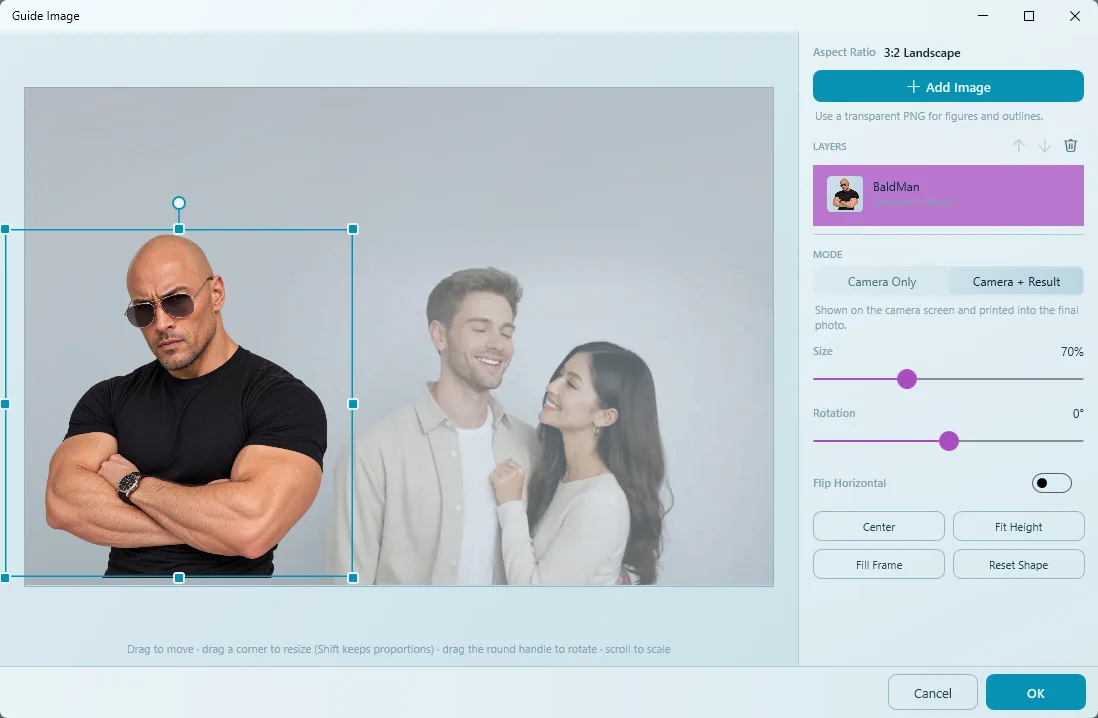
- Open the Guide Image tab and click Edit Guide Image.
- In the Guide Image window, click Add Image and pick a transparent PNG (a cut-out person works best).
- Drag the picture into place. Drag a corner to resize (hold Shift to keep proportions), drag the round handle to rotate, or scroll to scale. Size and Rotation sliders do the same with numbers.
- Choose the Mode: Camera Only or Camera + Result (see below).
- Click OK, then press Process (F5) to see it in the result.
Camera Only or Camera + Result
| Mode | What guests see | Use it for |
|---|---|---|
| Camera Only | Shown on the camera screen to help the guest pose. Not in the photo. | Pose outlines, "stand here" marks, position hints. |
| Camera + Result | Shown on the camera screen and printed into the final photo. | A guest star, mascot or prop that should be in the picture. |
Other tools in the Guide Image window
- Layers: add several images; reorder them with the arrows or delete one with the bin.
- Flip Horizontal: mirrors the selected image, for example so the star faces the guests.
- Center, Fit Height: quick placement.
- Fill Frame: stretches the image over the whole frame, for frame or border PNGs.
- Reset Shape: back to the original proportions.
The tab shows a summary such as Camera only: 0 · In result: 1.
Face Restoration
In the Face Restoration tab, turn the switch On to smooth and sharpen the faces in any photo. It adds a little processing time, so test the speed before the event.
Frame, QR code and camera filter
| Setting | Options |
|---|---|
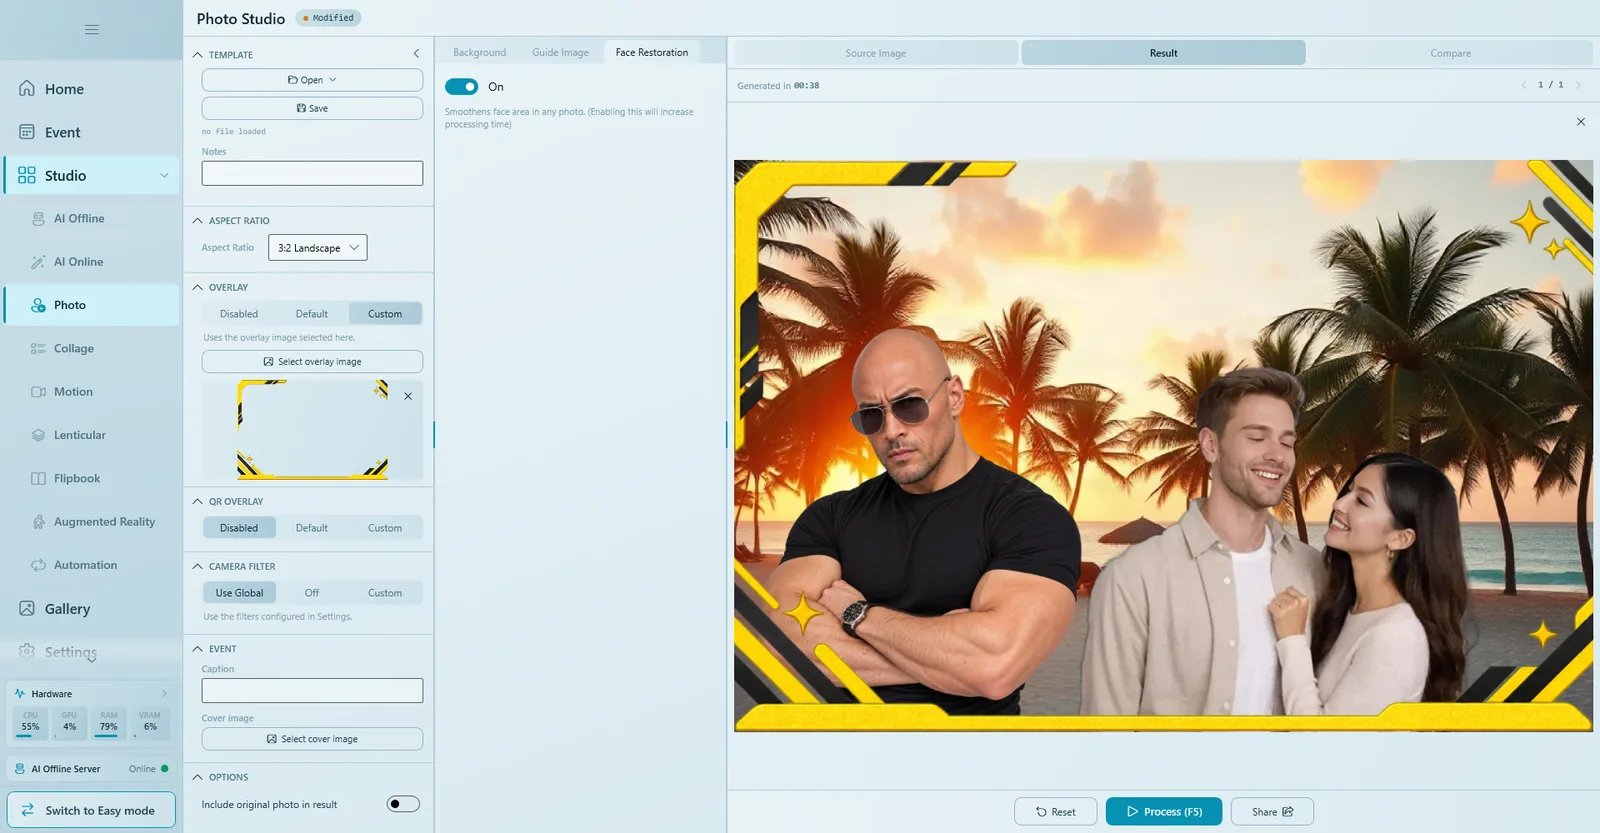
| Overlay | Disabled: no frame. Default: the global overlay from Settings (or the event's, inside an event). Custom: click Select overlay image and pick your own transparent PNG frame. |
| QR Overlay | Prints the download QR code on the photo. Disabled, Default (global or event setting) or Custom (position and size set here). |
| Camera Filter | Use Global: the filters from Settings. Off: no filter for this template. Custom: only the filters picked here; they are stored inside the template. |
The global versions of these settings are explained in Overlay & filters and QR & sharing.
Caption, cover and save
- Under Event, type a Caption and click Select cover image. This is how guests see the template when they choose one.
- Under Options, turn on Include original photo in result if guests should also get the untouched photo.
- Click Save and give the file a name. Photo Studio templates are saved as
.qsp.
If you opened Photo Studio from an event, use Save & Return to go straight back to the event.
Use it at an event
- Open your event and go to Templates.
- Click Open File and choose the
.qspfile (or use Create in Studio to build it from there). - Run the event. Guests see the Guide Image while they pose, and get their finished photo, framed, in seconds.
More on adding templates: Templates.
Tips for clean results
- A plain, evenly lit backdrop gives the cleanest cut-out, even without a green screen.
- Use the Detailed model when hair edges matter.
- Guide Image: leave the middle of the frame free for the guests and place the star at one side.
- Use a high-resolution transparent PNG for the guest star, cut out cleanly.
- Always test the saved template on a real photo from the event camera before the doors open.
Common problems
Parts of the person are see-through after Remove BG.
The Standard model can sometimes do this. Switch to Detailed, and improve the backdrop: plain, evenly lit, with some distance between the people and the wall.
A message says the model file is missing.
The Detailed model has not been downloaded yet. Click Download model under the Model list and wait for it to finish (this needs an internet connection once).
Process does nothing or asks for an image.
Load a test photo in Source Image first. With Change BG, also select a Background Image.
The guest star is in a different place on the event camera.
Set a fixed Aspect Ratio (for example 3:2) instead of Auto, then place the Guide Image again so it matches the shape of the final photo.
The guest star shows on screen but not in the photo.
Its mode is Camera Only. Open Edit Guide Image, select it and choose Camera + Result.
Processing is slow.
Face Restoration and the Detailed model on a computer without a suitable graphics card add time. Turn off what you do not need, or use Standard.
Next steps
Still need help?
Our team answers on WhatsApp. Tell us your Q-Booth version and what you see on screen.