First-Time Setup Checklist
Configure Q-Booth once per computer: folders, appearance, camera, printer, sharing, quality and the AI compute device.
Before you build your first event, spend a few minutes in Settings. You only do this once per computer (or when the hardware changes), and it prevents most problems on the event day — a black camera preview, an offline AI engine, guests who cannot download their photos. Follow this checklist from top to bottom; each step links to the full article.

Open Settings
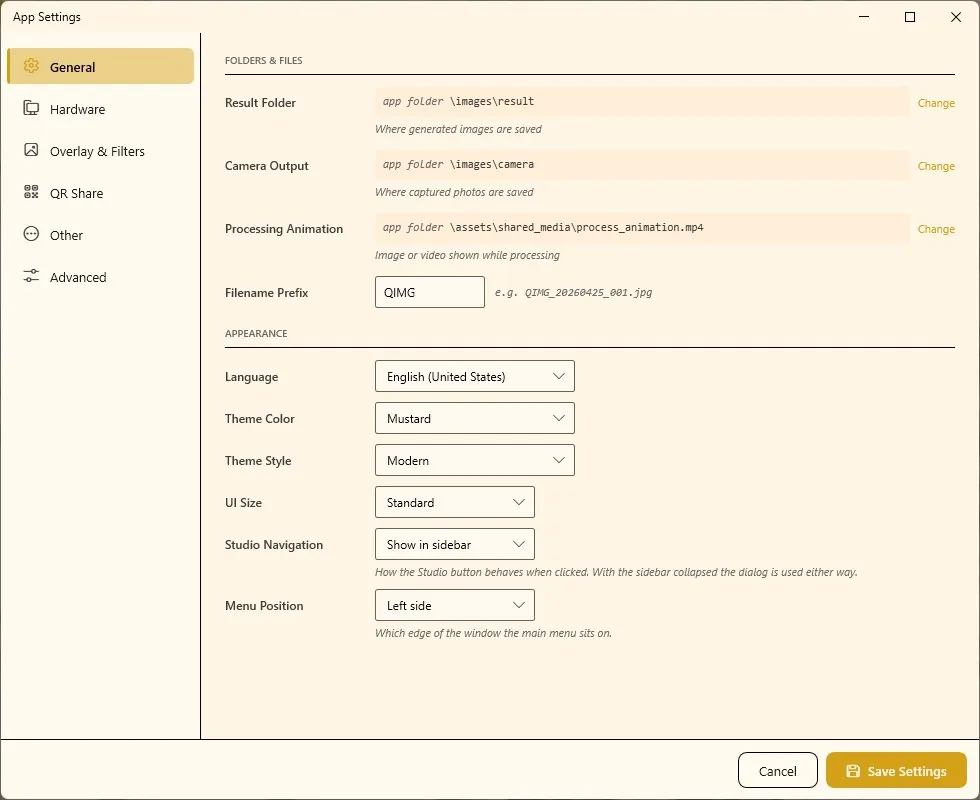
- Click Settings in the main menu. The App Settings window opens.
- The sections are listed on the left: General, Hardware, Overlay & Filters, QR Share, Other and Advanced.
- In Easy Mode the window opens with only the essential sections. Tick Show all settings to see the technical ones too.
- When you are done, click Save Settings. Cancel discards your changes.
The checklist
| # | Section | What to do | Details |
|---|---|---|---|
| 1 | General | Check folders, pick language and theme, AI Online key | General settings |
| 2 | Hardware | Connect and configure the camera | Camera settings |
| 3 | Hardware | Add the printer, test the microphone | Printer & audio |
| 4 | Overlay & Filters | Optional default frame and filter presets | Overlay & filters |
| 5 | QR Share | Set up and test Web QR, Local QR and email | QR Share |
| 6 | Other | Image and video quality, settings backup | Other settings |
| 7 | Advanced | Compute device and GPU Pack for AI Offline | Advanced settings |
1. General — folders and appearance
- Folders & Files: leave Result Folder and Camera Output on their defaults unless you have a reason to move them, for example a nearly full drive C. Use Change to pick another folder, Use Default to go back.
- Filename Prefix sets the start of every result file name (default
QIMG). - Appearance: choose Language, Theme Color, Theme Style and UI Size. Choose Studio Navigation (Show in sidebar or Select studio dialog) and Menu Position (left or right side). There is no right or wrong choice — pick what feels comfortable.
- AI Online Service: if you plan to use AI Online Studio, this is where the provider and API key go (AI-Online API Provider, API Key). The full steps are in AI Online Studio.
2. Hardware — camera
Q-Booth has two camera slots, Camera 1 and Camera 2. For a webcam, the quickest test:
- On the Camera 1 card, turn on Status and set Type to the webcam type.
- Pick your camera in Device. If a camera you just plugged in is missing, click the refresh icon.
- Click Configure. A live preview opens. Choose the resolution and orientation.
- If you choose a mirrored orientation, tick the option to flip the result so the final photo is not mirrored — guests like a mirrored preview, but not a mirrored print.
- Click Save.
Canon cameras and GoPro need a few extra steps (shooting mode, exposure, Bluetooth pairing). Follow Camera settings.
Turn on Dim Outside Frame under Live View Framing so the part of the preview outside the template's shape is darkened. It helps guests stand in the right place.
3. Hardware — printer and microphone
- Printer: under Printer, click Configure… and add your printer with its paper size, size mode, margins and alignment. This printer list is saved in its own window — click its own save button there. Then print one test page.
- Microphone (only if a template records sound): turn on Status, choose the Device, adjust Mic Level and click Test to record and play back a short sample.
Details: Printer & audio settings.
4. Overlay & Filters — optional
- Turn on Enable overlay by default and use Choose file to set a frame (a PNG with a transparent window) for each ratio you use. This app-wide frame is the lowest priority: a frame set on an event or a template replaces it. Think of it as a safety net for when nobody set a frame.
- Filter Presets › Configure manages the color filters guests can choose on the Camera Page.
Details: Overlay & filter settings.
5. QR Share — set up and test
This is where guests' results leave the booth. Set up the methods you will use, and test each one with its own Test button:
- Web QR — guests scan a QR code and download from the internet. Choose the Method (the Q-Booth cloud service or your own FTP server), click Check License Status for the cloud service, then Test QR.
- Local QR — guests download over the booth's own Wi-Fi, no internet needed. Click Add session, fill in the details, then Check Status.
- Email Share — choose Qbooth cloud service or Own SMTP, then use Test Send and check that the email arrives.
Never skip the test buttons. A wrong password or a venue network that blocks a port only shows up when you test — not by assuming it is right. Test again on the venue network on the event day.
Details: QR Share settings.
6. Other — quality and backup
- Image Quality and Video Quality balance file size against quality. The defaults suit sharing and standard print sizes.
- Backup & Restore › Export Settings… saves all your settings to one file. Do this once everything works — it makes moving to a new computer or reinstalling much faster.
Details: Other settings.
7. Advanced — AI compute device
Only needed for AI Offline features.
- Compute Device: Auto (recommended) uses the graphics card when possible, otherwise the processor. GPU requires an NVIDIA RTX 30-series or newer card.
- If an NVIDIA card is found but the GPU Pack is missing, click Download GPU Pack (about 2.4 GB). Do it on a stable connection before the event.
- Click Test Engine to check the selected device.
- After changing the compute device or Engine Boot, restart Q-Booth so the change takes effect.
Details: Advanced settings.
You are ready
With these seven steps done, the computer is ready for events. Close the Settings window with Save Settings and continue with the Quick start.
Do I need to repeat this for every event?
No. Settings apply to the whole app and every event. Repeat only the tests (camera, printer, QR, email) at each new venue, and change hardware settings when you swap a camera or printer.
I cannot see the Overlay, Other or Advanced sections
You are in Easy Mode, where Settings opens with only the essential sections. Tick Show all settings in the Settings window.
Next steps
Still need help?
Our team answers on WhatsApp. Tell us your Q-Booth version and what you see on screen.