Sharing & Printing
Control printing, set up Web QR and a QR code on the photo, and write the email guests receive with their photos.
This article covers everything that gets a finished photo into the guest's hands: printing, the Web QR code, a QR code printed on the photo itself, and the email guests receive. These are per-event rules. The printer, the cloud and the email account are set up once for the whole app.

Chapters (11)
How guests receive photos, end to end
A photo reaches the guest through four layers. Set them up in this order.
| Layer | Where | What you decide |
|---|---|---|
| 1. App-wide setup (once per computer) | Settings › QR Share and Settings › Hardware | Where photos are uploaded (Web QR), the local QR server, the email sending account, and which printers are connected. See QR Share settings and Printer & audio settings. |
| 2. Result delivery (per event) | GENERAL › Settings › RESULT DELIVERY | Whether guests wait at the booth (Direct) or leave and get the photo later (Email a link, Manual pickup, Scan a QR now). See Event settings. |
| 3. Sharing rules (per event) | OTHERS › Printing, Sharing and Overlay | Print limits and PIN, when photos are uploaded, a QR on the printed photo, and the email text. Covered in this article. |
| 4. Buttons on the Result Page | DESIGN › Result Page | Which actions the guest can tap: print, Web QR, Local QR, send email, retake and so on. A feature only shows up for guests if its button is on the page. See Page Designer. |
Every result is also saved in the event gallery, whatever delivery you pick. If an upload or email fails, staff can still find the photo there and reprint it or show its QR code. See Gallery.
Before you start
- At least one printer is added and turned on in Settings › Hardware, if you plan to print.
- Web QR is set up and tested in Settings › QR Share, if you plan to use QR codes or email. The QR on the photo, Email a link and the email itself all depend on it.
- An email sending account is set up in the same place, if you plan to send emails.
- The event is open in the Event Editor.
Printing
Open OTHERS › Printing. The page has three groups: Print Counter & Limits, Print Flow and Print PIN.
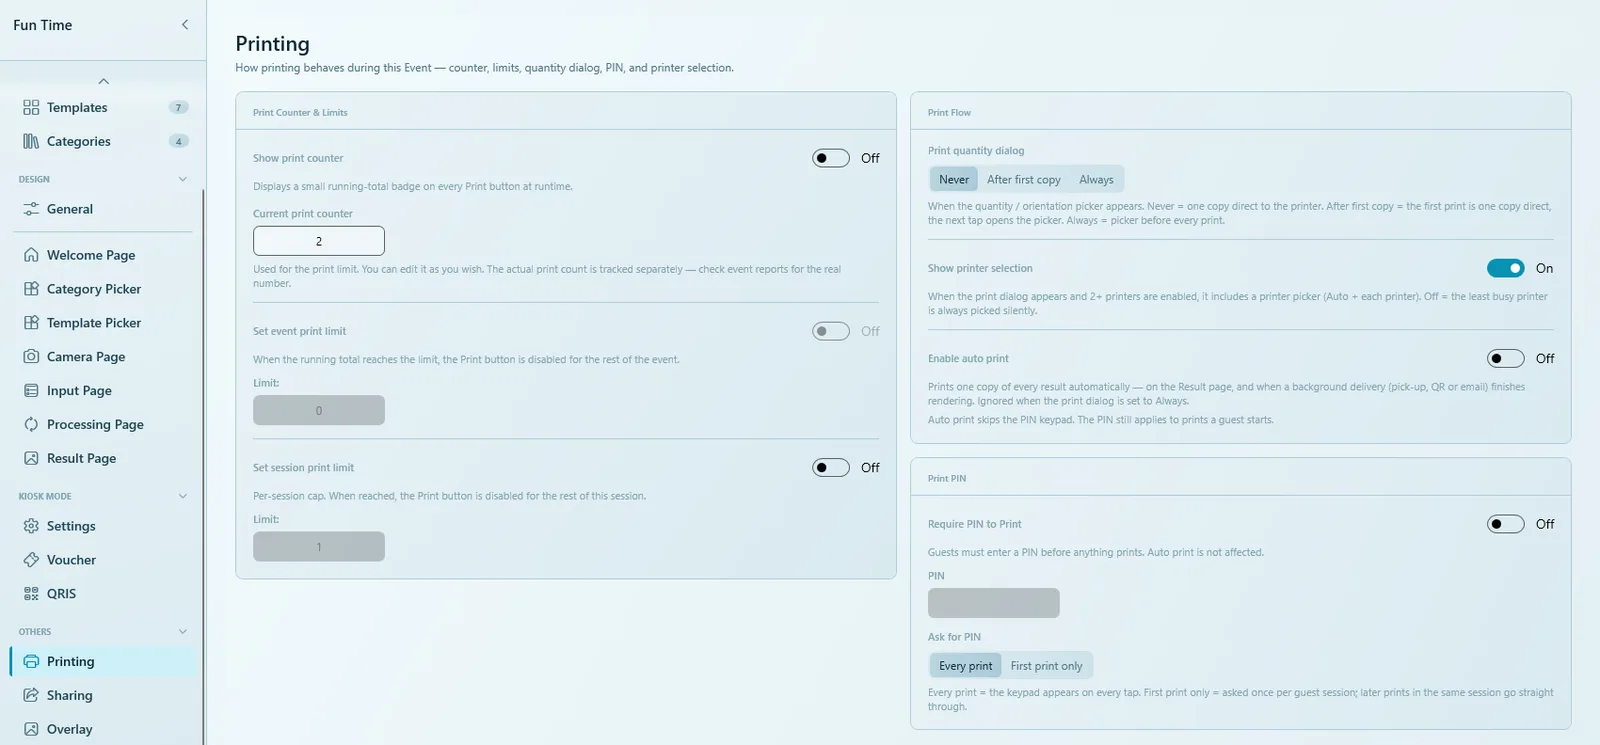
Print counter and limits
| Option | What it does |
|---|---|
| Show print counter | Shows a small badge with the running print total on every Print button at the booth. |
| Current print counter | The number the print limit counts against. You can edit it, or set it back to zero with Reset. The real number of prints is tracked separately in the Report. |
| Set event print limit | When the counter reaches the Limit:, the Print button is turned off for the rest of the event. Useful when the client paid for a fixed number of prints. |
| Set session print limit | A cap per guest session. When it is reached, the Print button is turned off until the next session. |
Print flow
| Option | What it does |
|---|---|
| Print quantity dialog | When the guest sees the copies/orientation picker. Never: one copy goes straight to the printer. After first copy: the first print goes straight through, later taps open the picker. Always: the picker opens before every print. |
| Show printer selection | When the print dialog opens and two or more printers are enabled, it also lets the guest pick a printer (Auto or a specific one). When off, Q-Booth always picks the least busy printer by itself. |
| Enable auto print | Prints one copy of every result automatically: on the Result Page, and also when a background delivery (pickup, QR or email) finishes. Ignored when the print dialog is set to Always. |
Print PIN
Turn on Require PIN to Print and type a PIN if staff should approve every print. Under Ask for PIN, choose Every print (the keypad appears on every tap) or First print only (asked once per guest session; later prints in the same session go straight through).
Auto print skips the PIN keypad. The PIN still applies to prints a guest starts by tapping Print.
A single template can always print to its own printer: open the template's advanced settings (the gear icon in CONTENT › Templates) and pick a printer. If that printer is unavailable during the event, printing falls back to Auto. See Templates.
Web QR
Open OTHERS › Sharing. The WEB QR group decides when photos are uploaded so guests can scan a QR code and download them on their phone.
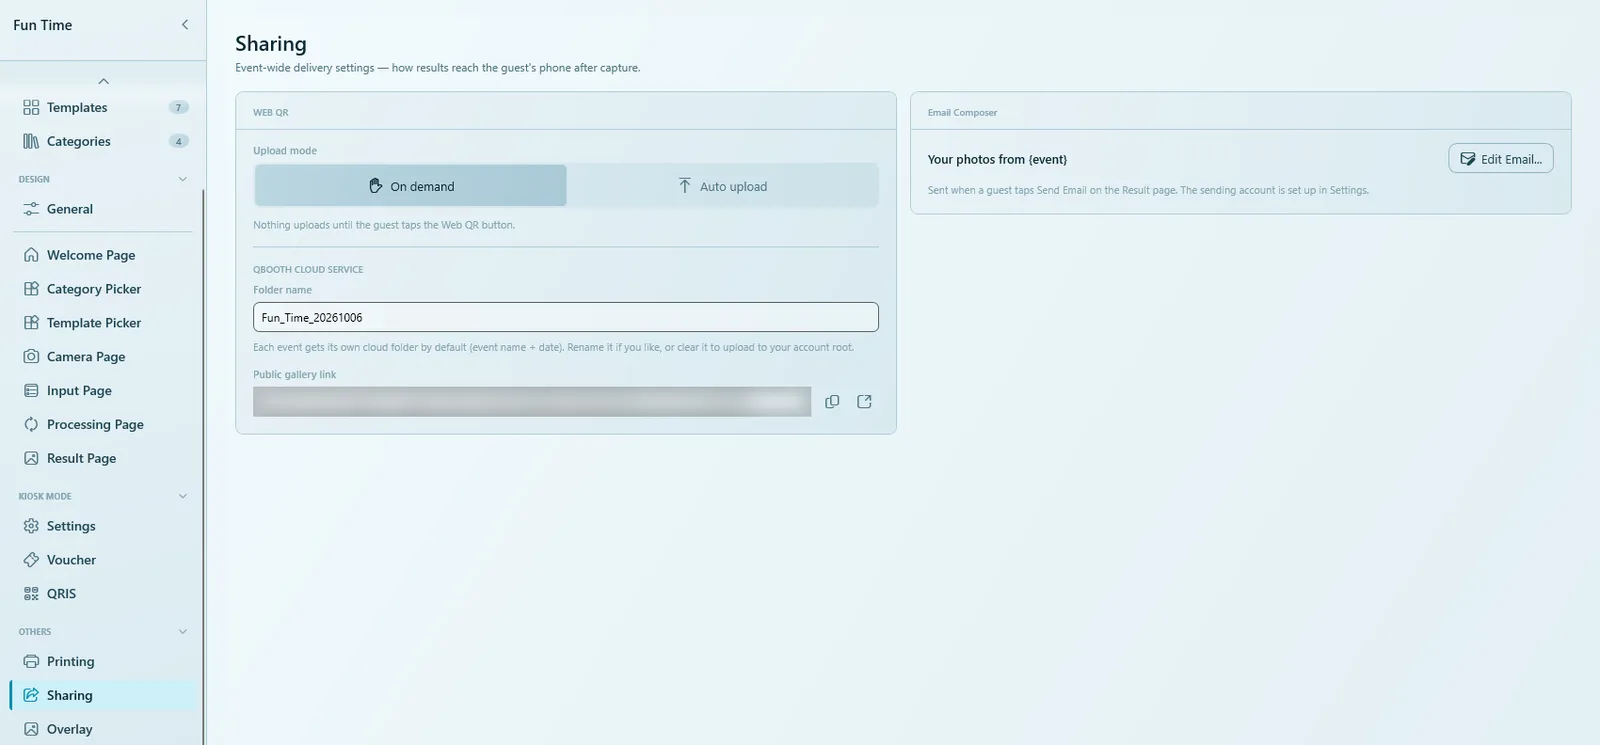
| Option | What it does |
|---|---|
| Upload mode › On demand | Nothing is uploaded until the guest taps the Web QR button. Saves internet data; the guest waits a moment for the upload. |
| Upload mode › Auto upload | Every result is queued for upload as soon as it is made, so the QR code is usually ready by the time the guest asks for it. |
| QBOOTH CLOUD SERVICE › Folder name | Each event gets its own cloud folder (event name + date). Rename it if you like, or clear it to upload to your account root. |
| Public gallery link | A link to all of the event's uploaded photos. Use the buttons beside it to copy it or open it in a browser, and send it to your client after the event. |
If you rename the folder after photos were uploaded, those photos stay in the old folder. Keep the old gallery link to reach them.
Q-Booth can also show a Local QR: the guest's phone downloads the photo straight from the booth computer over the local Wi-Fi network, with no upload. It is set up in Settings › QR Share and used through a Local QR button on the Result Page.
QR code printed on the photo
You can print a scannable QR code onto the photo itself, so guests can download the digital copy later from the print. This switch lives on the Overlay page, next to the frames.
- Open OTHERS › Overlay.
- In the QR on Result group, turn on Print QR code on result.
- Click Position & Size..., which appears once the switch is on.
- Choose a Position (Top-Left, Top-Right, Bottom-Left or Bottom-Right), then set Margin X, Margin Y and QR size. You can also drag the QR in the preview, or drag a corner to resize it.
- Save the event and make a test print. Scan the QR with your phone once the upload has finished.
While this switch is on, every result is uploaded automatically, even if Upload mode is set to On demand. The QR on the print points to a link that is made in advance, and it starts working once the photo has finished uploading.
Each template can follow this setting or change it in its own QR Overlay group in the studio: Default (follow the event, or the app setting outside an event), Disabled (no QR on this template) or Custom (its own position and size). For overlays and frames, see Event overlay.
Email Composer
The Email Composer writes the email a guest receives when they tap Send Email on the Result Page, or when they choose Email a link as their delivery. The email always includes a link to the photos.
- In OTHERS › Sharing, click Edit Email....
- Fill in the Subject, the Message and the Sign-off. Click a Variable: chip (Event name, Photo link, Guest name) to insert it where you are typing.
- Set the Button Label (for example "View your photos"). It is shown as a button above the link; leave it empty for a plain link.
- Optionally turn on Ask guest for their name, add a logo, and add up to two Cc and two Bcc addresses under Copy Others (for example the event planner).
- Check the live Preview, type your own address and click Send Test Email.
- Click Save.
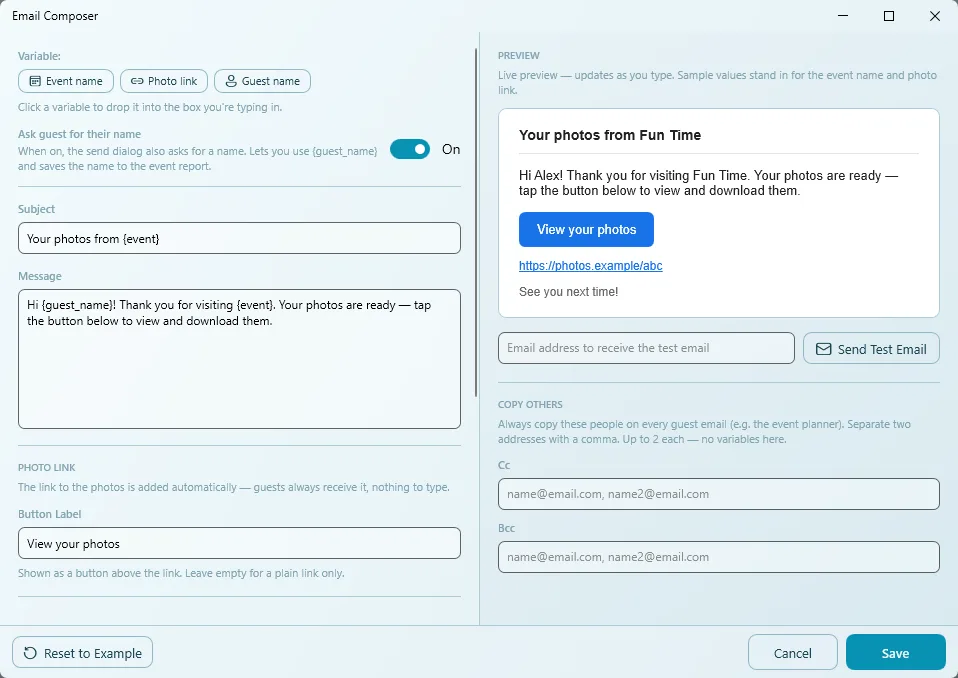
| Option | What it does |
|---|---|
| Ask guest for their name | The send dialog also asks for a name. This lets you use {guest_name} and saves the name in the event report (Contacts). |
| Subject, Message, Sign-off | The email text. Variables: {event} = event name, {link} = photo link, {guest_name} = guest's name. |
| Photo Link / Button Label | The photo link is added automatically. The button label is optional. |
| Logo | Attach logo to email, with Placement Top or Bottom. |
| Copy Others | Always copy these people on every guest email. Up to 2 addresses each for Cc and Bcc, separated by a comma. No variables here. |
| Reset to Example | Puts back the example text. |
There is no separate "enable email" switch in the event. Guests can send email when the Result Page has a Send Email button and an email account is set up in Settings › QR Share.
Tips
- For a self-service booth, combine Set session print limit with Kiosk Mode, so each paid or voucher session gets a fixed number of prints.
- Use Auto upload on fast internet and On demand on a weak or metered connection.
- Before the event, make one complete test: print, scan the Web QR, and send an email to yourself.
Common problems
No QR code appears on the printed photo.
Check that Print QR code on result is on, that Web QR is set up in Settings (otherwise no QR is added), and that the template's QR Overlay is not set to Disabled.
The QR code on the print does not open the photo yet.
The link only works once the photo has finished uploading. Check the booth's internet connection and wait a moment.
Guests cannot send email.
Make sure the Result Page has a Send Email button, the email account in Settings › QR Share passes its test, and Web QR is set up (the email contains a link to the uploaded photo).
I turned on a print PIN but auto print still prints without it.
That is expected: auto print skips the PIN. Turn off Enable auto print if every print must be approved.
Next steps
Still need help?
Our team answers on WhatsApp. Tell us your Q-Booth version and what you see on screen.