Settings: Printer & Microphone
Add one or more printers, choose paper and print size mode, fix margins with a test print, and set up the microphone.
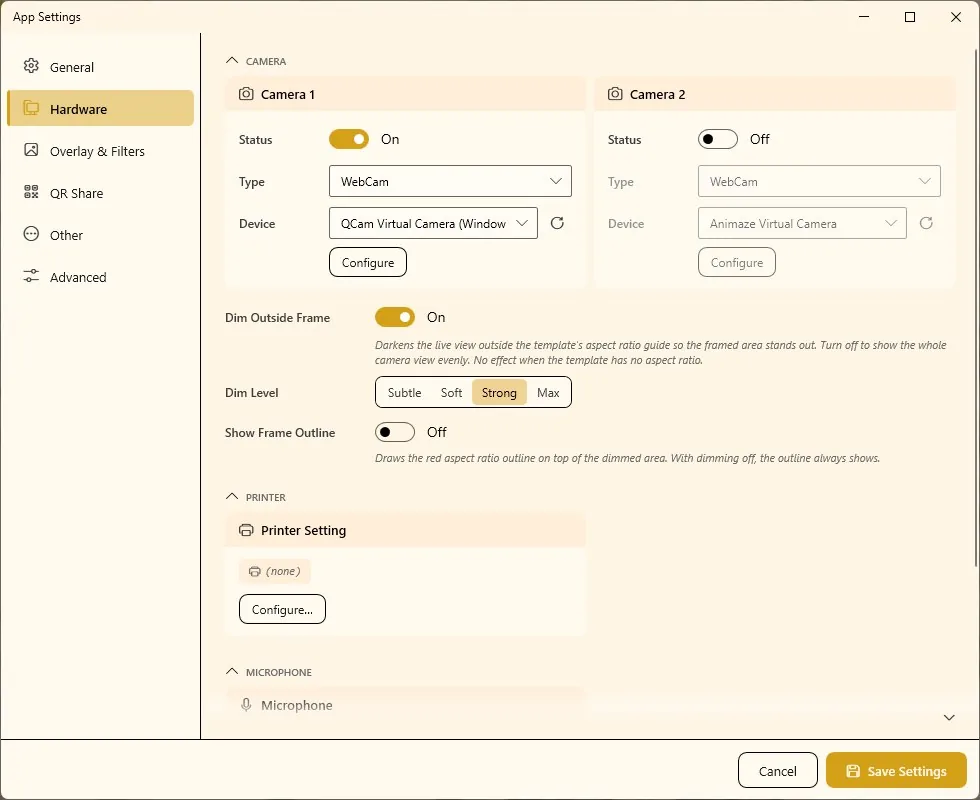
The Printer and Microphone sections sit on the Settings › Hardware tab, below the cameras. Here you tell Q-Booth which printers to use, on which paper and how the image is placed on the page, and which microphone records sound for video templates.
Before you start
- Install the printer's Windows driver and print one page from Windows first. Q-Booth can use any photo printer that has a Windows driver.
- Load the paper you will use at the event (for example 4×6 in / 4R).
- Know the aspect ratio of your templates — the paper should match it (see Match paper and template ratio).
Add a printer
Q-Booth keeps a list (pool) of printers. Each entry has its own paper, margins and placement, so you can add the same physical printer twice with different paper sizes, or several printers for a busy event.
- Open Settings › Hardware and scroll to Printer Setting.
- Click Configure…. The Printer Setup window opens. If the list is empty it says No printers yet.
- Click Add Printer. A new entry appears in the list on the left; select it to edit it on the right.
- Give it a Name you'll recognise, e.g. "DNP 4R".
- In Printer, choose the Windows printer.
- Choose Paper Size, Orientation and Print Size Mode.
- Leave margins and alignment at
0for now, and click Test Print. - Adjust if needed (see Test print and fine-tune), then click Save in the Printer Setup window.
The printer list is saved by the Save button of the Printer Setup window itself — not by Save Settings. Don't close that window with Cancel if you want to keep your changes.
Back on the Hardware tab, the card shows how many printers you have and how many are active.
Printer options
| Option | What it does |
|---|---|
| Name | Your own label for this entry, shown in printer lists. |
| Enabled | Switch an entry off without deleting it (it then shows a Disabled badge). |
| Set as Main | Makes this the main printer (marked Main). |
| Printer | The Windows printer to send to. |
| Printer Properties / Printer Preferences | Open the printer driver's own windows — for driver options such as borderless printing, cutting, colour or print quality. |
| Paper Size | The paper sizes the driver offers. |
| Orientation | Auto, Portrait or Landscape. Auto turns the page to suit the image. |
| Print Size Mode | How the image is fitted to the paper — see below. |
| Top / Bottom Margin, Left / Right Margin | Empty space on the page, in centimetres. |
| Horizontal Alignment, Vertical Alignment | Move the image on the page: choose the edge (Left/Right, Top/Bottom) and the distance in centimetres. Use it to correct a print that sits off-centre. |
| Test Print | Prints a test page with the current settings. |
| Remove | Deletes the entry. |
Print Size Mode
| Mode | Result | Use when |
|---|---|---|
Preserve Full Image | The whole image is printed. If its ratio differs from the paper, white bands appear on two sides. | Nothing may be cut off — e.g. frames with text close to the edge. |
Fill Page and Crop | The image fills the whole page; whatever sticks out is cut off. | You want no white borders and the template ratio is (almost) the same as the paper. |
Match paper and template ratio
The cleanest prints come from a template whose aspect ratio matches the paper. Then neither mode has to add borders or crop.
| Paper | Matching template ratio |
|---|---|
| 4×6 in (4R, 10×15 cm) | 2:3 portrait or 3:2 landscape |
| 6×8 in | 3:4 portrait or 4:3 landscape |
| Square paper | 1:1 |
For a 2×6 in photo strip, design a full 4×6 in sheet with two strips side by side (for example in Collage Studio) and let the printer's cutter option split it, if your printer has one.
Test print and fine-tune
- Click Test Print and look at the page.
- White edges you don't want: choose
Fill Page and Crop, or turn on borderless printing in Printer Preferences. - Something is cut off: choose
Preserve Full Image, or check that the template ratio matches the paper. - Image off-centre: use Horizontal Alignment / Vertical Alignment to move it a few millimetres (e.g.
0.2cm). - Turned the wrong way: set Orientation to match your template instead of
Auto. - Print again until it's right, then Save.
Always do one more test print at the venue, on the paper and printer you'll actually use. Then print one real result from a full guest session.
Using several printers
Add one entry per printer and keep them Enabled. Which printer an event uses — and whether guests see a printer choice — is set per event under Printing (counter, limits, quantity dialog, PIN and printer selection). When several printers are active, Q-Booth can pick the least busy one automatically. See Sharing & Printing.
Microphone
A microphone is only needed for templates that record sound with the video, for example in Motion Studio.
- Scroll to Microphone on the Hardware tab.
- Turn Status on and choose the Device.
- Set Mic Level (50–300 %). 100 % is the normal level; raise it for a quiet mic, lower it if the sound distorts.
- Click Test and speak. The level meter moves while it is Recording.... Click Stop, then Play to listen back.
- Click Save Settings.
| Option | What it does |
|---|---|
| Status | Turns sound recording on or off. |
| Device | The microphone to use. |
| Mic Level | Input gain, 50–300 %. |
| Test / Stop / Play | Record a short sample and play it back. |
Troubleshooting
"No printer is configured."
Open Settings › Hardware › Configure…, add a printer, make sure it is Enabled, and click Save.
The print is cropped or shifted.
Check that the template ratio matches the paper, choose the right Print Size Mode, and correct the position with margins and alignment. Make a Test Print after each change.
My printer is not in the Printer list.
Q-Booth lists the printers installed in Windows. Install the driver, check that Windows can print a test page, then reopen the Printer Setup window.
"Print limit reached for this event."
The event has a print limit. Change it in the event's printing settings — see Sharing & Printing.
"Microphone access is blocked by Windows."
Open Windows Settings › Privacy & security › Microphone and turn on microphone access, then test again.
The test recording is silent or very quiet.
Check that the right Device is selected and the mic is not muted on the device itself, then raise Mic Level.
Next steps
Still need help?
Our team answers on WhatsApp. Tell us your Q-Booth version and what you see on screen.