Settings: Overlay & Filters
Set an app-wide default frame for every aspect ratio, print a QR code on results, and manage the camera filter presets guests can pick.
The Overlay & Filters tab holds the app-wide defaults for three things: the frame (overlay) laid over every result, the QR code printed on results, and the camera filter presets guests can choose. Events and templates can override these defaults — this tab is the safety net when nothing else is set.
If the Overlay & Filters tab is missing, turn on Show all settings at the bottom left of the App Settings window.
How overlays work
An overlay is a PNG frame that Q-Booth lays on top of the finished result — your logo, event name, date or a decorative border. The photo shows through the transparent part of the PNG.
There are three levels. The most specific one wins:
| Priority | Level | Where you set it |
|---|---|---|
| 1 (strongest) | Template overlay | In the template, in its studio (Overlay: Default / Disabled / Custom). |
| 2 | Event overlay | In the event editor — see Event Overlay. |
| 3 (weakest) | Global overlay | Here, in Settings › Overlay & Filters. |
A template whose overlay is set to Default uses the event's overlay when it runs inside an event, and this global overlay otherwise. Think of the global overlay as a fallback frame for when an operator forgets to set one for the event.
Don't confuse an overlay with a collage frame. In Collage Studio the frame is a layer inside the design; the overlay is a separate image added on top of the finished result.
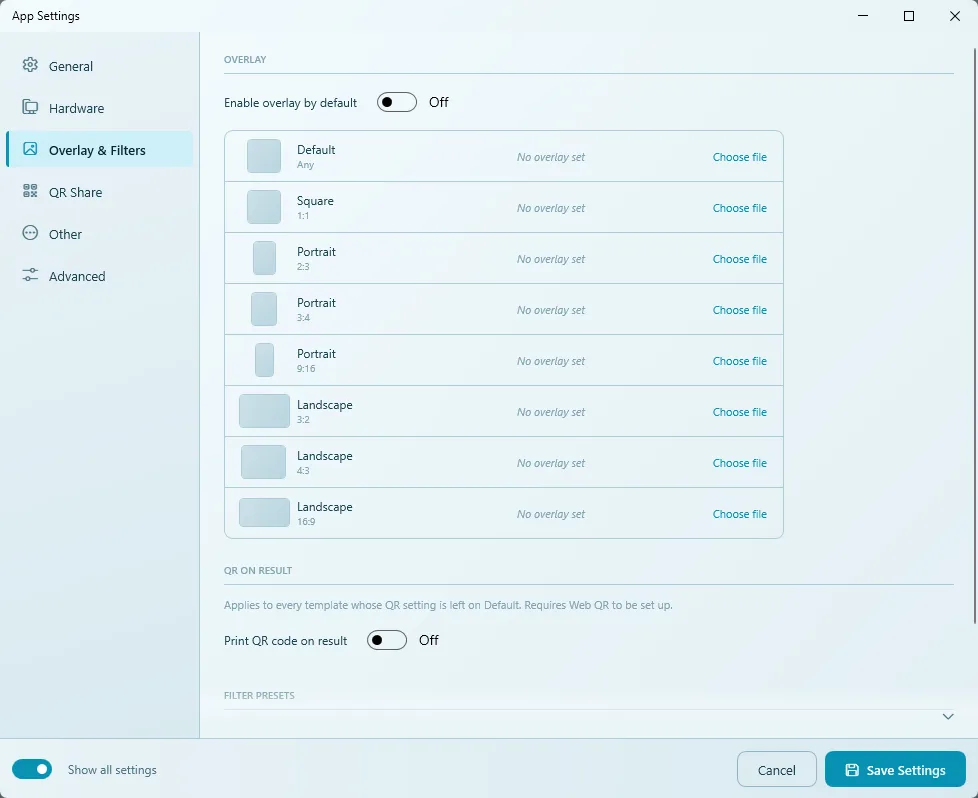
Set a global overlay
- Open Settings › Overlay & Filters.
- Find the row for the ratio of your templates (e.g. Portrait 2:3) and click Choose file.
- Select your PNG frame. A thumbnail replaces No overlay set. Use Change later to swap it.
- Repeat for other ratios you use. Fill Default (Any) as a catch-all for ratios without their own file.
- Turn on Enable overlay by default so the overlay is applied automatically when a session starts.
- Click Save Settings.
Overlay slots
| Slot | Used for results with ratio | Suggested PNG size |
|---|---|---|
| Default (Any) | Any ratio whose own slot is empty | — |
| Square 1:1 | 1:1 | 1920 × 1920 |
| Portrait 2:3 | 2:3 | 1280 × 1920 |
| Portrait 3:4 | 3:4 | 1440 × 1920 |
| Portrait 9:16 | 9:16 | 1080 × 1920 |
| Landscape 3:2 | 3:2 | 1920 × 1280 |
| Landscape 4:3 | 4:3 | 1920 × 1440 |
| Landscape 16:9 | 16:9 | 1920 × 1080 |
Preparing the overlay file
- Use a PNG with transparency. Everything transparent shows the photo; everything opaque covers it.
- Make it the same ratio as the slot, ideally at the output size above, so it isn't stretched.
- Keep important text away from the very edges if you print with
Fill Page and Crop(see Print Size Mode). - Check the result once with a real photo — faces should not be hidden behind the frame.
QR on Result
Prints a scannable QR code onto the result image, so guests can scan the printed photo to download the digital copy.
- Set up Web QR first in QR Share. Without it, no QR is added.
- Turn on Print QR code on result.
- Click Position & Size... and choose the corner (Top-Left, Top-Right, Bottom-Left, Bottom-Right), Margin X, Margin Y and QR size. You can also drag the QR in the preview.
- Click Save Settings.
This applies to every template whose QR setting is left on Default. Events have their own QR-on-result setting — see Sharing & Printing.
Filter Presets
Filter presets are camera "looks" — colour grades and textures — that guests can pick from the filter strip on the Camera Page. The card shows the Total Preset and Active Preset counts.
- Click Configure on the Filter Presets card. The Preset Filter Settings window opens.
- Click + New Preset, or select an existing preset under Saved Presets.
- On the LUT tab, choose a LUT Filter (colour grade).
- On the Texture tab, optionally choose a Texture Overlay and set its Opacity and Blend Mode.
- Tick the presets that should be available to guests (active).
- Click Save Preset Filter.
| Built in | Included |
|---|---|
Film LUTs (.cube) | 35mm Portrait, B&W, Bold Film, Coastal Film, Elite Chrome, Fashion Film, Free Spirit, Gold 200, Kodacrome 64, Moody Film, Moody Grade, Moody Stock, Pastel Morning, Polaroid Color, Warm Tones |
| Textures | Grunge, Light Leak, Smoke, Noise, Paper |
To add your own: use Add to import a .cube LUT or a JPG/PNG texture, or Download for more. If you copy files into the filter folders by hand, click Rescan. A LUT's file name becomes the preset name.
The Original preset (no filter) is read-only. A filter stored inside a template can be renamed and its blend/opacity adjusted, but its LUT and texture are locked.
Troubleshooting
The overlay doesn't appear on results.
Check that Enable overlay by default is on, that the slot for your template's ratio (or Default) has a file, and that the event or template doesn't override it with its own overlay or with Disabled.
The frame looks stretched or misaligned.
The PNG's ratio doesn't match the slot. Export the frame at the ratio of the slot (see the table above).
The frame covers the whole photo.
The PNG has no transparent area (e.g. it was saved as JPG or with a white background). Re-export it as a PNG with a transparent window.
No QR code is printed on the result.
Web QR isn't set up, or the template's QR setting is Disabled. Set up Web QR in QR Share and test it with Test QR.
Guests don't see my filters.
Make sure the presets are ticked as active, and that the event's Camera Page has the filter strip element — see Page Designer.
Next steps
Still need help?
Our team answers on WhatsApp. Tell us your Q-Booth version and what you see on screen.