Settings: Advanced
Auto-launch an event, keep the automatic restart on during events, fix a black camera preview, play high-fps video, set error handling, choose CPU or GPU for Face Swap with the GPU Pack, and turn on the Local API and the Remote control for your phone.
The Advanced tab holds technical settings: starting an event automatically, how the camera preview and videos are drawn, error handling, the Compute Engine that runs the offline face and background tools (Face Swap, Face Restore, Background Change) on your processor or graphics card, and the Local API with the Remote control for your phone. Leave everything on its default unless you have a reason — each option below says when to change it.

Chapters (13)
- 0:00What the Remote Control does
- 0:10Settings › Advanced › Local API
- 0:19Port and password
- 0:26Allow other devices on the network, Save
- 0:35The Windows firewall prompt
- 0:43QR code: connect your phone
- 0:57The remote: online light and status
- 1:05Start event, start session, pick a template
- 1:28Shoot, retake, process
- 1:42Print and QR Share
- 1:48Home and Stop event
- 1:54Dimmed buttons and dialogs
- 2:03Next: the Local API for developers

Chapters (12)
- 0:00What you can build
- 0:13Turn it on: Settings › Advanced › Local API
- 0:26The password: Bearer token or X-QBooth-Key
- 0:35The built-in Sandbox
- 0:41Greyed-out commands and "available"
- 0:53202 accepted, then poll status
- 1:05Errors: 409 wrong_page
- 1:14A whole guest in four calls
- 1:28Nothing is bypassed
- 1:41Docs page and the API log
- 1:51No code? The Remote Control
- 1:58Wrap-up
If the Advanced tab is missing, turn on Show all settings at the bottom left of the App Settings window.
Auto Launch Event on App Start
Turns a computer into a self-starting booth (since 5.4.0.0): when Q-Booth opens, it launches the chosen event full screen in kiosk mode by itself.
- Turn on Auto Launch Event on App Start.
- Choose the Event to run.
- Click Save Settings.
Next time Q-Booth starts, a countdown appears first. Cancel it to stay in the app instead (for example to change something before the event). If the chosen event is later deleted, auto-launch simply switches off.
Combine this with Windows starting Q-Booth automatically after login, and the booth recovers by itself after a power cut. Set an exit PIN in the event so guests can't leave kiosk mode — see Event settings.
Automatic restart during events
Since 5.9.0.0 there are two switches here, both on by default:
- Restart when a background video stops — if a page's background video stops playing, the booth restarts between guests and reopens the event.
- Restart when memory runs high — if Q-Booth uses far more memory than normal (about half the computer's memory, at most 12 GB), it restarts the same way, at most once every 30 minutes.
Keep both on. With the video restart off, the pages go black after a video stops and the booth keeps using more memory until the computer freezes.
How the restart looks to guests, and what to do if it happens often: see The booth restarts by itself during an event.
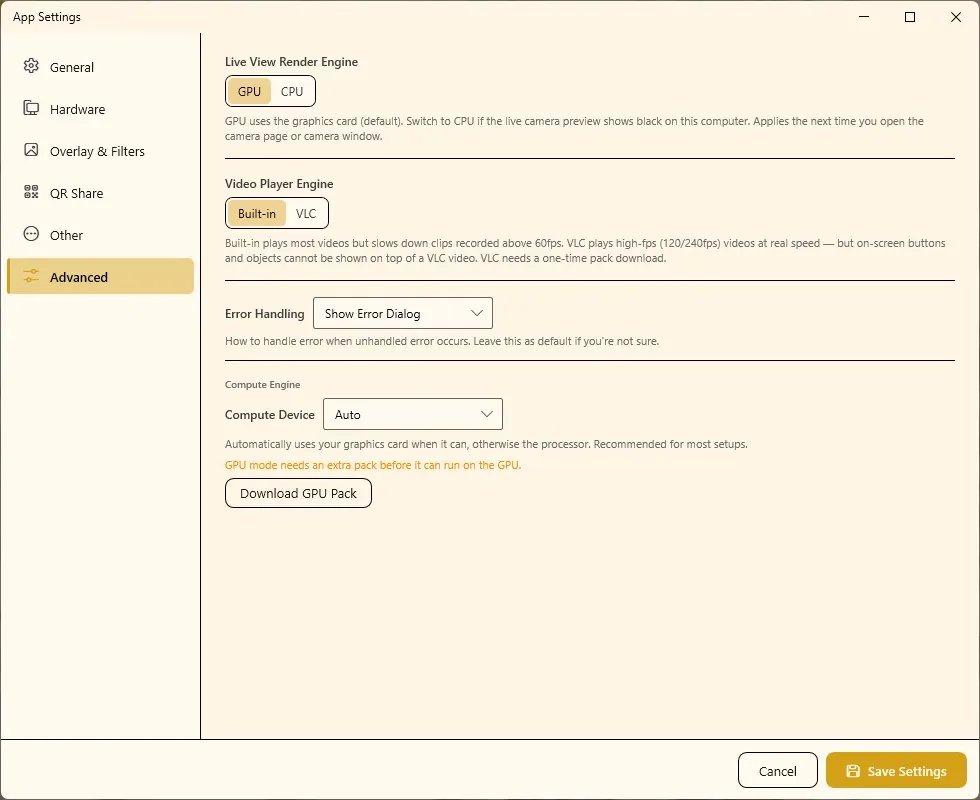
Live View Render Engine
| Choice | When to use |
|---|---|
| GPU (default) | Uses the graphics card to draw the camera preview. Smooth and light on the processor. |
| CPU | Use when the live camera preview is black on this computer (often while photos are still taken correctly). Works everywhere but uses more processor power. |
The change applies the next time you open the camera page or camera window — no restart needed. If Q-Booth finds no usable graphics card at all, it runs the preview on CPU by itself and says so when it starts (No GPU Detected); updating the graphics driver usually helps.
On a version older than 5.9.0.0 where the booth keeps restarting itself because background videos stop, set this to CPU and click Save Settings: the CPU preview doesn't slowly use up graphics memory the way the old GPU preview did. It uses more processor, so check the preview still runs smoothly. The likely cause was fixed in 5.9.0.0, so update first.
Video Player Engine
| Choice | Pros | Cons |
|---|---|---|
| Built-in (default) | Plays most videos. On-screen buttons and objects can be shown on top of the video. | Clips recorded above 60 fps play slower than real time. |
| VLC | Plays high-frame-rate video (120/240 fps) at real speed. | Buttons and objects can't be shown on top of the video. Needs a one-time download: a Download VLC Pack button appears when you pick VLC and it isn't installed yet. |
Only switch to VLC if high-fps clips (for example from a GoPro slow-motion booth) stutter or play too slowly, and check that no page relies on buttons drawn over the video. On versions before 5.9.5.0, VLC could sometimes freeze the "Please Wait" window just as an AI result was ready — see Troubleshooting.
Keep original without overlay
When on (since 5.4.0.0), Q-Booth saves an extra copy of every image result before the overlay frame is added, into an _original folder next to the results. These copies are not shown in the gallery and are never shared or printed — copy them by hand when a client wants frameless photos. Images only, not videos. Off by default, and it only works for photos taken after you turn it on.
Error Handling
How Q-Booth reacts to an unexpected error: Show Error Dialog (default) shows a message. With Silent, no pop-up appears — the app closes instead, and it does not restart by itself. The error is still written to the logs.
Leave it on Show Error Dialog unless you have a reason. On an unattended kiosk, Silent means the booth can simply disappear and needs someone to start it again.
Compute Engine
The Compute Engine runs the offline face and background tools on this computer — Face Swap, Face Restore and Background Change. It does not affect AI Online, which runs in the cloud. It is also separate from the AI Offline Server that runs the AI Offline image templates (Imagine, Re-Imagine…) — nothing here starts, fixes or speeds up that server; see AI Offline Studio.
Compute Device
| Choice | What it does |
|---|---|
| Auto (default) | Uses the graphics card when it can, otherwise the processor. Recommended for most setups. |
| CPU | Always uses the processor. Works on any computer, but Face Swap and Face Restore are slower. |
| GPU | Always uses the graphics card. Much faster. Needs an NVIDIA RTX 30-series or newer card and the GPU Pack. Greyed out on computers without an NVIDIA card. |
Download the GPU Pack
On a computer with an NVIDIA card, GPU mode needs an extra pack. If it isn't installed yet, the tab shows GPU mode needs an extra pack before it can run on the GPU and a Download GPU Pack button.
- Make sure you have a stable internet connection — the pack is large (around 2.4 GB). Do this at the studio, not at the venue.
- Click Download GPU Pack and wait until it has finished downloading and installing.
- Set Compute Device to GPU (or leave Auto).
- Click Save Settings and restart Q-Booth.
Test the engine
With GPU selected on an NVIDIA computer, the tab shows the Detected GPU and a Test Engine button. The test checks Graphics acceleration, Face Swap and Face Restore and reports whether all checks passed. Use Test Again after fixing something (for example updating the graphics driver).
Engine Boot (warm-up)
Decides whether the AI engine stays loaded in memory (faster) or is loaded only when needed (uses less memory). The choices depend on the device:
| Device | Choice | Effect |
|---|---|---|
| GPU | Auto | Q-Booth picks the best mode for your card. Recommended. |
| Warm Boot | No delay when switching templates, but keeps about 3 GB of graphics memory reserved the whole session. | |
| Cold Boot | No extra memory at rest. A template's first run — and the first run after switching templates — takes a few seconds longer. | |
| CPU (or Auto without an NVIDIA card) | Keep Loaded | Recommended. Loads once on the first photo and stays ready; uses about 2.5 GB of memory until you close the app. |
| Free After Each Photo | Frees memory after every photo. Only for computers short on memory — each photo loads the engine again, which can add up to a minute. |
The CPU choices exist since 5.2.0.0.
Changing Compute Device, or Engine Boot in GPU mode, takes effect only after you restart Q-Booth — the tab reminds you with Changing this takes effect after you restart the app. The CPU Engine Boot choice applies from the next photo, no restart. Choosing Auto for Compute Device also sets Engine Boot back to Auto. Never change these in the middle of an event.
Local API and Remote control
Since 5.9.2.0, another app — on this PC or on the same network — can control a running booth: start or stop an event, start a guest session, pick a template, capture, retake, process, print, show the QR code and go back to Home. The simplest way to use it needs no code at all: the Remote control on your phone.
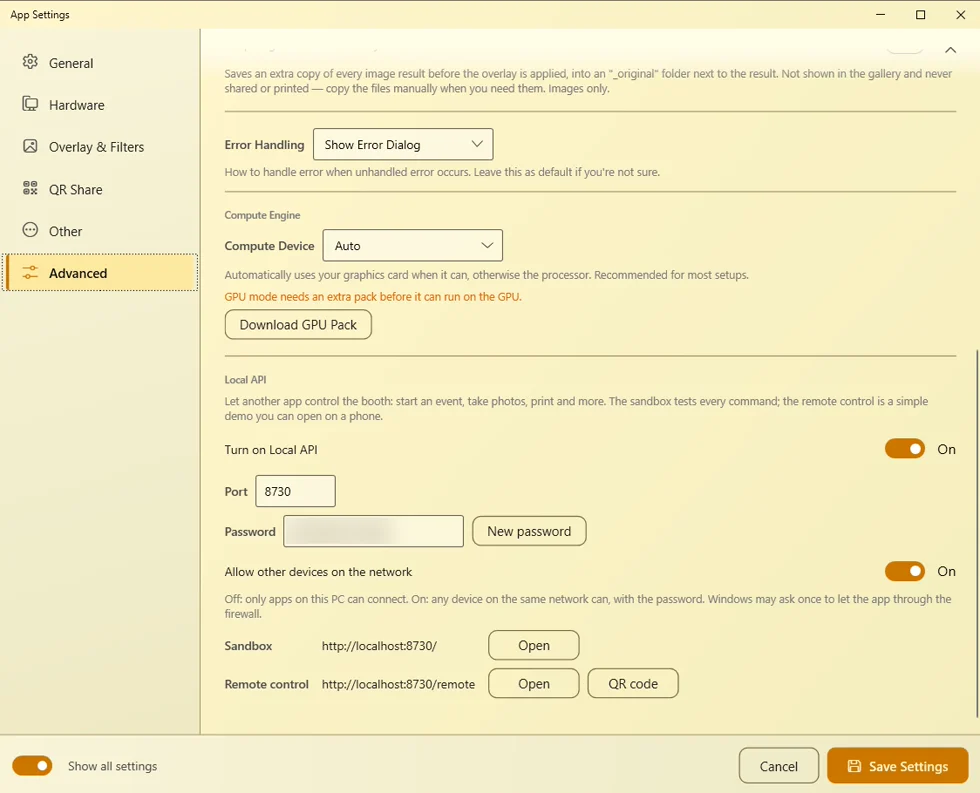
- Turn on Local API — off by default. Click Save Settings to apply.
- Port — default
8730. Change it only if another program already uses it. - Password — every call must carry it. Left empty, one is made for you when you save. New password makes a fresh one; apps and phones using the old one stop working until they get the new one.
- Allow other devices on the network — off: only apps on this PC can connect. On: any device on the same network can, with the password. Windows may ask once to let Q-Booth through the firewall — allow it.
- Sandbox → Open — a test page in the browser with a button for every command (type the password first) and a Documentation link. For developers: Local API reference.
- Remote control → Open shows the remote on this PC; QR code shows a code to open it on a phone.
The booth keeps its own rules: a payment, Start PIN, print PIN or print limit still applies, and a dialog on the booth screen (payment, PIN, QR, a notice) must be closed on the booth first. Stopping the event this way does not ask for the exit PIN. Every call is written to the app log (log\local_api\).
Since 5.9.4.0 an app can also show its own template picker and its own result screen: the template and category lists can come with each cover picture, and a "result" call gives the latest guest's photos and videos as links the app can show directly. Only the latest guest's result is available — from the moment the Result page shows until the next guest starts — never earlier guests' photos.
The Local API is a local connection only. It does not work over the internet, and it is not a cloud printing service — people can't send their own photos to the booth to print. Ready-made example apps are on Local API examples.
Remote control
A simple remote for the booth with big buttons, on any phone or tablet on the same Wi-Fi. Nothing to install.
- Turn on Turn on Local API and Allow other devices on the network, then click Save Settings. If Windows asks about the firewall, click Allow.
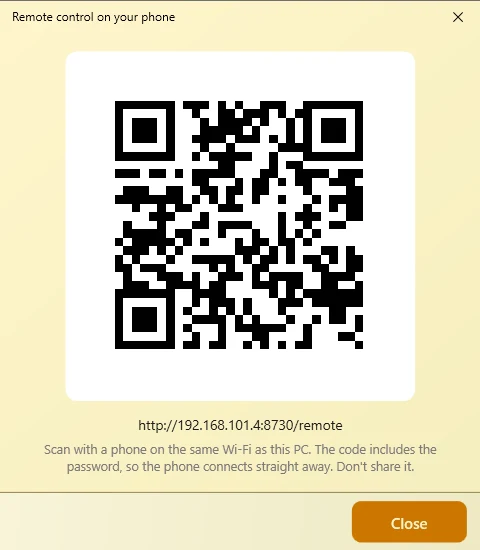
- Next to Remote control, click QR code.
- Scan the code with a phone on the same Wi-Fi as the booth PC. The phone opens the remote, already connected.
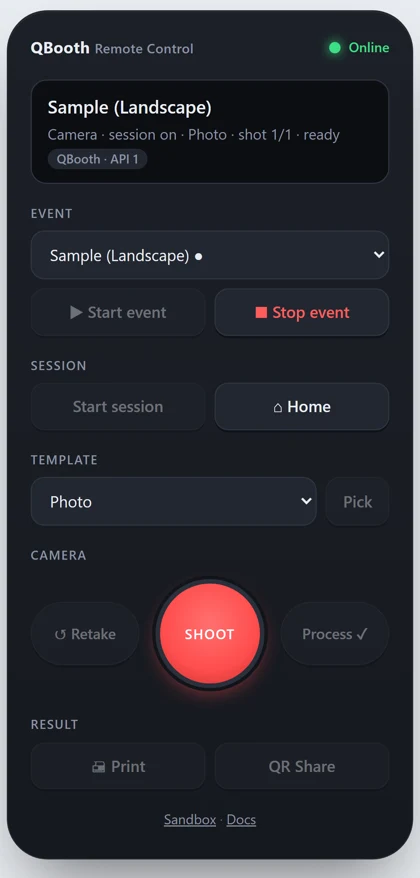
The green Online light shows the remote is connected; the panel under it shows the event, the page the booth is on and the camera step. Work from top to bottom:
- Event — pick an event, then Start event or Stop event.
- Session — Start session is the guest's Start button; Home ends the session and goes back to the Welcome page.
- Template — pick a template, then Pick. Since 5.9.4.0 the remote shows the template covers to pick from.
- Camera — the big Shoot button starts the countdown on the booth; then Retake or Process.
- Result — Print and QR Share for the result on screen. Since 5.9.4.0 the remote also shows the guest's photos after processing.
A dimmed button means the booth can't do that right now (wrong page, a dialog open, a photo processing). A Start PIN, a payment or a print PIN still shows on the booth screen and is answered there, not on the phone.
The QR code carries the password: anyone who scans it can run the booth. Don't post it or send it around; if it leaks, click New password and save. The remote works on the local network only — it is not remote support and doesn't let anyone into the PC.
Troubleshooting
The camera preview is black.
Set Live View Render Engine to CPU, save, and reopen the camera page. See also Camera troubleshooting.
The AI Offline Server stays offline.
The Compute Engine settings on this tab don't affect the AI Offline Server — changing Compute Device won't fix it. See AI Offline Studio for what the server needs. If it never turns green on a Pro license with an RTX card, send logs to support (Export Logs).
Face Swap is very slow.
With an NVIDIA RTX card: set Compute Device to GPU (or Auto), Download GPU Pack, then restart. Without NVIDIA it runs on the processor and will be slower.
I changed to GPU but nothing changed.
Restart the app — Compute Device only changes after a restart.
The app keeps closing by itself with no message.
Check whether Error Handling is set to Silent, then send the logs to support.
The GPU option is greyed out.
No NVIDIA graphics card was detected. GPU mode needs an NVIDIA RTX 30-series or newer card; otherwise use Auto or CPU. Check the requirements in System requirements.
Some engine checks fail.
Update the NVIDIA graphics driver, restart the computer and run Test Again. Until it passes, use Auto or CPU.
High-fps video stutters or plays slowly.
Switch Video Player Engine to VLC and download the VLC pack. Remember that buttons can't be shown on top of VLC video.
The first Face Swap photo of a session is slow.
That's the engine loading. Use Warm Boot (GPU — restart the app after changing it) or Keep Loaded (CPU), and make one test photo before guests arrive.
The Sandbox or the remote doesn't open.
Turn on Turn on Local API and click Save Settings first. If the line under the switches says Could not start, another program holds the port — pick another Port and save.
My phone can't open the remote.
Turn on Allow other devices on the network and save, allow Q-Booth in the Windows firewall prompt, and make sure the phone is on the same Wi-Fi as the booth PC (not mobile data, not a guest network that isolates devices). Then show the QR code again and scan it.
A remote button is dimmed, or a command is refused.
The booth can't do it right now — it is on another page, a dialog is open on the booth screen, or a photo is processing. Close the dialog on the booth (payment, PIN, QR, a notice) and try again.
Next steps
Still need help?
Our team answers on WhatsApp. Tell us your Q-Booth version and what you see on screen.