Lenticular Studio
Calibrate your lens with the Pitch Test, build a lenticular flip template, and print sharp prints that change when tilted.
Lenticular Studio turns two or more photos into one interlaced print. Put a lenticular lens sheet on top, tilt it, and the picture flips between the photos. The lens has to match the print exactly, so start with the Pitch Test, then build your template.

Chapters (22)
- 0:00Intro
- 0:17What you need — and why the box number is only a start
- 0:38Open Lenticular Studio · the Pitch Test row
- 0:57The Pitch Test dialog
- 1:13LPI, DPI and direction
- 1:40Step size & range — the first pass
- 2:07Band dimensions
- 2:22Printer settings
- 2:53Print the sheet
- 3:06Read the sheet
- 3:31Second pass
- 3:53Write it down
- 4:10Chapter 2 · Lens tab
- 4:41Separator
- 4:55Images tab · layer 1
- 5:29Layer 2 · other layer types
- 5:55Slideshow video · save the template
- 6:27Process
- 6:54The result looks wrong — and that is right
- 7:08Print at actual size
- 7:25Assemble and flip
- 7:36Three things to remember
How a lenticular print works
A lenticular lens sheet is a clear plastic sheet covered in tiny parallel ridges (lenses). Q-Booth slices each of your photos into very thin strips and weaves the strips together on one sheet. Each ridge sits over one strip from every photo. When you tilt the card, each ridge shows a different strip, so you see a different photo.
This only works if the strips line up with the ridges. The number that controls this is the LPI (lenses per inch). If it is off by even a few hundredths, the print looks blurry, striped or "ghosted" (both photos visible at the same time).
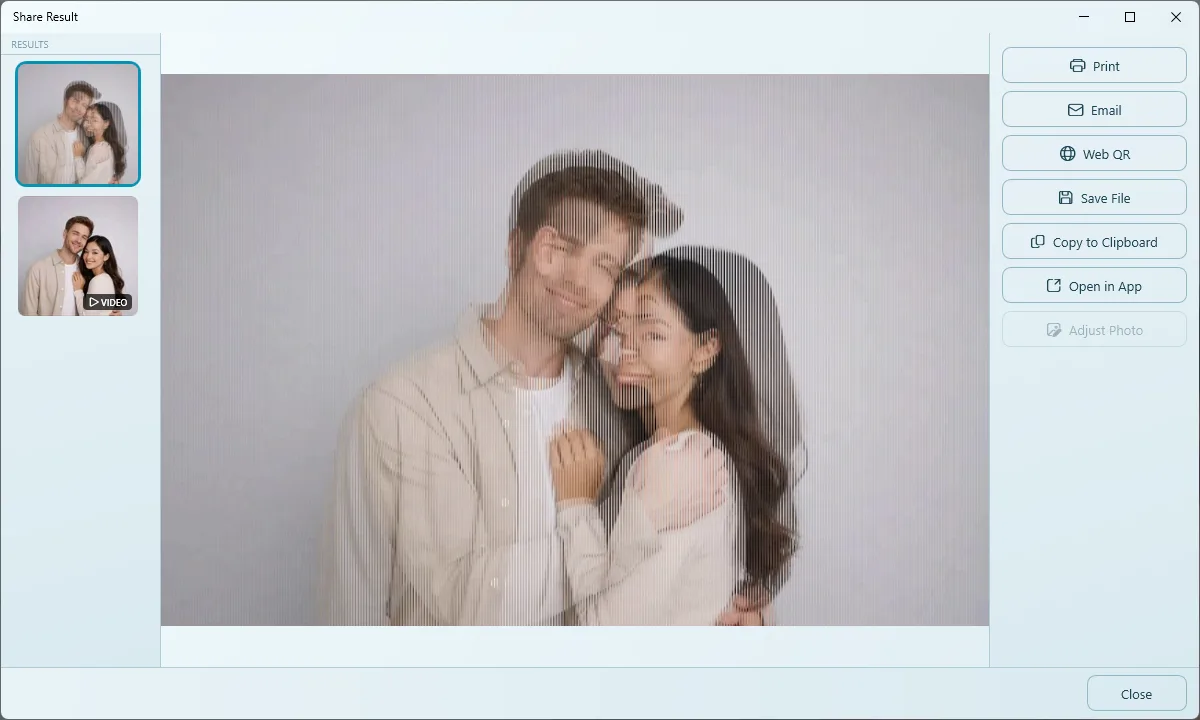
On screen the interlaced result looks like a mess of fine stripes. That is normal. Only the lens on top turns it back into clean photos.
What you need
- A lenticular lens sheet. The box shows an LPI value, for example 50 or 75. Treat it as a starting point, not the final answer.
- A photo printer and glossy photo paper.
- Tape or adhesive to fix the lens to the print, and a cutter to trim it.
Step 1: the Pitch Test (do this before printing)
The Pitch Test prints a calibration sheet with many bands, each made for a slightly different LPI. You lay the lens on the sheet and find the one band that looks right. Its number is the correct LPI for your printer, paper and lens together.
The Pitch Test result belongs to one combination of printer, paper and lens. Repeat it whenever you change any of them, including a new batch of lens sheets.
Open the Pitch Test
- Open Studio › Lenticular.
- In the left panel, under the Template section, find the Pitch Test row. It is always visible, not hidden in a menu.
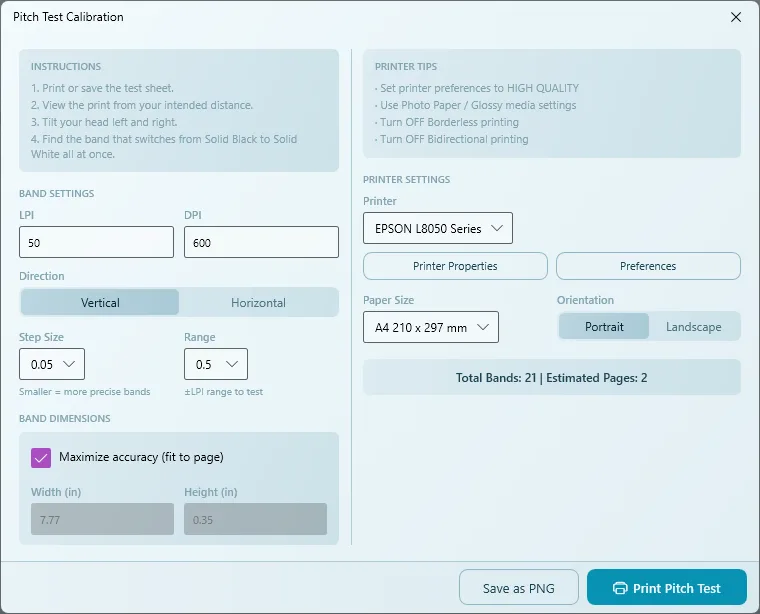
- Click Open Pitch Test…. The Pitch Test Calibration window opens.
Set the bands
- LPI: type the number from the lens box, for example
50. - DPI: the print resolution, for example
600or720. Write it down. You must use the same DPI in every test and later in the template. - Direction: choose Vertical if the ridges on your lens run top to bottom, Horizontal if they run left to right. It must match the physical lens.
- Step Size: how far apart the bands are. Use
0.05for the first pass. - Range: how far above and below your LPI to test. Use
0.5for the first pass. With LPI 50 this gives 21 bands from 49.50 to 50.50. - Leave Maximize accuracy (fit to page) on. It makes the bands as large as the page allows, and bigger bands are easier to judge. Turn it off only if you need a specific Width (in) and Height (in).
The bar at the bottom right shows Total Bands and Estimated Pages and updates as you type.
Set up the printer
- Choose the Printer, Paper Size and Orientation.
- Click Printer Properties or Preferences to open the Windows printer driver and follow the Printer Tips card: highest quality, photo/glossy media, borderless off and bidirectional printing off.
- In any print dialog, print at actual size (100%). Never use "fit to page".
- Click Print Pitch Test. If the printer is on another computer, click Save as PNG and print that file there, also at 100%.
Bidirectional printing prints alternate passes in opposite directions. On a sheet of very fine lines that alone can ruin the test, so always switch it off.
Read the sheet
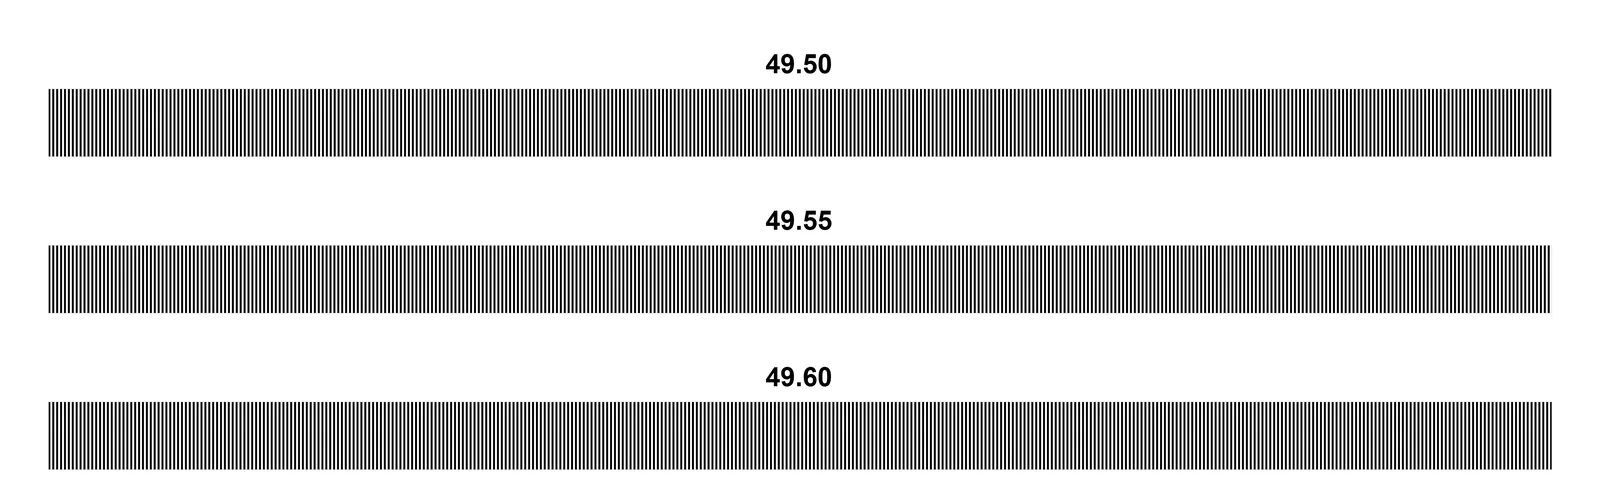
- Lay the lens on the printed sheet, ridges parallel to the band lines.
- Look from the distance your guests will hold the finished print.
- Tilt your head left and right (Vertical) or up and down (Horizontal).
- Most bands break up into zebra stripes: those numbers are wrong. Find the one band that switches from solid black to solid white all at once.
- Read the number printed above that band. That is your LPI.
Optional: a finer second pass
For extra precision, run the test again centred on the number you found (for example 50.15) with Step Size 0.01 and Range 0.05. That prints 11 bands one hundredth apart. Do not go finer: the band labels show only two decimals.
Write the result down
Close the Pitch Test window. It does not fill in the template for you. Write down both numbers, the LPI you found and the DPI you tested at, because they only work as a pair.
Step 2: the Lens tab
The Lens tab describes the physical lens and the size of the finished print.
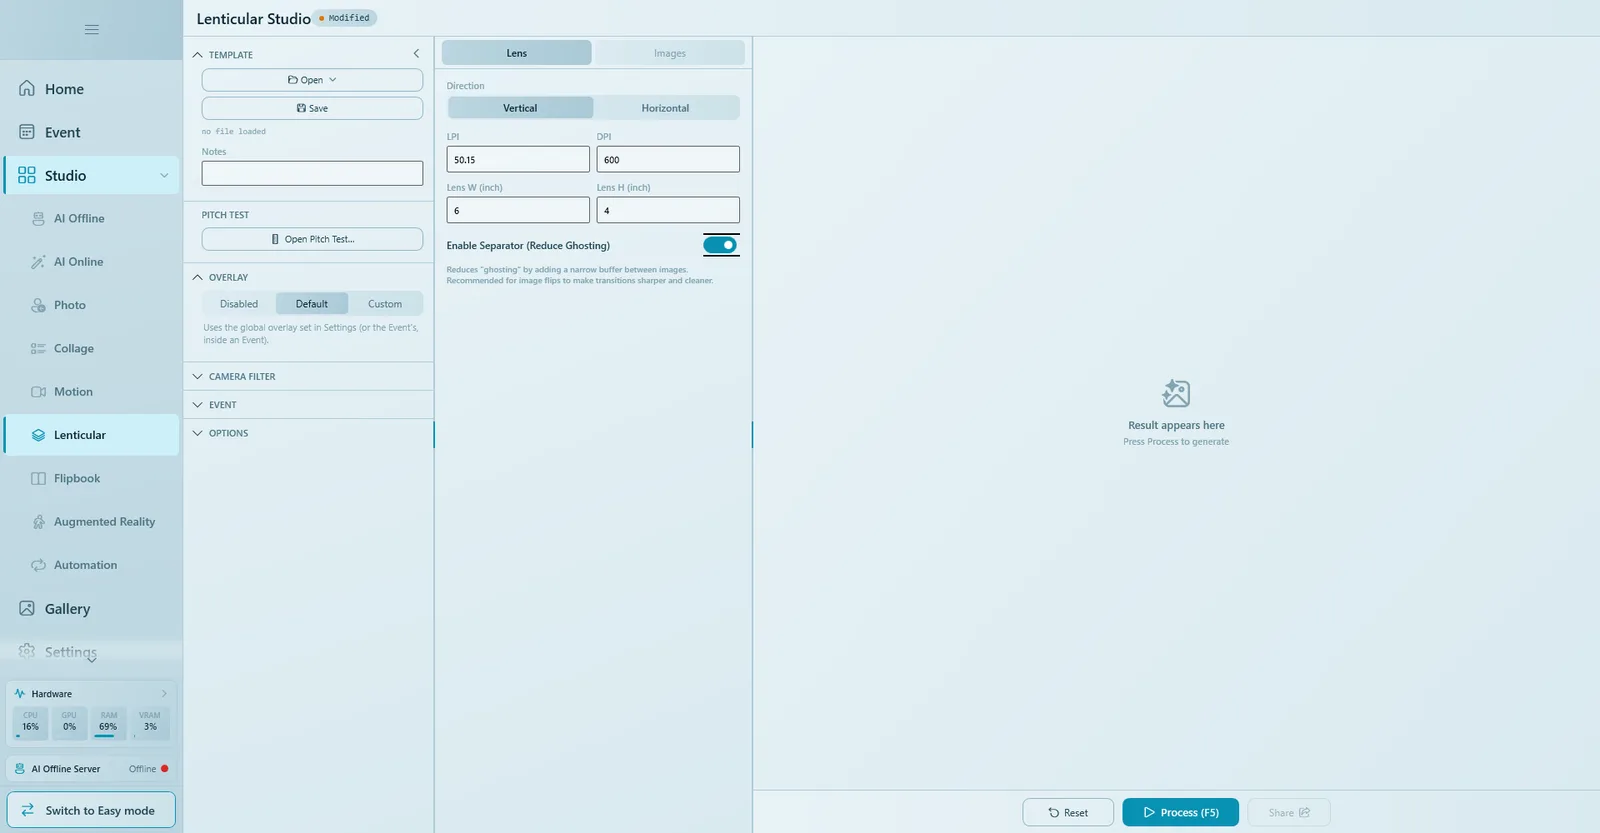
| Setting | What to enter |
|---|---|
| Direction | Vertical or Horizontal, exactly as in the Pitch Test. |
| LPI | The value you found with the Pitch Test (for example 50.15), not the number on the box. |
| DPI | The same DPI you used in the Pitch Test. |
| Lens W (inch) / Lens H (inch) | The physical size of the finished piece in inches, for example 6 × 4. Together with DPI it sets the pixel size of the sheet. |
| Enable Separator (Reduce Ghosting) | Adds a narrow buffer between the images so one does not bleed through the other mid-flip. Leave it on for image flips. |
Step 3: the Images tab
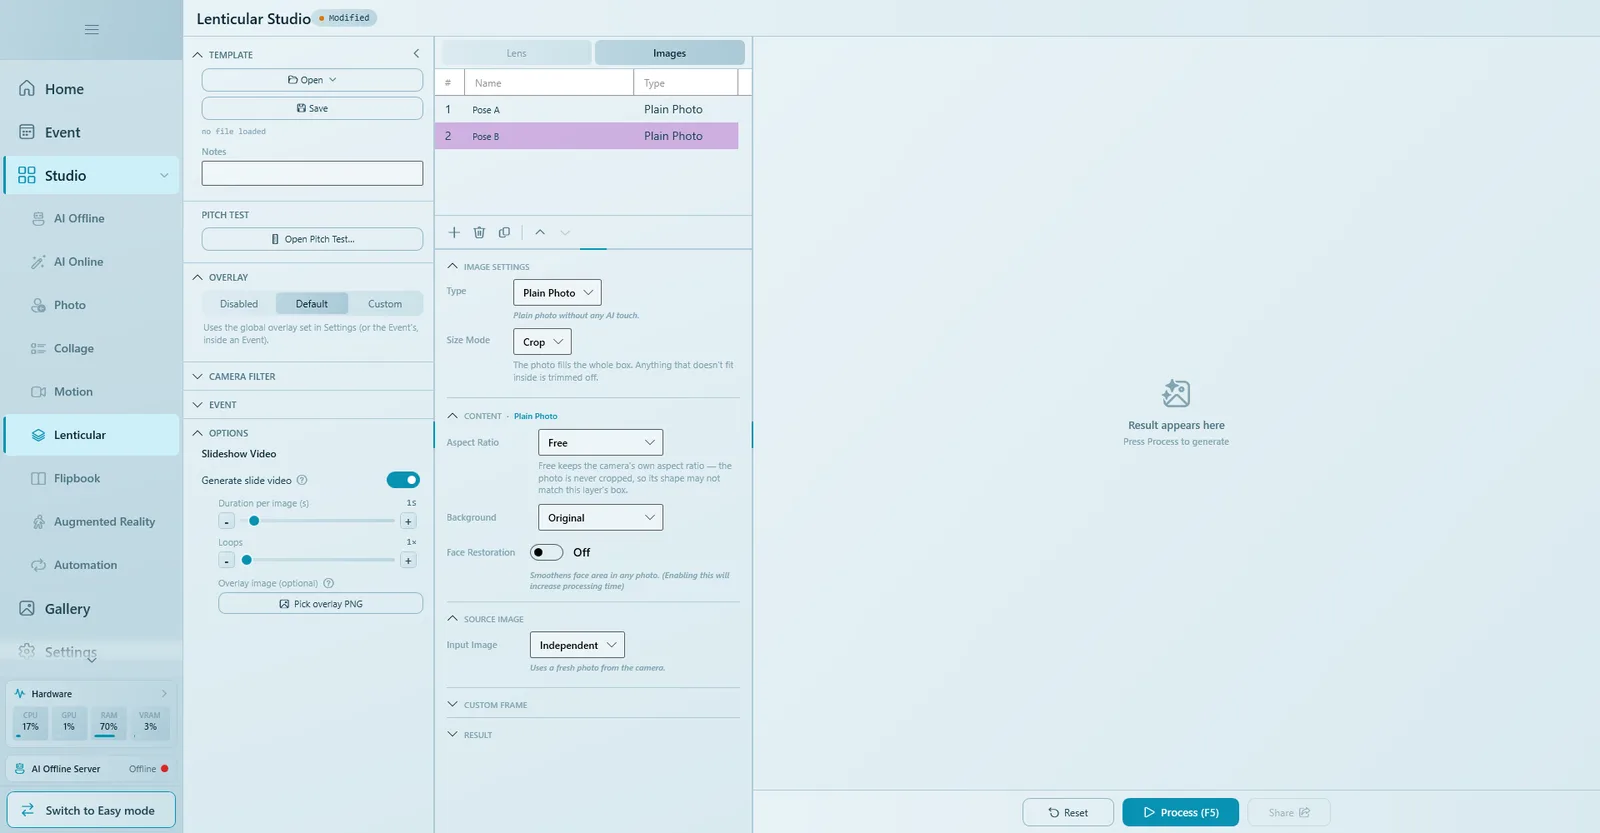
Each row in the Images tab is one image in the flip. You need at least two; Q-Booth will not process with fewer. The order of the rows is the order the images appear as the card is tilted.
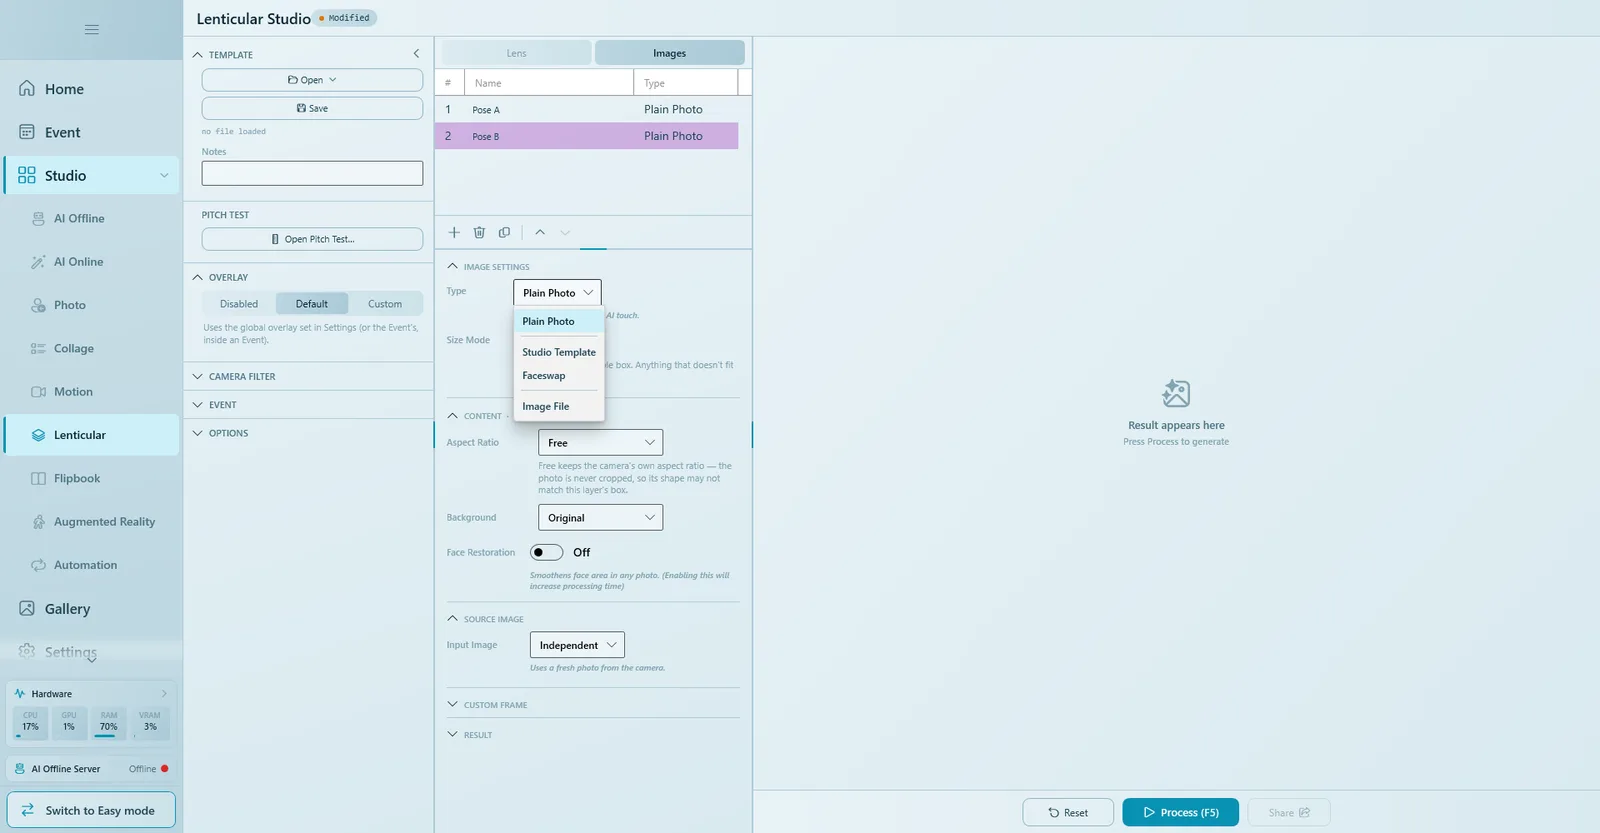
- Open the Images tab and click + under the table to add a layer.
- Click the name and give it a clear name, for example "Pose A".
- Under Image Settings, choose the Type (see below).
- Set Size Mode to Crop (fills the whole area, trims the edges) or Fit (keeps the whole photo, leaves blank space). For a flip, use Crop on every layer so the images line up.
- Fill in the Content and Source Image sections. Input Image = Independent uses a fresh photo from the camera.
- Add the second layer the same way. Use the up/down arrows to change the order, the copy icon to clone a layer and the bin icon to remove one.
| Type | Use it for |
|---|---|
| Plain Photo | The photo as it is, with no AI. |
| Studio Template | Runs a saved studio template (Photo, AI Offline or AI Online) inside the layer. |
| Faceswap | A photo with the face swapped onto your target picture (Advanced or Pro licence). |
| Image File | A fixed picture you provide, the same on every print (for example a logo card). |
Custom Frame
Under Custom Frame, Use Custom Frame limits a layer to part of the lens area. Click Create Frame... / Edit Frame... to open the Layer Frame Editor. Overlay inside frame clips the layer overlay to the frame (off = the overlay spans the full lens), and Image Position places the image Above Frame or Below Frame.
Include a layer as its own result
Open the Result section of a layer and turn on Include as result to also deliver that layer's finished photo as a separate result, next to the lenticular sheet.
Overlay and slideshow video
- Overlay (left panel): Disabled, Default (the overlay from Settings, or the event's overlay inside an event) or Custom. The overlay is applied to each layer before interlacing, so it is sliced by the lens pattern like the photos.
- Options › Slideshow Video: turn on Generate slide video to create a short MP4 that cycles through the images. Set Duration per image (s), Loops and an optional Overlay image (optional). This video is what guests can share; the lenticular sheet only works in the hand.
Step 4: save, process and print
- Click Save. Tip: put the LPI in the file name (for example
flip_6x4_50.15.qsl) so you know which lens it was built for. - Click Process (F5). If the layers need photos, the input window appears first (the same screen guests see at an event). Q-Booth renders each layer at full print resolution and interlaces them.
- Click Share, then Print. Adjust Photo is disabled for the lenticular sheet, and it prints at actual size (1:1).
- Lay the lens on the print and slide it until the image snaps into place. Tape it down and trim.
- When you are happy, click Save & Return (inside an event) or Save.
Never let anything scale a lenticular print: no "fit to page", no resizing, no cropping. A resized sheet no longer matches the lens.
Lenticular sheets are very large files and are deliberately not uploaded for the QR link. A small copy of each layer is uploaded instead.
Three things to remember
- LPI and DPI travel together. The LPI you found only works at the DPI you found it with.
- Direction on the Lens tab must match the direction you tested.
- Always print at 100%.
Troubleshooting
The print is blurry or shows broad stripes when tilted.
The LPI does not match. Run the Pitch Test with the same printer, paper and lens, enter the new LPI on the Lens tab, and check that the DPI is the one you tested with.
I see both images at the same time (ghosting).
Turn on Enable Separator (Reduce Ghosting), check that Direction matches the ridges, and slide the lens sideways until it registers. Then check the LPI again.
It worked before, but not with new lens sheets or paper.
The calibration only fits one printer + paper + lens combination. Repeat the Pitch Test.
The print does not fit the lens size.
Something scaled it. Print at actual size / 100%, with borderless printing off, and check Lens W (inch) and Lens H (inch).
"At least 2 layers are required."
Add a second layer on the Images tab before processing.
No band looks clean on the test sheet.
Check the printer settings first (bidirectional off, highest quality, photo paper, 100%), and that Direction matches the lens. If the right value is outside the tested range, increase Range and print again.
Next steps
Still need help?
Our team answers on WhatsApp. Tell us your Q-Booth version and what you see on screen.