Kiosk, Payment & Vouchers
Turn an event into a self-service booth where guests start a session with a voucher code or a Payment Gateway QR payment, and buy extra prints.
Kiosk Mode turns an event into a self-service booth. After a guest taps Start, they pass a gate first: they type a voucher code or pay by scanning a QR code with their phone (the Payment Gateway). Only then does the session begin. Use it for booths that run without staff, for prepaid packages, or for paid sessions. Guests can also buy extra prints at the end.
Chapters (8)
How it works
- The guest taps Start on the Welcome Page.
- The kiosk gate appears: a keypad for a voucher code, a Payment Gateway payment code, or, if both are allowed, the question "How would you like to pay?"
- When the code is accepted or the payment arrives, the session starts: survey (if any), templates, camera, result. If nobody touches the gate for 30 seconds, it gives up and returns to the Welcome Page.
- The Result Page returns to the start by itself after its own timer (Result Page › Page › TIME LIMIT), ready for the next guest.
All of this lives in the KIOSK MODE group of the Event Editor: Settings and Voucher. The payments themselves are in OTHERS › Report. While the gate is on, the Welcome Page in the editor shows a Start gate: line so you can see it at a glance.
Since 5.9.0.0 the app calls the payment option Payment Gateway, like lumaqube.com does. Before that it was called QRIS, and there was a separate KIOSK MODE › QRIS page. That page is gone: payments are in Report › Payment Recap and Payments, and the Test button is on Kiosk Mode Settings. Guests in Indonesia still pay with a QRIS code.
Kiosk Mode here means the voucher or payment gate. The full-screen, locked booth that many people call "kiosk mode" is simply Launch. See Running an event.
Turn on Kiosk Mode
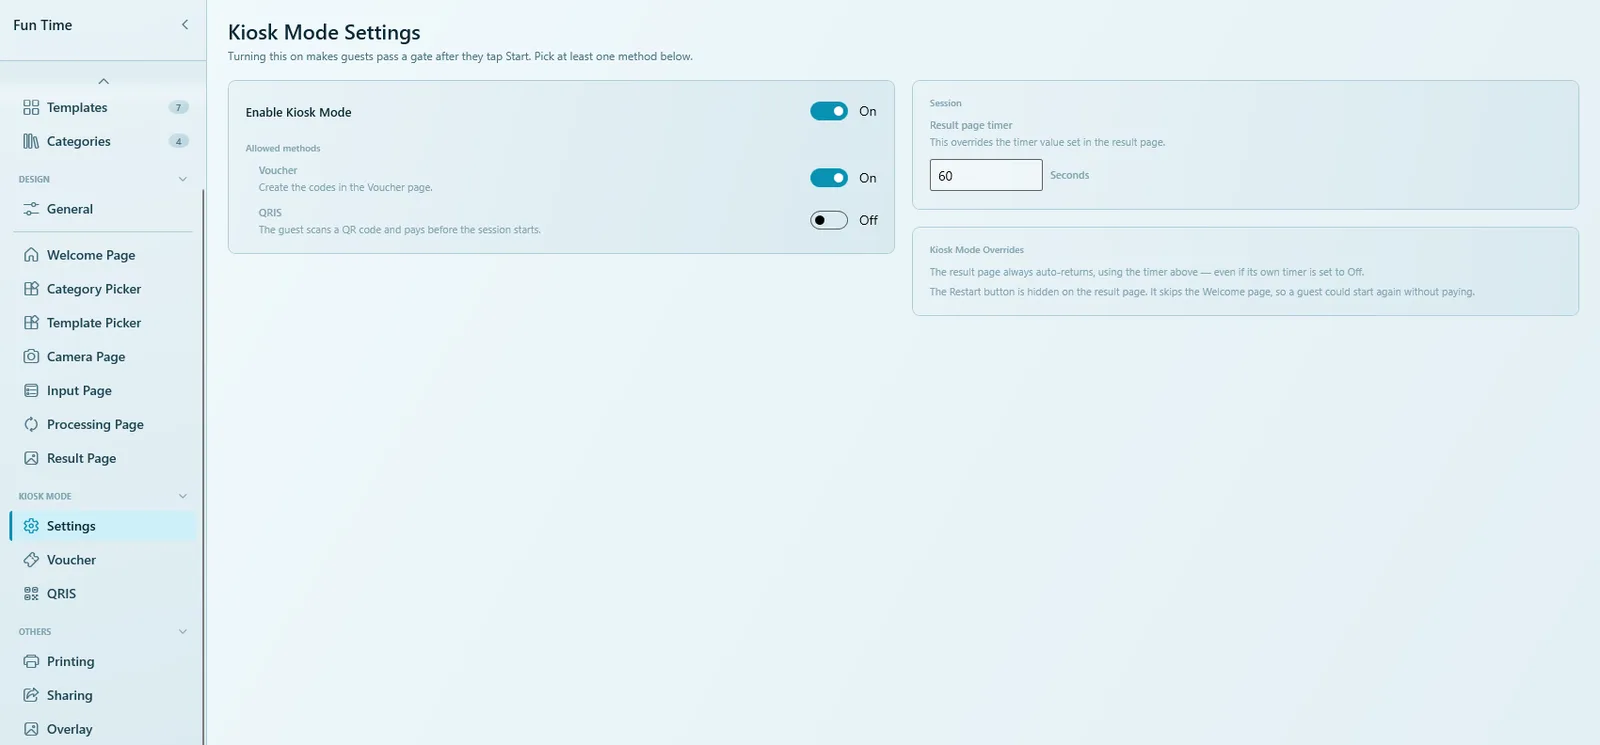
- Open the event and go to KIOSK MODE › Settings. The Kiosk Mode Settings page opens.
- Turn on Enable Kiosk Mode.
- Under How guests pay, click the Voucher tile, the Payment Gateway tile, or both. A tile that is on has a tick in its corner.
- If you use the Payment Gateway, fill in the Price per session in the Pricing card: what a guest pays to start one session.
- Check Prints per guest and the Time Limits summary. Click Change next to a page to adjust it.
- Click Save.
| Option | What it does |
|---|---|
| Enable Kiosk Mode | Guests must pass the gate after tapping Start. Turn on at least one tile under How guests pay; with none on, the gate does nothing and guests start as usual. |
| How guests pay › Voucher | Guests type a code you created on the Voucher page. |
| How guests pay › Payment Gateway | The guest scans a QR code and pays before the session starts. This tile only appears when the Payment Gateway add-on is active on your license. Under the tiles you see the add-on's end date, the methods the booth's payment account offers, and Test amount + Test. With both tiles on, guests choose on screen. |
| Pricing › Price per session | What a guest pays for one session, in the payment account's currency (see the currency check below). It can't be 0. The Pricing card shows whenever the booth has the add-on, even while the Payment Gateway tile is off. Turning on Enable Kiosk Mode alone doesn't charge anyone: the Payment Gateway tile must be on too. |
| Pricing › Price per extra print | What a guest pays for each extra print. See Extra prints. If the currency doesn't match the payment account, a warning shows once for both prices. |
| Prints › Prints per guest | Shows the Printing page's per-guest limit, or No limit. Change it on the Printing page. |
| Prints › Sell extra prints | Lets guests buy more prints when theirs are used up. See Extra prints. |
| Time Limits | A read-only summary of how long a guest can stay on each page, with a Change link for each one (since 5.8.0.0). No time limit shows in amber. That is allowed, it is just a reminder. See Page time limits. |
Before 5.8.0.0 this page had Session › Result page timer, which replaced the Result Page's own timer. It is gone: the Result Page sets its own timer on its Page tab › TIME LIMIT, and Kiosk Mode only shows it. See Page Designer.
Page time limits (since 5.8.0.0)
Time limits stop a guest from holding the booth, for example after walking away from the template screen. Each page sets its own limit on its Page tab › TIME LIMIT, with or without Kiosk Mode. Kiosk Mode doesn't change them, it only shows them in the Time Limits summary.
- Time: Off, 30s, 1m, 2m, 3m, 5m or Custom (in seconds, minimum 15).
- Restart timer on tap: on = every tap starts the timer over; off = every guest gets a fixed time.
- Category Picker and Template Picker: When time runs out › Back to Home (ends the session; on a paid event the guest loses what they paid), Random or First (picks for the guest and carries on). The Template Picker limit isn't used when guests pick on the Welcome Page.
- Camera Page: When time runs out › Finish (the default: shots still left are taken with the normal countdown, then processed) or Back to Home. A shot already counting down always finishes. Retakes per guest: Unlimited, 1, 2, 3 or 5. Once they are used up, Retake disappears for the whole session.
- Result Page: returns to Home after the time set on its Page tab › TIME LIMIT.
Random or First together with auto capture and auto process means a guest who walked away still gets photos taken and processed. With AI templates that costs money.
The Picker Timer, Camera Timer and Result Timer elements only show the countdown to guests; hiding one doesn't stop its limit. The settings of each page are described in Page Designer.
What changes in Kiosk Mode
While Kiosk Mode is on, these buttons are hidden on the Result Page to protect paid sessions (listed in the Kiosk Mode Overrides box):
- Restart Session. It skips the Welcome Page, so a guest could otherwise start again without paying.
- Switch Template (since 5.5.0.0).
Since 5.8.0.0 Kiosk Mode no longer changes the Result Page's timer. Set it on the Result Page itself (Page tab › TIME LIMIT).
Vouchers
Vouchers are numeric codes that guests type at the booth to start a session. Each code works once. Hand them out as printed cards, sell them as packages, or give them to VIP guests.
Create a batch of vouchers
- Go to KIOSK MODE › Voucher. The Voucher Management page opens.
- Click Create Voucher.
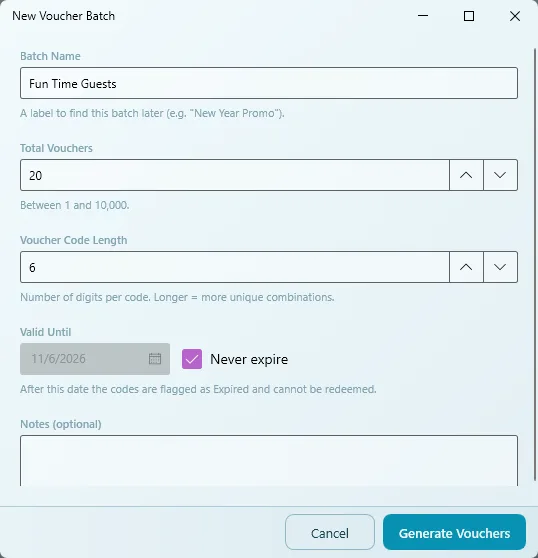
- Fill in the New Voucher Batch window (see the table below).
- Click Generate Vouchers and confirm. The codes appear in the list.
| Field | What to enter |
|---|---|
| Batch Name | A label to find this batch later, for example "VIP Guests" or "New Year Promo". |
| Total Vouchers | How many codes to make, between 1 and 10,000. |
| Voucher Code Length | Number of digits per code, from 4 to 16 (default 8). Longer codes give more unique combinations and are harder to guess. If you ask for many codes with a short length, Q-Booth asks you to increase the length. |
| Valid Until / Never expire | After this date the codes are marked Expired and can no longer be used. Tick Never expire for codes without an end date. |
| Notes (optional) | Your own notes about the batch. |
The voucher list
The list shows every code with its batch, Valid Until, Status, Used Date and the Trans. Code of the session that used it. The summary line shows how many are Active, Used, Expired and Deleted.
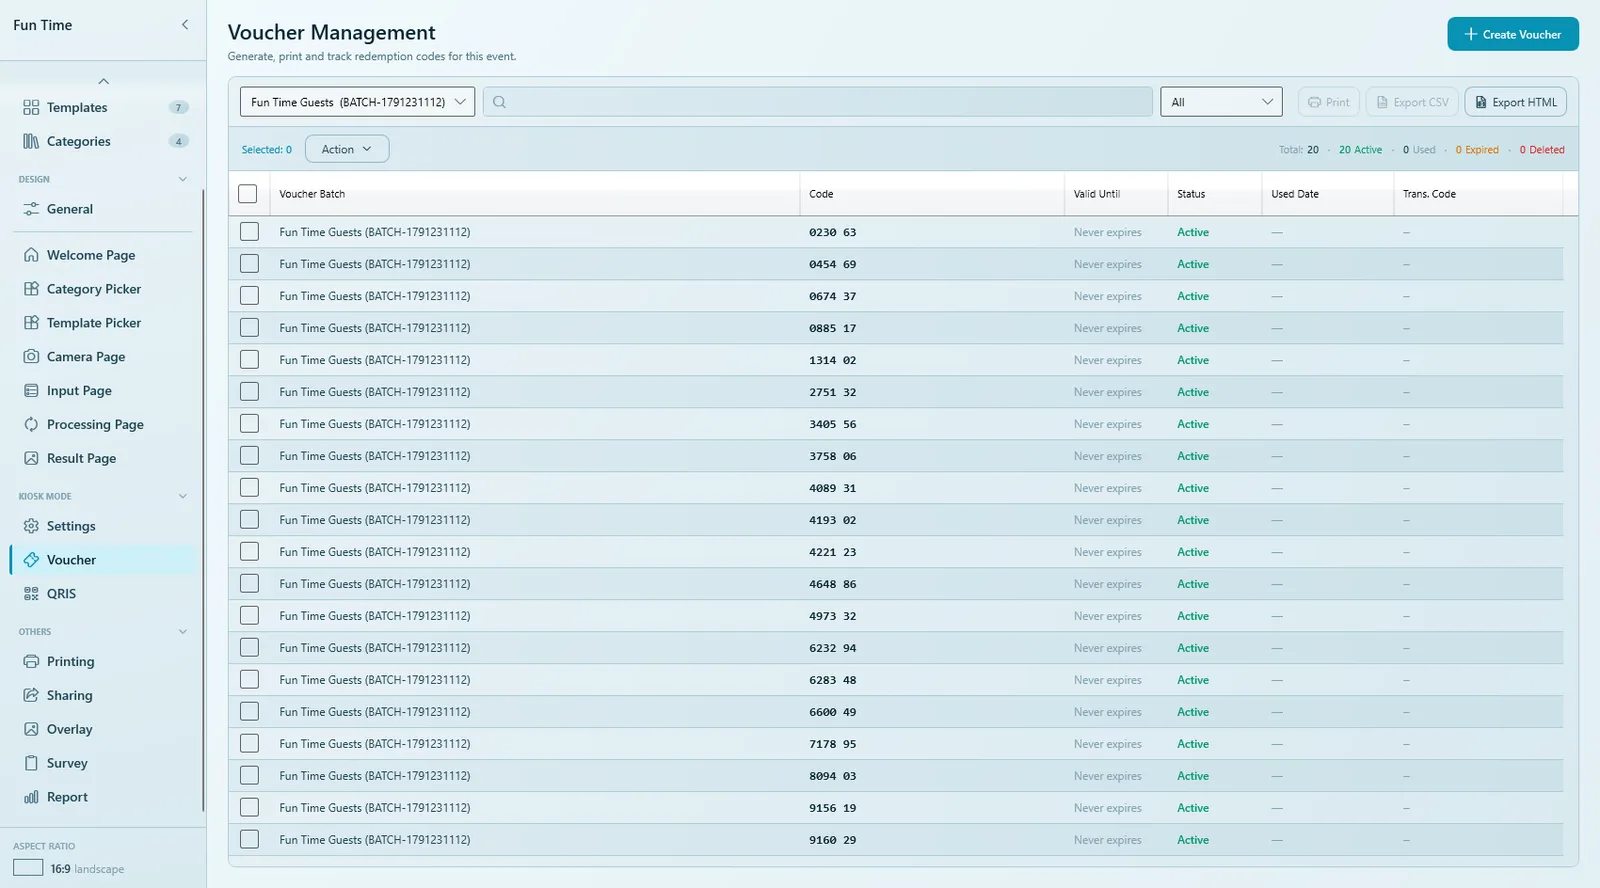
- Filter and search: pick a batch, pick a status (All, Active, Used, Expired…), or search for a code or batch name.
- Change several codes at once: tick the codes, then use Action › Set Active, Set Inactive or Delete. Used codes are skipped, and only active codes can be deleted.
- Export: Export CSV for a spreadsheet, Export HTML for a report of one batch.
Use Set Inactive to hold back codes you have not handed out yet. A guest who types an inactive code is asked to see a member of staff.
Print voucher cards
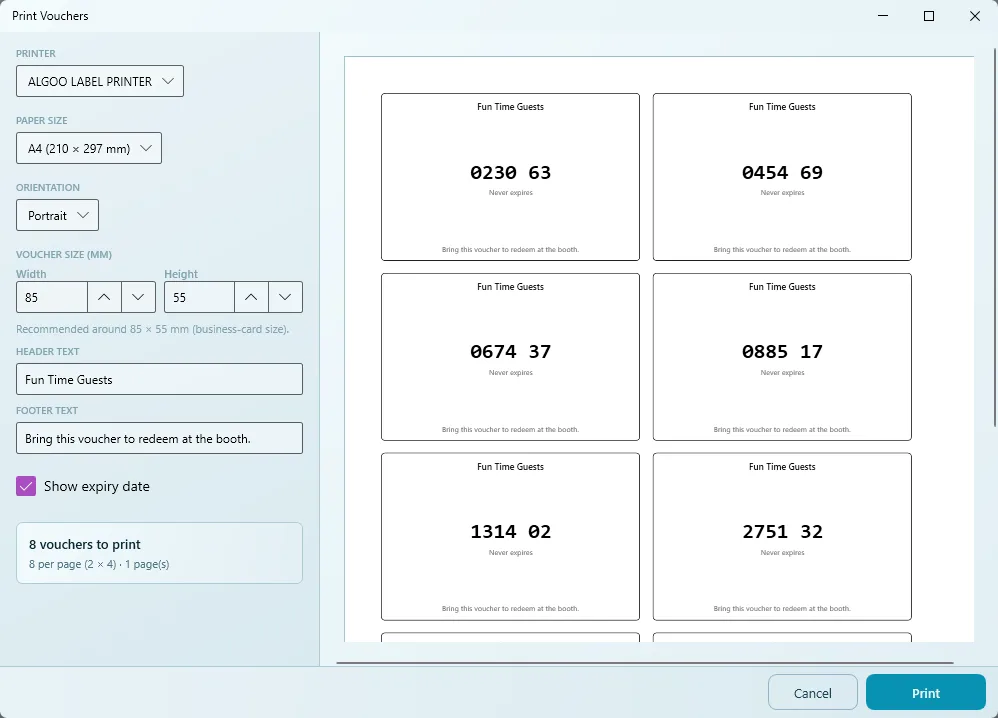
- Filter the list to one batch, or tick codes from the same batch. Printing covers one batch at a time.
- Click Print.
- In Print Vouchers, choose the PRINTER, PAPER SIZE and ORIENTATION.
- Set the VOUCHER SIZE (mm). Around 85 × 55 mm (business-card size) is recommended.
- Edit the HEADER TEXT and FOOTER TEXT, and choose whether to Show expiry date.
- Check the preview and the page count, then click Print.
Vouchers at the booth
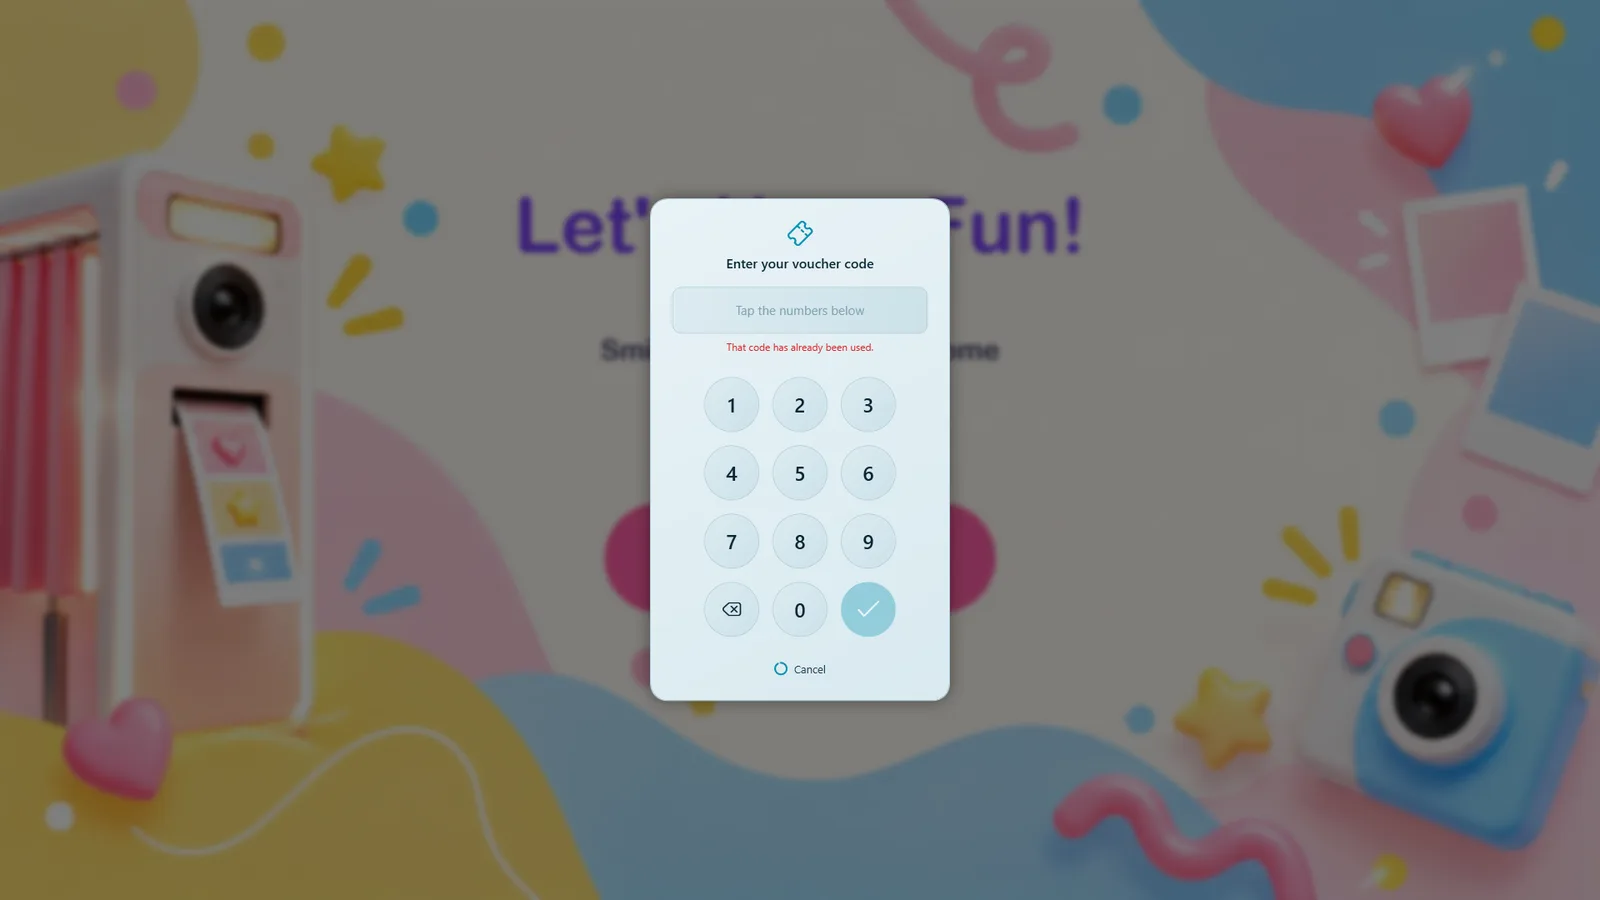
The guest taps Start, types the code on the keypad ("Enter your voucher code") and confirms with the tick. The session begins right away. If the code cannot be used, the keypad shows why:
| Message | Reason |
|---|---|
| That code isn't valid. Please check it and try again. | The code does not exist (typing mistake). |
| That code has already been used. | Each code works once. |
| That code has expired. | The Valid Until date has passed. |
| That code isn't active yet. Please ask a member of staff. | The code is set to Inactive. |
| That code is no longer valid. | The code was deleted. |
If a code used at the booth still shows Active in Voucher Management, reopen the Voucher page to refresh the list. Report › Vouchers always shows the current status.
Payment Gateway: guests pay by QR
With the Payment Gateway tile on, the booth shows a payment QR code for the Price per session. The guest scans it with their bank or e-wallet app, and the session starts as soon as the payment comes in. The money goes into the payment account connected to the booth on lumaqube.com (see Connect your payment account).
It needs the Payment Gateway add-on on your license (called QRIS in older versions). Without it, the tile doesn't appear. The add-on runs for a period, bought per month or per year on lumaqube.com: see the Buy page or the Shop in the member area.
Which QR guests scan
Each country has one method, its national QR code. Guests pay from any bank app or e-wallet that scans it (for example Touch 'n Go, GrabPay, ShopeePay or GCash). In mainland China guests scan the QR with the Alipay app.
| Country | Gateway | Guests pay with | Currency |
|---|---|---|---|
| Indonesia | Midtrans (or Faspay) | QRIS | IDR (Rupiah) |
| Malaysia | HitPay | DuitNow | MYR |
| Singapore | HitPay | PayNow | SGD |
| The Philippines | HitPay | QR Ph | PHP |
| China (mainland, since 25-10-2026) | Alipay | The Alipay app | CNY |
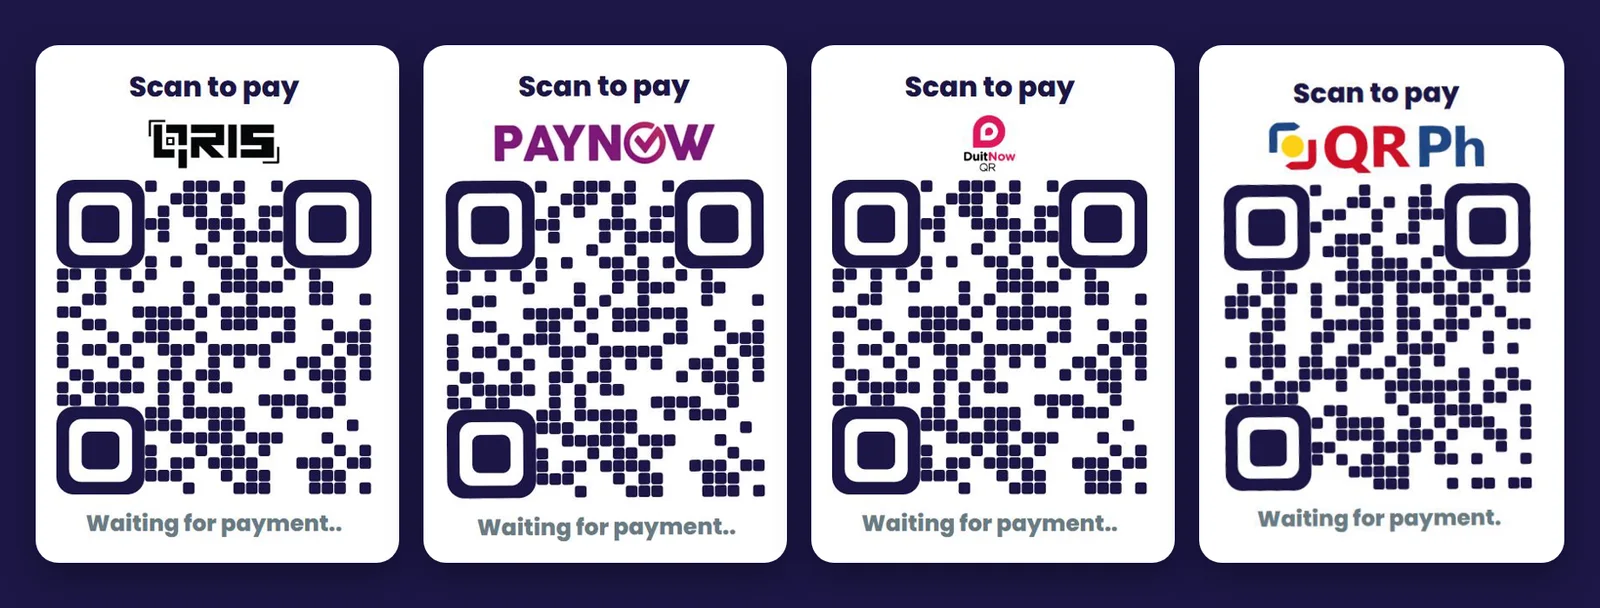
The guest must scan the QR from inside their bank, e-wallet or Alipay app. A phone camera or Google Lens opens it as a broken web link ("This site can't be reached"). This goes for QRIS too.
Other countries aren't supported yet. The event's prices must be in the payment account's currency. If they aren't, Kiosk Mode Settings offers a Use <X> for this event button. Which gateway makes the QR (Faspay, Midtrans, HitPay or Alipay) depends on the payment account the booth pays into, not on a booth setting; the guest sees the same screen either way. The Vendor column in the Report shows which one took each payment. With Midtrans the QR can take a few seconds longer to appear.
Messages on Kiosk Mode Settings
Under the Payment Gateway tile, the page shows the state of the add-on and of the booth's payment account. Each method shows its logo (QRIS, DuitNow, PayNow, QR Ph) here and on the guest's payment card.
| Message | Meaning |
|---|---|
| Payment Gateway active until <date> (<n> days left). | The add-on's end date. The server checks it on every payment. |
| Payment Gateway ended on <date>. Guests can't pay until it is extended on lumaqube.com. (orange) | Extend the add-on on lumaqube.com (Licenses & Cloud or Shop). It works on the booth at once, no restart needed. The date on this page updates at the next app start or with About › Refresh Add-ons. |
| Methods: QRIS · IDR | The methods and currency the booth's payment account offers. |
| Could not check the methods for this booth. Is the PC online? | The PC is offline. |
| The server is not taking payments for this booth right now. | The add-on period has ended, or payments were switched off. |
| This booth's payment account takes <X>, but this event's price is in <Y>. Guests can't pay until they match. | Click Use <X> for this event, then check the prices. An event with no price yet (a new one, or one where both prices are still 0) takes the account's currency by itself when Kiosk Mode Settings opens, so this only shows on an event that already has a price (since 5.9.0.0). |
What the guest sees
- With both Voucher and Payment Gateway on, the "How would you like to pay?" screen names the booth's method with its logo: QRIS, PayNow, DuitNow or QR Ph. If the booth couldn't reach the server since the event started, an event that isn't priced in Rupiah shows "Pay by QR" instead.
- "Scan to pay" with the amount, the QR code and a countdown ("Expires in …"). The code lasts 5 minutes, so a guest who walks away without tapping Cancel doesn't hold the booth for long. The card never closes on its own before that, because the guest may still be opening their banking app.
- "Waiting for payment…" while the guest pays in their app.
- "Payment received", and the session continues.
- If the code expires ("This code has expired."), can't be made ("Could not generate a payment code."), or the guest cancels, no session starts.
- If the add-on period has ended, the booth still offers the Payment Gateway, but a guest who picks it sees "Payment is not available right now. Please ask the staff." and no session starts.
- If the booth shows "No payment account is connected for this booth", the license has the add-on but no account picked yet. Connect one on lumaqube.com under Payment Gateway › Accounts and choose it for this booth under Booths (see Connect your payment account). Only if Booths says "Being set up — contact us to finish.", contact support.
Test the payment before the event
- Open Kiosk Mode Settings. Under the Payment Gateway tile, type a small Test amount.
- Click Test. A Test payment window shows a real payment code.
- Pay it with your own banking or e-wallet app.
- Wait for "Payment received". The test appears in Report › Payments marked TEST; it counts in Collected but not in Revenue.
The test charges in the payment account's currency (for example SGD), even while the event is still priced in another one. The amount starts small (Rp 100, PHP 20, otherwise 1). It is real money on a live account.
The Payment Gateway needs a working internet connection at the booth for the whole event. Test it on the venue's network, not only at home.
Extra prints: "Print more" (since 5.9.0.0)
When a guest has used up their prints, they can buy more right on the Result Page and pay by QR. It needs the Payment Gateway add-on.
- On the Printing page, turn on Set session print limit and set the prints each guest gets. Without a per-guest limit guests never run out, so there is nothing to sell (the card says so).
- On Kiosk Mode Settings, turn on Sell extra prints in the Prints card.
- Set Price per extra print in the Pricing card. It is charged in the event's currency, like the session price. Decimals are fine (for example SGD 0.50, HitPay's minimum in Singapore).
- Click Save.
At the booth, once a guest has used their prints, the Print button changes to Print more. It stays in the same place with the same look; a button made from an image keeps its image and does the same thing. The guest picks how many (up to 10, never more than the paper left), sees the total, taps Pay and pays by QR. As soon as the payment is received, all the copies print at once: no quantity dialog, no print PIN, and no need to tap Print again. It works however the guest got in: voucher, Payment Gateway, or a free booth.
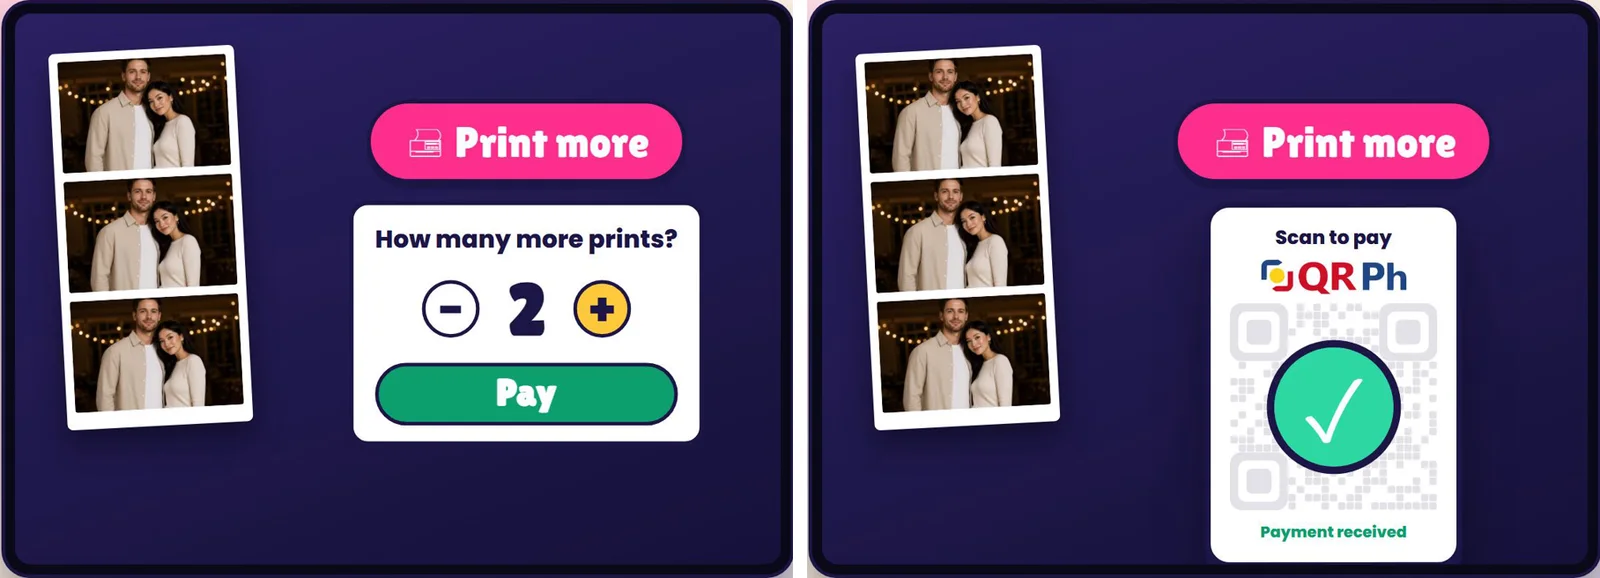
- If the copies can't print (no printer, printer error), they aren't lost. The button goes back to Print and "Prints added: N" shows, so the guest taps Print once the printer is fixed. These prints belong to that guest's session only.
- The Result Page's timer pauses while the guest buys. After paying it starts again from the full time; if they back out, it carries on.
- A flipbook prints all its pages at once, so the button asks for more prints first when the book doesn't fit in what's left.
- When the event's total print limit is reached, the button just turns off.
- In the Report, the money is part of that session's price: Transactions shows for example "Rp 30.000 (+2 prints)", and Payments lists it as "QRIS · Extra prints".
Connect your payment account on lumaqube.com
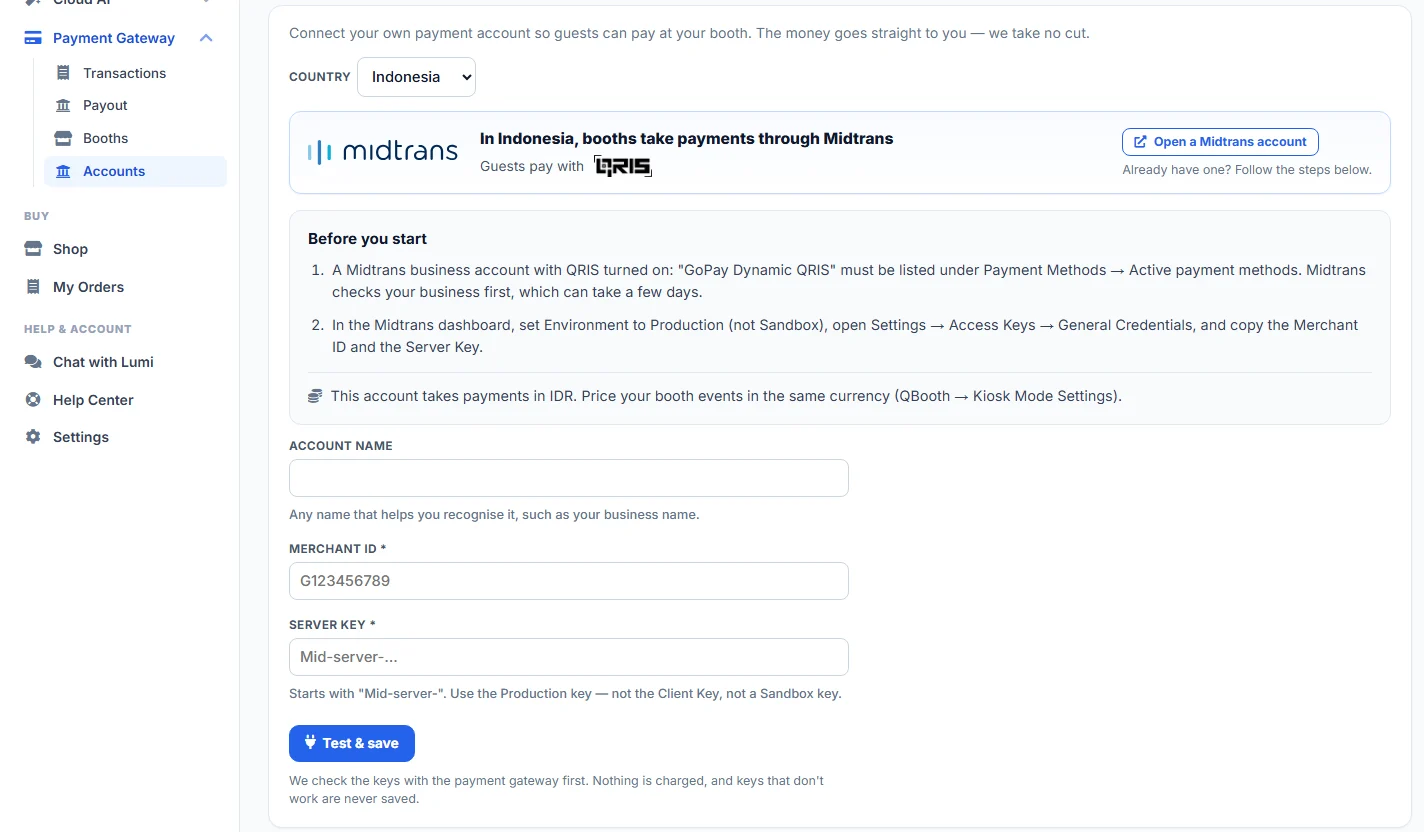
To take payments at the booth, you connect your own payment account (Midtrans in Indonesia, HitPay in Malaysia, Singapore and the Philippines, Alipay in mainland China) in the member area on lumaqube.com. The money goes straight into that account. Lumaqube takes no cut; the gateway charges its own fee. No add-on is needed to connect or test an account, but the booth needs the Payment Gateway add-on to take payments.
- Get the gateway account ready on the gateway's own website (the page has an Open a Midtrans / HitPay account link).
- Midtrans: a business account with QRIS on. GoPay Dynamic QRIS must be under Payment Methods › Active payment methods. Set Environment to Production (not Sandbox), open Settings › Access Keys › General Credentials, and copy the Merchant ID and the Server Key.
- HitPay: a business account verified for live payments. In the HitPay dashboard open Settings › Payment Methods and turn on your country's method (DuitNow, PayNow or QR Ph). Then open Developers › API Keys and copy the API Key. Your HitPay username is the name after "@" in your HitPay checkout links.
- Alipay: an Alipay business (merchant) account with Order QR Code Payment (订单码支付, part of Face-to-Face Payment 当面付) enabled. If it isn't, apply in the Alipay Merchant Platform (b.alipay.com) › Product Center; Alipay reviews it first. There are no keys to copy.
- Log in to lumaqube.com and open Payment Gateway › Accounts › Add account.
- Pick the Country, give an Account name if you like (for example your business name), and paste the keys. Midtrans: Merchant ID + Server Key (it starts with "Mid-server-"). HitPay: HitPay username + API Key (the live key, not one starting with "test_").
- Click Test & save. The keys are checked with the gateway first. Nothing is charged, and keys that don't work aren't saved.
Alipay works differently: pick China, give an Account name if you like, and click Connect Alipay. Alipay opens in a new tab: log in with the business account (or scan its QR with the Alipay app) and approve QBooth自助拍照收款 (it asks for 订单码支付, Order QR Code Payment). If Alipay is already logged in in that browser, it shows that account, so make sure it's the right one. The tab then shows the Accounts page with "Connected — your Alipay account is ready". Lumaqube never sees your Alipay password. - Open Payment Gateway › Booths. Each license shows its status ("Payment Gateway active until <date>", "… ended <date>" or "… not active"). Choose the account under Pays into and click Save. A license without the add-on shows Activate (or Renew once it ended), which goes to the Shop.
- In Q-Booth, set the event's price on Kiosk Mode Settings, in the account's currency (for example SGD for PayNow).
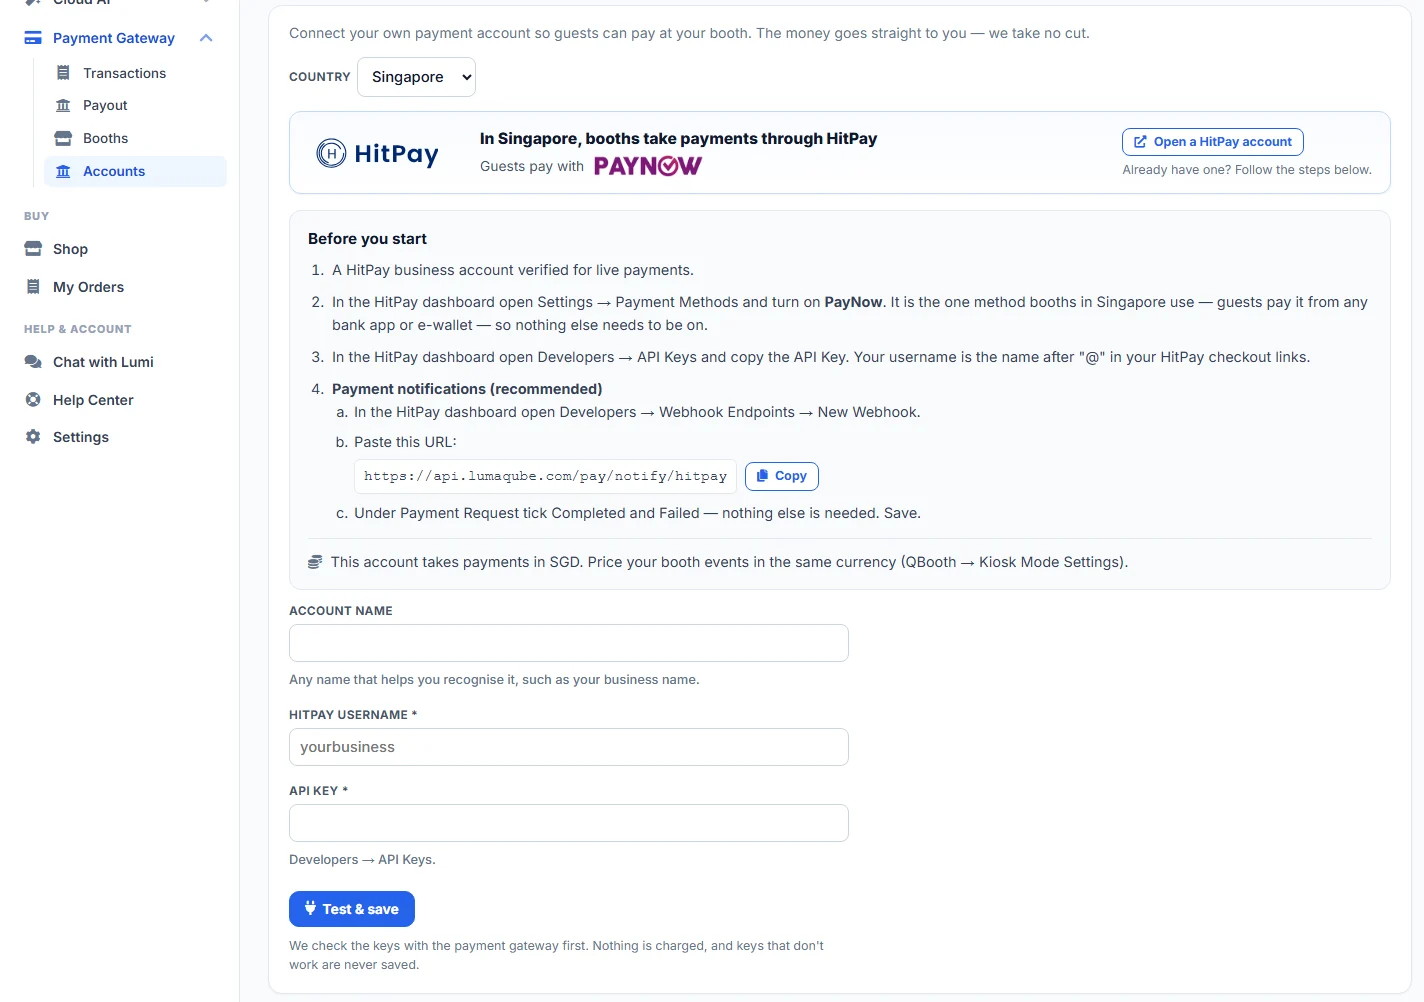
HitPay only, optional but recommended: payment notifications. In HitPay open Developers › Webhook Endpoints › New Webhook, paste the URL shown on the lumaqube.com page (use Copy), tick Completed and Failed under Payment Request, save, then run a Test payment. The box turns green once a notification arrives. Booths take payments without it; with it, a payment is still recorded if the booth goes offline right after the guest pays. Midtrans needs nothing here.
On each account card:
- Test checks the keys again.
- Test payment makes a real small payment with a QR to scan. The money lands in your account minus the gateway fee, and isn't listed in Transactions.
- Change name, key or methods edits the account. Leave the key blank to keep it.
- Remove only works once no booth uses the account ("Still used by …. Move that booth to another account first.").
Payment Gateway › Transactions on the website lists every payment your booths took, with Method and Account, and a Recap tab with totals per day or month.
| Message on lumaqube.com | What to do |
|---|---|
| The keys didn't work: … | The gateway refused them. Copy them again (live / Production keys). |
| That is the Client Key. Paste the Server Key instead. / A Midtrans Server Key starts with "Mid-server-". | Midtrans: you pasted the wrong key. |
| That is a sandbox key (it starts with "test_")… | HitPay: use the live key. |
| We couldn't check the keys right now… | Try again in a minute. |
| Alipay says this account can't take QR payments yet | Face-to-Face Payment isn't enabled on that Alipay account, or is still in review. |
| The approval in Alipay wasn't finished | The window was closed or the approval refused. Click Connect Alipay again. |
| The connection took too long, or was started in another window | Start again from the same browser window and finish within 30 minutes. |
| Alipay no longer accepts this connection (on Test) | The approval was cancelled in Alipay. Open the account's Change name, key or methods and click Connect Alipay again (for Alipay that section only changes the name). |
| This account is already connected on lumaqube.com. If it is yours, contact us. | The same merchant account is on another member's login. Contact Lumaqube. |
| Connect an account first (on a booth) | The license has the add-on but no account yet. Add one under Accounts. |
| Being set up — contact us to finish. (on a booth) | The team has to finish that booth's setup. Contact support. |
| Set up by Lumaqube — contact us to change it. (on an account) | The team connected this account (for example Lumaqube's shared account), so it can't be edited here. |
Payments and kiosk figures in the report
OTHERS › Report has three kiosk views. Payments and Payment Recap only appear with the Payment Gateway add-on; before 5.9.0.0 they were called QRIS Payments and QRIS Recap.
- Vouchers: every code with its status and the session that used it.
- Payments: every payment code shown to guests, paid or not, with Date, Amount, Method (for example QRIS), Status in colour (Waiting, Paid, Expired, Cancelled, Failed), Vendor (which gateway took it), the vendor reference and the transaction code. Test payments are marked TEST.
- Payment Recap: the totals, and one row per day.
| Figure | Meaning |
|---|---|
| Revenue | Guest payments only: what this event earned. |
| Collected | Every paid QR code, including your test payments. This is the amount the payment service will settle; check it against their statement. |
| Paid | How many guest QR codes were paid. |
| Not paid | Guest QR codes that expired or were cancelled without payment. |
| Failed | The payment service could not create a QR code; the guest saw an error, not a code. |
The KPI cards Revenue, Paid Sessions and Vouchers Used are available on the Summary. In Transactions, each session shows how it was paid: Voucher, QRIS or Free (kiosk), plus any extra prints bought. See Report.
Tips for a self-service booth
- Set a Set session print limit in Printing so each session gets a fixed number of prints. Turn on Sell extra prints if guests may buy more.
- Set a time limit on the Template Picker and Camera Page so a guest who walks away doesn't hold the booth. See Page time limits.
- Turn on Require PIN to exit and the keyboard blocks in GENERAL › Settings, and keep the exit PIN somewhere safe. See Running an event.
- Choose a Result Page TIME LIMIT long enough for guests to scan the QR code before the booth resets.
- Before every show: back up the event, test a full session with Launch (F5), including one voucher and (if used) one Payment Gateway test payment.
Common problems
Guests start without entering a code.
Enable Kiosk Mode is off, or no tile is on under How guests pay. Turn on at least one and save.
There is no Payment Gateway tile.
The Payment Gateway option only appears when the Payment Gateway add-on is active on your license. In versions before 5.9.0.0 it was called QRIS.
The guest sees "Payment is not available right now. Please ask the staff."
The license's Payment Gateway period has ended or was switched off. Extend it on lumaqube.com; it works at once, no restart needed.
Kiosk Mode Settings says "This booth's payment account takes <X>, but this event's price is in <Y>".
Click Use <X> for this event and check the prices. Guests can't pay until the currencies match. A new event with no price yet takes the account's currency by itself, so this only shows on an event that already has a price.
The guest sees "Could not generate a payment code."
The payment service could not create a QR code. Check the internet connection, then try the Test button on Kiosk Mode Settings, under Payment Gateway (before 5.9.0.0: on the QRIS page).
A guest says they paid, but the booth didn't start.
Check Report › Payments for that time (before 5.9.0.0: the QRIS page). The status shows whether the payment was received.
"Print more" never appears.
Sell extra prints needs a per-guest limit: turn on Set session print limit on the Printing page. Without it guests never run out of prints.
The Result Page goes back home too fast.
Raise the time on the Result Page's Page tab › TIME LIMIT. Since 5.8.0.0 that is the only place, Kiosk Mode included.
A guest paid and then stayed on the camera, retaking for a long time.
On the Camera Page's Page tab, set a TIME LIMIT and Retakes per guest. See Page time limits.
The Restart or Switch Template button disappeared from the Result Page.
That is intended in Kiosk Mode: both are hidden on purpose, so a guest can't start again without a new voucher or payment.
Q-Booth says the voucher count is too large.
The code length is too short for that many unique codes. Increase Voucher Code Length.
Next steps
Still need help?
Our team answers on WhatsApp. Tell us your Q-Booth version and what you see on screen.