Introduction to Q-Booth
Understand what Q-Booth does, how Events and Studios fit together, and which edition and mode suit your booth.
Q-Booth is photo booth software for Windows that turns a computer, a camera and a screen into a complete self-service booth. This page explains the big ideas — Events, Studios, the editions and the two interface modes — so the rest of the help center makes sense.

What Q-Booth does
Q-Booth handles the whole guest experience in one application: the welcome screen, choosing a style, the camera countdown, processing the photo (frames, collages, AI, video effects), and delivering the result by print, QR code or email. It also keeps statistics and reports for every event.
One installation covers many kinds of booths:
- Photo booth — a single photo with a frame, ready to print or share.
- Strip and collage booth — several shots arranged in one layout, such as a 2-strip print.
- AI photo booth — face swap, AI background replacement and AI image generation, either on the booth computer (AI Offline) or through an online AI service (AI Online).
- Video booth — boomerangs, short clips, 360 and slow-motion style videos with music and transitions.
- Flipbook booth — a short video printed as the pages of a flip book.
- Lenticular prints — prints that change when viewed from different angles.
- Augmented Reality — guests pose with a character that walks into the frame.
- Kiosk mode — a self-service booth with vouchers or payment before the session.
- Automation — processes every photo dropped into a folder automatically, for example photos from a roaming photographer.
The key idea: Events and Studios
Everything in Q-Booth is built from two building blocks. Understanding them is the single most important step.
| Building block | What it is | Example |
|---|---|---|
| Studio | Where you design one template — what happens to a guest's photo. Each studio produces one kind of result and saves it as a template file. | A gold-frame photo, a 3-shot strip, a face swap into a movie poster. |
| Event | The container for one occasion. It gathers your templates, organizes them into categories, holds the design of every kiosk screen, decides how guests receive results, and records statistics. | "Sarah & Daniel Wedding" with five templates and a custom welcome screen. |
| Launch | Running an event full screen at the booth, where guests use it on their own. | The booth on the wedding day. |
A studio does not stand alone: every template you build ends up inside an event, and an event with no templates cannot be launched. There are two ways to get a template into an event:
- From inside the event — in the event's Templates section, click Create in Studio, design the template, then click Save & Return. Best for templates made for one occasion.
- From the Studio menu — open a studio from the main menu, design and save the template file (or save it to the Template Gallery), then add it to any event with Open File or From Gallery. Best for templates you reuse across many events.
See Templates for every way to add and manage templates, and Studio basics for what all studios have in common.
Module map
The main menu on the left side of the window gives you these modules:
| Module | What you do there | Read more |
|---|---|---|
| Home | Your dashboard: license summary, cloud subscription, version history with updates, guides and tips. | Interface tour |
| Event | Create, edit, launch, back up, archive and analyze events. | Events overview |
| Studio › AI Offline | AI on the booth computer: Face Swap and AI image generation. | AI Offline Studio |
| Studio › AI Online | AI images and video through an online AI service. | AI Online Studio |
| Studio › Photo | A single photo with frame, background removal and face restoration. | Photo Studio |
| Studio › Collage | Layered layouts: several photos, text, images and frames on one canvas. | Collage Studio |
| Studio › Motion | Video: boomerang, 360, clip sequences with transitions and music. | Motion Studio |
| Studio › Lenticular | Interlaced images for lenticular printing. | Lenticular Studio |
| Studio › Flipbook | Turns a short video into printable flip book pages. | Flipbook Studio |
| Studio › Augmented Reality | Guests pose with an animated character. | AR Studio |
| Studio › Automation | Watches a folder and processes every new photo automatically. | Automation Studio |
| Gallery | Browse every result and camera photo on this computer. | Gallery |
| Settings | App-wide options: folders, appearance, camera, printer, sharing, quality and AI device. | First-time setup |
| About | Version, updates and license management. | Installation |
Which studios appear depends on your edition (see below).
Editions: Basic, Advanced and Pro
Q-Booth comes in three editions. They share the same Event Editor, page designer, sharing and printing features — the difference is mainly the AI features and the hardware they need.
| Feature | Basic | Advanced | Pro |
|---|---|---|---|
| Photo, Collage and Motion Studio | Included | Included | Included |
| Lenticular, Flipbook and Augmented Reality Studio | Add-on | Add-on | Included |
| AI background removal | Included | Included | Included |
| AI Online Studio (online generative AI) | — | Included | Included |
| AI Offline Studio | — | Face Swap only | All AI templates |
| Face Swap (offline) | — | Included | Included |
| Offline generative AI (works for group photos) | — | — | Included |
| Automation Studio | — | Included | Included |
| Event Editor, Template Gallery, QR sharing without internet | Included | Included | Included |
| Cloud Sharing | 1 year included | 1 year included | 1 year included |
| Graphics card | Not required (runs on the processor) | Not required (runs on the processor) | NVIDIA RTX with 8 GB VRAM required |
Some extras, such as kiosk payment and white label, are sold as add-ons for any edition. Your edition and add-ons are shown on Home and in About. When you create a template from inside an event, the studio picker only lists the studios your license allows.
Pro needs a supported NVIDIA graphics card for its offline AI. Check System requirements before you choose an edition or a computer.
Easy Mode and Expert Mode
Q-Booth has two interface modes. Switch between them with the button at the bottom of the main menu: Switch to Easy mode or Switch to Expert mode.
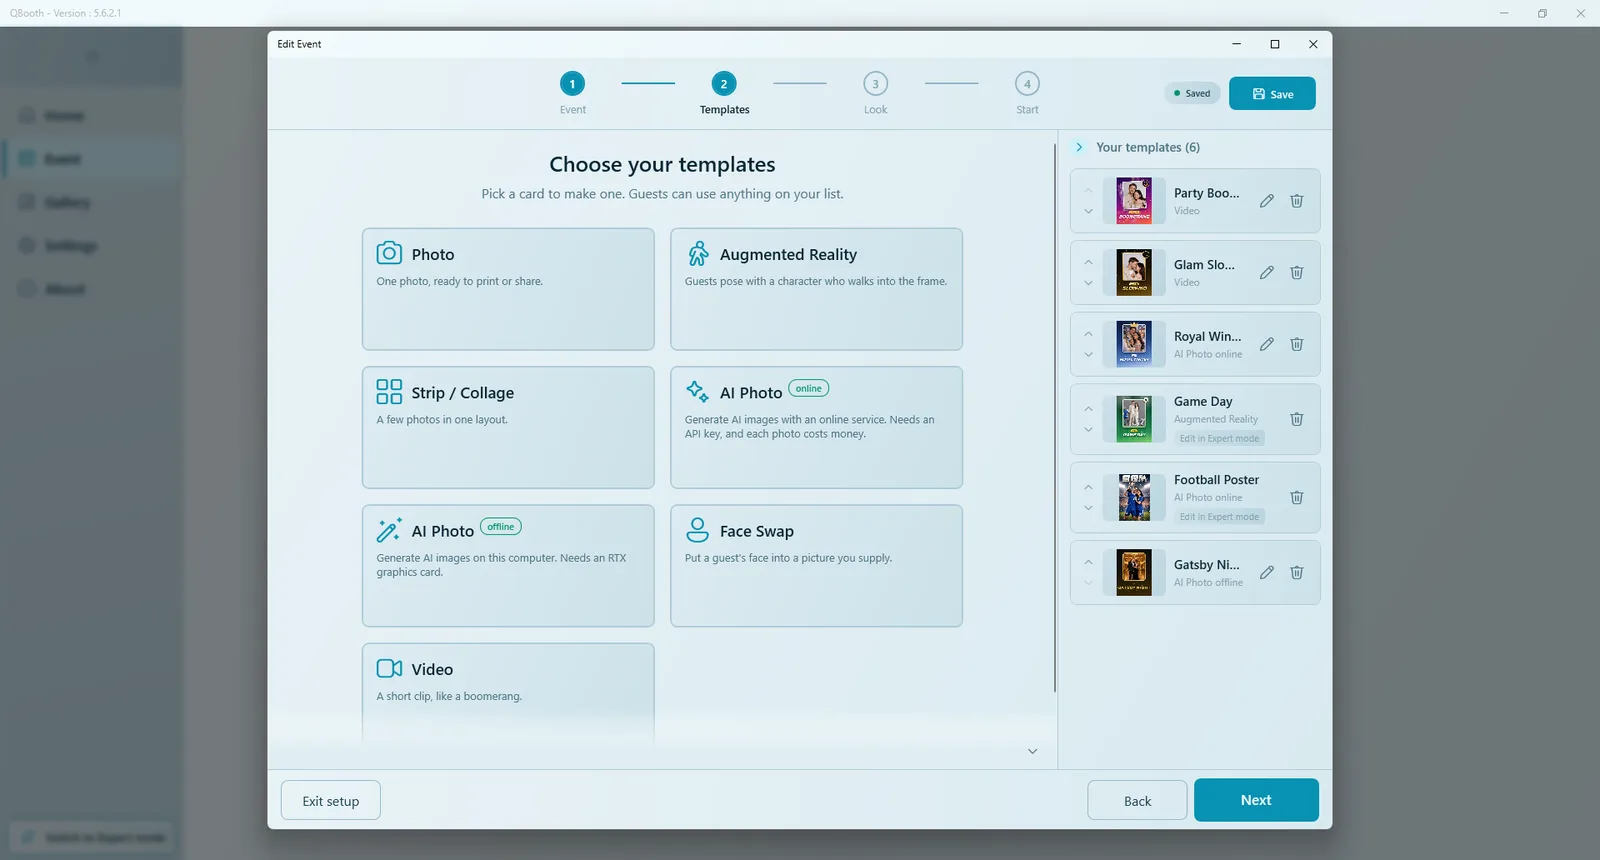
| Easy Mode | Expert Mode | |
|---|---|---|
| Best for | New users and simple events | Full control and advanced designs |
| Creating an event | A four-step wizard: Event, Templates, Look, Start | The full Event Editor with every section |
| Making templates | Simple cards: Photo, Strip / Collage, AI Photo, Face Swap, Augmented Reality, Video | Every studio with all options |
| Main menu | Shorter menu without the Studio group | All modules and studios |
| Settings window | Opens with the essential sections; tick Show all settings for the rest | Opens with every section |
Both modes work on the same events and templates. If an event uses features that Easy Mode cannot show (for example categories or a background video), Easy Mode can still start or delete it; to change it, switch to Expert Mode. If a booth should always stay in one mode, hide the switch in Settings › General with the Mode switch option.
How to use this help center
- New to Q-Booth? Read the Getting Started articles in order: System requirements, Installation, Interface tour, First-time setup and Quick start.
- Setting up hardware? Go to the Settings & Hardware section (camera, printer, sharing).
- Building an event? The Events and Sharing, Kiosk & Reports sections cover every part of the Event Editor.
- Designing templates? Each studio has its own article in the studio sections.
- Something not working? Start with Troubleshooting and the FAQ.
Button and menu names appear like this, exactly as they read in the app in your language. A path such as Settings › Hardware means "open Settings, then the Hardware section".
Next steps
Still need help?
Our team answers on WhatsApp. Tell us your Q-Booth version and what you see on screen.