Event settings
Set an event's name, result delivery, folders, screen ratio, monitor and exit PIN, and back up, reset or delete it safely.
The GENERAL group of the Event Editor holds the event's basic setup: its name and screen, how guests receive their result, where files are saved, how staff leave the booth, plus backup, reset and the event's own photo gallery. Set these first, right after creating an event.

Chapters (12)
Before you start
- Create the event or open it with Edit (see Events overview).
- Connect the booth monitor you will use at the venue, so it appears in OUTPUT MONITOR.
- If guests should get their photo by QR code or email, set up QR Web and email first in Settings › QR Share.
GENERAL › Settings
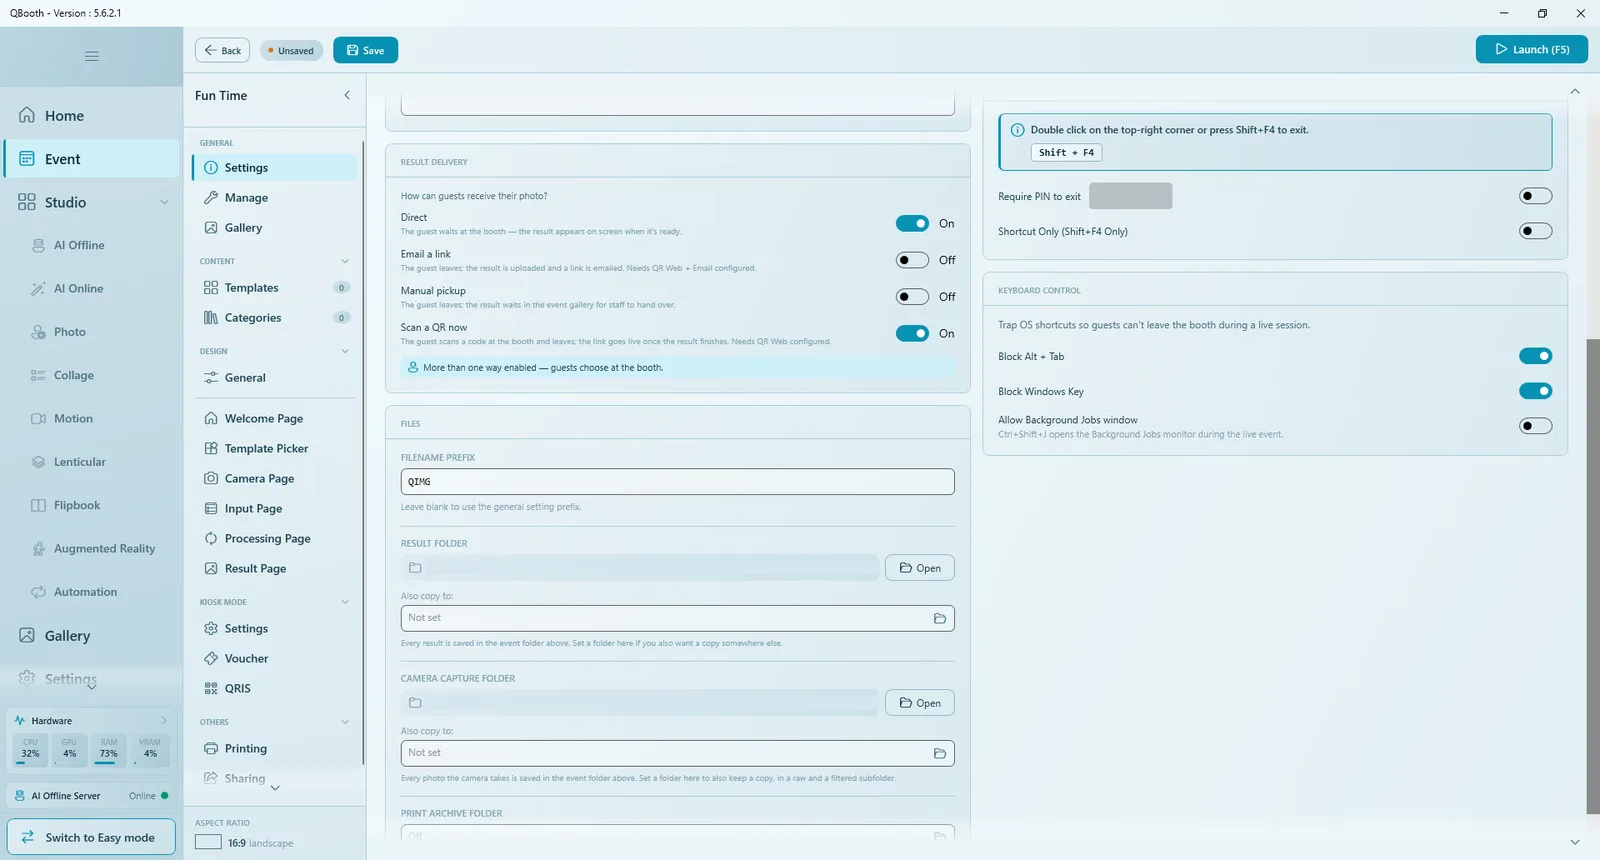
Click GENERAL › Settings. The page has boxes for identity, result delivery, files, display, exit access and keyboard control. Remember to click Save after changing anything.
Identity
| Field | What it does |
|---|---|
| EVENT COVER | The picture on the event's card in the event list. Click Select Image to choose one; the cross removes it. |
| EVENT NAME | The name you see in the event list. You can change it at any time. |
| EVENT ID | Created automatically and used as the event's folder name. It cannot be changed after creation. |
Result Delivery
Under RESULT DELIVERY (How can guests receive their photo?) switch on one or more ways:
| Option | What happens | Needs |
|---|---|---|
| Direct | The guest waits at the booth; the result appears on screen when it is ready. | Nothing. |
| Email a link | The guest leaves; the result is uploaded and a link is emailed to them. | QR Web and email configured. |
| Manual pickup | The guest leaves; the result waits in the event gallery for staff to hand over. | Nothing. |
| Scan a QR now | The guest scans a code at the booth and leaves; the link goes live once the result is finished. | QR Web configured. |
- One option on: it is used without asking.
- More than one on: the editor shows More than one way enabled — guests choose at the booth. At runtime guests see How would you like your photo? with buttons such as Wait here, Email it to me, Get it later and Scan a QR.
- Every result is always saved in the event gallery, whatever the guest chooses.
- If an option needs QR Web or email that is not set up, the editor shows a warning. When QR Web uses FTP, Scan a QR now works only for AI Online and AI Offline templates; other templates fall back to Direct.
Leaving-early options are most useful for slow templates such as AI, so the queue keeps moving. Each template can follow the event setting or use its own choice: open its gear icon in Templates and choose Use event setting or Custom under Result Delivery.
Files
| Field | What it does |
|---|---|
| FILENAME PREFIX | Text at the start of every result file name. Leave blank to use the prefix from Settings › General. |
| RESULT FOLDER | Every result is saved inside the event folder; Open shows it in File Explorer. Also copy to: writes an extra copy of each result to another folder (for example a shared or synced folder). |
| CAMERA CAPTURE FOLDER | Every photo the camera takes is saved in the event folder. Also copy to: keeps an extra copy elsewhere, in a raw and a filtered subfolder. |
| PRINT ARCHIVE FOLDER | Set a folder to keep a digital copy of every print. |
The event folders are created when the event is saved for the first time, so Open works only after saving.
Display
| Field | What it does |
|---|---|
| ASPECT RATIO | The screen shape of the booth: 16:9 (1920×1080), 4:3 (1920×1440), 3:2 (1920×1280), 1:1 (1920×1920), 9:16 (1080×1920), 3:4 (1440×1920), 2:3 (1280×1920), or Custom. |
| OUTPUT MONITOR | The screen the booth runs on. Its resolution and shape are shown below the list as a check. |
Choose the ratio that matches how the booth monitor stands: landscape (for example 16:9) or portrait (for example 9:16). It is the canvas size of every page in the Page Designer and decides which overlay frame is used. Set it before you design the pages.
Exit Access
By default staff leave the running booth with a double click on the top-right corner or Shift + F4. Esc is disabled on purpose.
| Option | What it does |
|---|---|
| Require PIN to exit | Asks for a PIN before leaving. Type the PIN in the field next to the switch. |
| Shortcut Only (Shift+F4 Only) | Turns off the corner double click, so only the keyboard shortcut works. Useful on touch screens where guests might tap the corner. |
Write the exit PIN down somewhere safe before the show. Without it you cannot leave the booth screen.
Keyboard Control
Blocks system shortcuts so guests cannot leave the booth during a live session.
| Option | What it does |
|---|---|
| Block Alt + Tab | Guests cannot switch to another program. |
| Block Windows Key | Guests cannot open the Start menu. |
| Allow Background Jobs window | Lets staff open the Background Jobs monitor with Ctrl + Shift + J during the live event. |
GENERAL › Manage
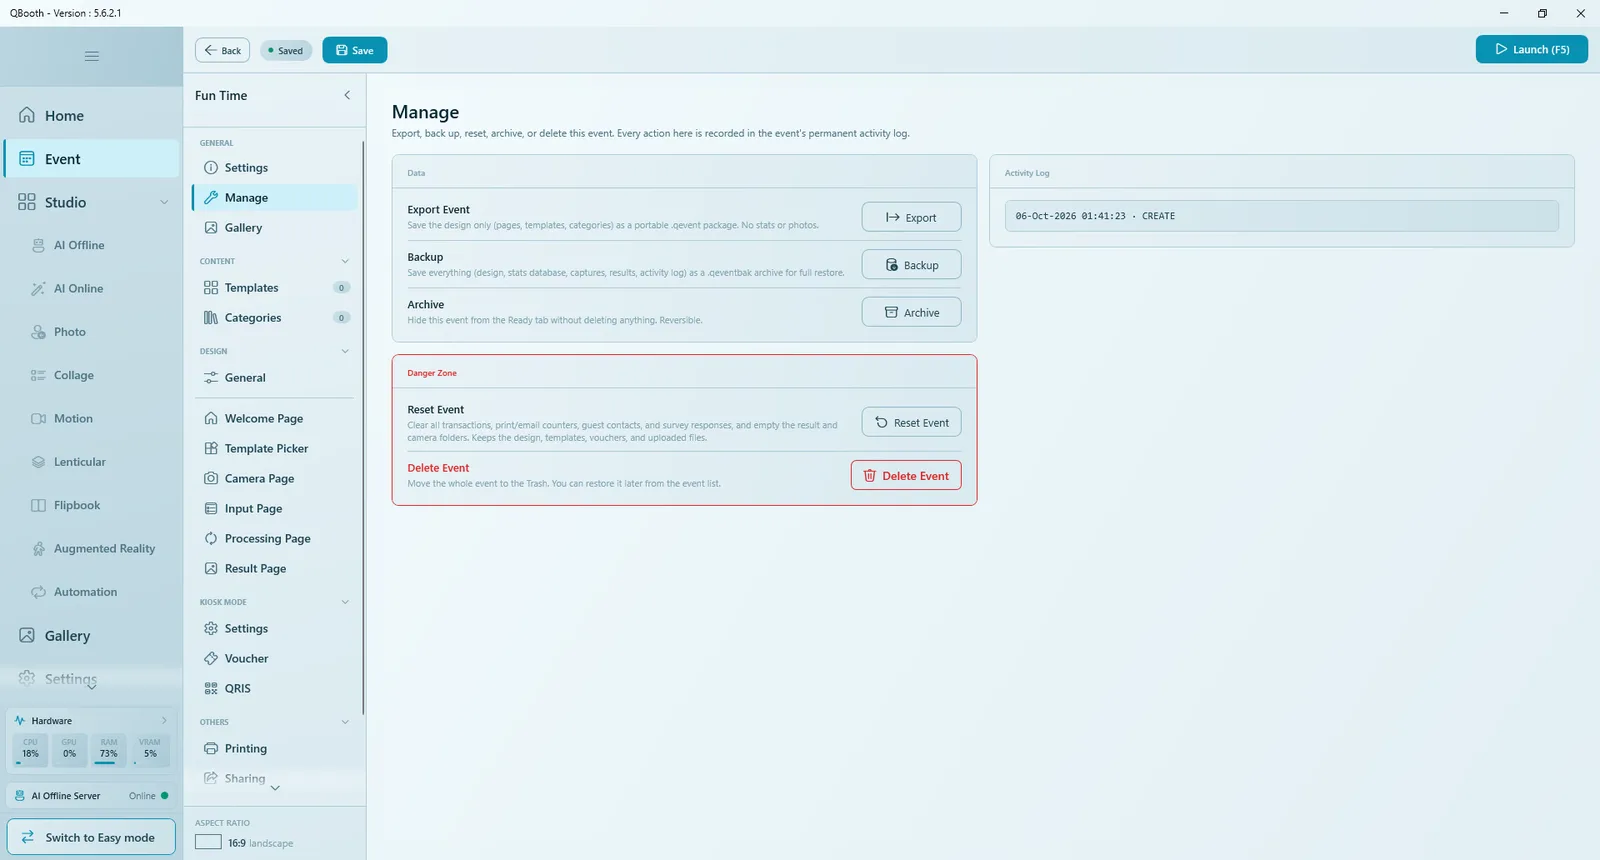
Manage keeps your event safe. Every action here is recorded in the event's permanent activity log.
Data
| Action | What it saves | Use it for |
|---|---|---|
| Export Event (Export) | The design only (pages, templates, categories) as a .qevent package. No statistics, no photos. | Reusing the setup on another computer or for another client. |
| Backup | Everything (design, statistics database, captures, results, activity log) as a .qeventbak archive. | Full recovery, and before every show or reset. |
| Archive | Nothing is deleted; the event is hidden from the Ready list. Reversible. | Tidying up finished events. |
Exported and backed-up events come back in through the event list: … › Import from File… for a .qevent, Restore from Backup for a .qeventbak. When a backup has the same Event ID as an existing event, Q-Booth asks whether to overwrite it or restore it as a separate copy. Save the event before exporting.
Danger Zone
| Action | What it does |
|---|---|
| Reset Event | Clears all transactions, print and email counters, guest contacts and survey answers, and empties the result and camera folders. Keeps the design, templates, vouchers and uploaded files. Use it to start a new day or a new client with the same setup. |
| Delete Event | Moves the whole event to the Trash. You can restore it from the event list; the Trash is emptied automatically after 30 days. |
Both actions ask you to type a number shown on screen to confirm.
Reset Event permanently deletes the result photos in the event folder. Run Backup first.
Activity Log
A permanent record of important actions on the event (for example CREATE, SAVE, EXPORT), each with date, time and the files involved. Useful to check when an event was backed up or reset.
GENERAL › Gallery
The event gallery shows every photo and video made at this event, including results kept for Manual pickup.
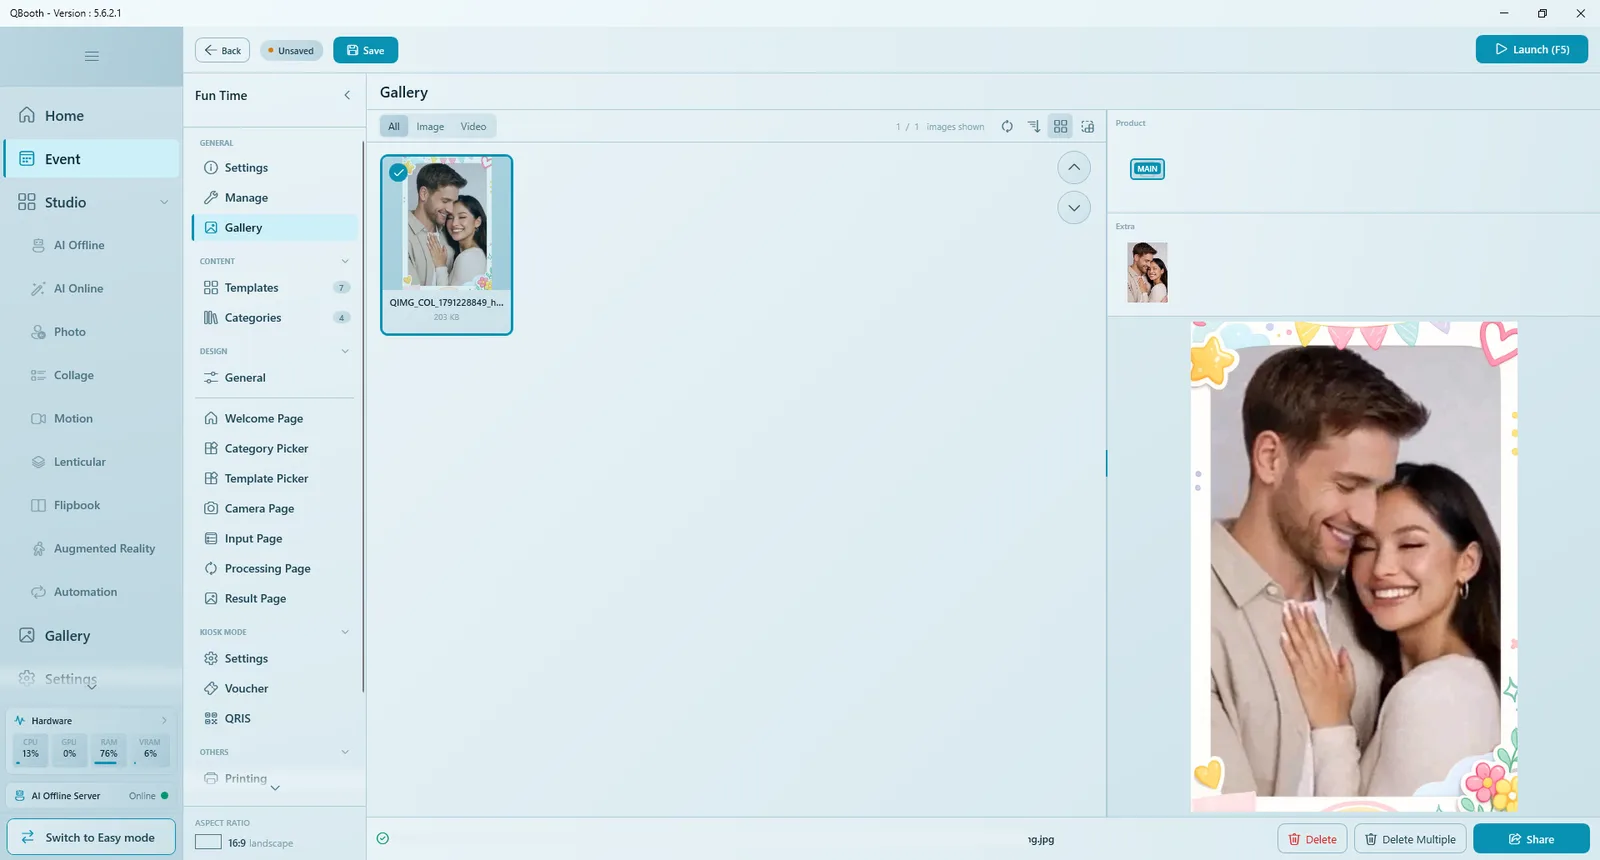
- Filter by All, Image or Video; the counter shows how many items are displayed.
- Click a thumbnail to preview it. The file name of the selected item is shown at the bottom.
- Share sends a result to a guest again (for example a QR code with the photos of a session); Delete and Delete Multiple remove results that did not work out.
Staff can also open this gallery while the booth is running, if Gallery Access is enabled on the Welcome page (see Page Designer › Page tab). The app-wide gallery for all events is described in Gallery.
Best practice
- Set the aspect ratio and output monitor first, then design.
- Before every show: Backup, test with Launch (F5), leave with Shift + F4, and keep the exit PIN somewhere safe.
- For several days with the same setup: Backup at the end of each day, then Reset Event the next morning.
- Use Also copy to: on the result folder if a second screen, a slideshow or a cloud sync folder should receive the photos.
Common problems
The editor shows a warning next to Email a link or Scan a QR now.
QR Web (and, for email, an email method) is not set up yet. Configure it in Settings › QR Share. Until then the result still goes into the event gallery.
The booth opens on the wrong screen.
Choose the right screen in OUTPUT MONITOR, save, and launch again. Check that Windows detects the monitor before you open Q-Booth.
I cannot leave the booth.
Press Shift + F4 (not Esc). If Shortcut Only is on, the corner double click does not work. If Require PIN to exit is on, enter the PIN set here.
The Open button says to save the event first.
The event folders are created on the first save. Click Save, then Open again.
Next steps
Still need help?
Our team answers on WhatsApp. Tell us your Q-Booth version and what you see on screen.