Event Overlay (Frames)
Add a frame to every photo of an event, and know when to use the event, global, template or collage frame.
An overlay is a frame image laid over every finished photo, such as a border with the event logo, date or hashtag. On the event's Overlay page you set one frame per photo shape for this event only. This article also explains how it differs from the global overlay in Settings and from a frame designed inside a Collage template.

Chapters (11)
Three places to put a frame
Q-Booth has three overlay levels and one design technique that people often mix up with them.
| Where | Applies to | Typical use |
|---|---|---|
| Settings › Overlay & Filters (global overlay) | Every template on this computer whose overlay is left on Default, when no event frame replaces it. | Your own studio branding, used at every job. See Overlay & filters settings. |
| OTHERS › Overlay inside an event (event overlay) | Every template in this event whose overlay is left on Default. | The client's frame for one event: wedding names, company logo, hashtag. Covered in this article. |
| The OVERLAY group inside a studio (template overlay) | That one template only. | A template that needs a special frame of its own, or no frame at all. |
| A frame PNG as the top Image File layer of a Collage template | That collage design only. | Photo strips and multi-photo layouts where the photos must sit in the frame's holes. This is part of the design, not an overlay. See Collage Studio. |
Which one wins
From strongest to weakest: template overlay → event overlay → global overlay.
- In each studio, the template's OVERLAY group has three choices: Default (follow the event's overlay when the template runs in an event, otherwise the global one), Disabled (no overlay for this template) and Custom (this template's own overlay image).
- A template set to Custom keeps its own frame, even when the event has an overlay.
- A template set to Disabled never gets a frame from the event or from Settings.
Collage frame or overlay?
For a collage or photo strip, the transparent frame PNG belongs inside the Collage template, not in Overlay:
- Add the frame PNG as an Image File layer at the top of the layer list.
- Put the photo layers (for example Plain Photo) below it.
- Size and place each photo layer so it fills one hole of the frame.
This way the photos are cut to the frame's slots exactly, and you see the result on the Collage canvas. An overlay, by contrast, is laid over the finished result at render time and is not shown on the studio canvas. Use the event overlay for a general border that fits every template; use the collage frame when the layout depends on it.
If a Collage template already has its frame as an image layer, set that template's OVERLAY to Disabled, or make sure the event overlay is not used for it. Otherwise the event frame is stacked on top of the collage frame.
Before you start
- Prepare one PNG per photo shape your templates produce, with a transparent area where the photo should show through.
- Make each file the same size as the output of that shape (for example 1280×1920 for a 2:3 portrait), so it is not stretched.
- Check which shapes your templates use in CONTENT › Templates. The event's screen ratio (16:9 and so on) is not the same as the photo ratio.
Set up the event overlay
- Open the event and go to OTHERS › Overlay.
- In the row of the matching shape, click Choose file and select your PNG. A thumbnail replaces No overlay set.
- Repeat for every shape your templates use. Optionally add a file in the Default row as a fallback.
- Turn on Enable overlay by default.
- Click Save, then test with Launch (F5) and check the finished photo.
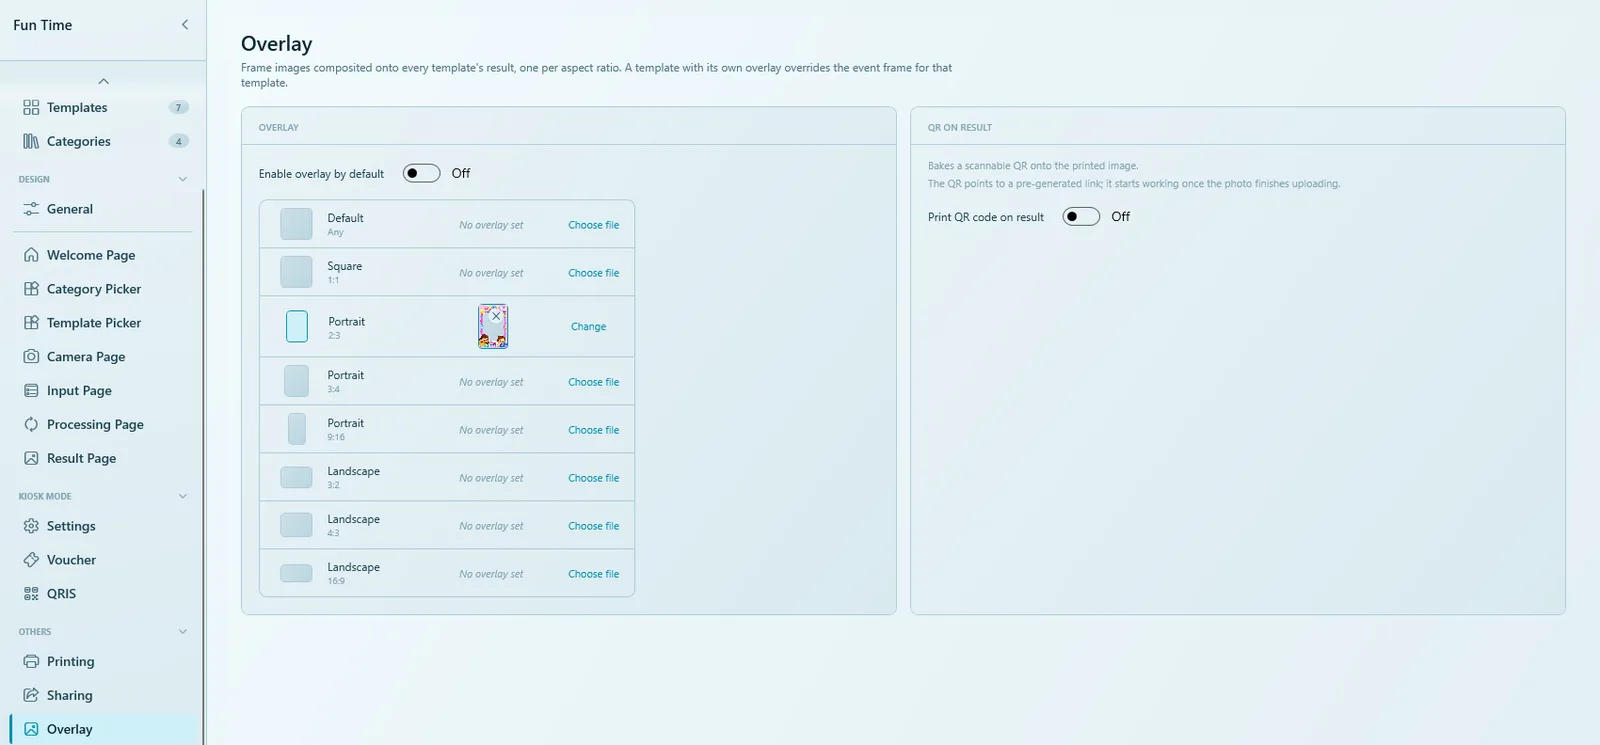
To replace a frame, click Change. To remove it, click the small cross on its thumbnail.
Overlay slots
| Slot | Ratio | Used for |
|---|---|---|
| Default | Any | Results whose shape has no file of its own. |
| Square | 1:1 | Square results. |
| Portrait | 2:3, 3:4, 9:16 | Upright results, one slot each. |
| Landscape | 3:2, 4:3, 16:9 | Wide results, one slot each. |
The slot is picked by the shape of the template's result, so one event can mix portrait and landscape templates and each gets the right frame.
QR on Result
The same page has the QR on Result group with the Print QR code on result switch, which prints a download QR code onto the photo. It is explained in Sharing & printing.
When to use which
- Same branding at every job → global overlay in Settings.
- A frame for this client or this event → event overlay (this page).
- One template needs something different → that template's OVERLAY set to Custom or Disabled.
- Photo strip or collage with holes for the photos → frame PNG as the top Image File layer in Collage Studio.
Common problems
The frame does not appear on the photos.
Check that Enable overlay by default is on, that the slot for the template's photo shape (or Default) has a file, and that the template's OVERLAY is not set to Disabled or Custom.
The frame looks stretched or blurry.
The PNG does not match the result's shape or size. Make one file per shape at that shape's output size.
The frame covers the faces.
The photo area of the PNG must be transparent. Re-export the frame with a transparent centre (PNG, not JPG).
A collage shows two frames on top of each other.
The collage already has its frame as an image layer. Set that template's OVERLAY to Disabled.
I can't see the overlay in the studio editor.
That is normal. Overlays are applied when the result is made. Run a test with Launch (F5) or process a photo in the studio to see it.
Next steps
Still need help?
Our team answers on WhatsApp. Tell us your Q-Booth version and what you see on screen.