Collage Studio
Build photo strips and multi-photo print layouts with a frame layer, photo slots, text, QR codes and AI layers.
Collage Studio arranges several elements (photos, a frame, text, a QR code, even AI results) on one layered canvas. Use it for photo strips, two- or four-box frames, "original + AI" prints and any custom print layout.

Chapters (17)
- 0:00Intro
- 0:16What you'll make
- 0:34Open Collage Studio & canvas 2:3
- 0:51The frame is the top layer
- 1:11Overlay vs frame
- 1:33Original photo in the top slot
- 1:50Duplicate → AI Online
- 2:02Template Gallery: Cloud → Superhero
- 2:19One photo, two looks
- 2:38Process, result & save
- 2:59Photo strip with Layer Result
- 3:35Print & cut into two strips
- 3:50Strip by cloning: one 2×6 strip
- 4:12Output clone: Tile right
- 4:29Clone result
- 4:41At an event
- 4:53Three things to remember
How a collage is built
A collage works like a stack of transparent sheets. The top row of the layer list is the front of the picture.
- Your frame design is a PNG with transparent holes. It goes in an Image File layer at the top of the list, covering the whole canvas.
- The photo layers sit below the frame, each one sized to a hole. Whatever is underneath shows through the holes.
- Each photo layer with its own input becomes one shot at the booth. Four photo layers = four shots, automatically. There is no separate "number of shots" setting.
Do not put the collage frame in Overlay. Overlay is a separate image laid over the finished result (global in Settings, or per template). The collage frame belongs in the top Image File layer.
Open Collage Studio
Open Studio › Collage. A new collage already has an empty canvas (2:3 Portrait) with one Plain Photo layer.
- Left: Template (Open, Save, Notes), Canvas, Overlay, QR Overlay, Camera Filter, Event, Options.
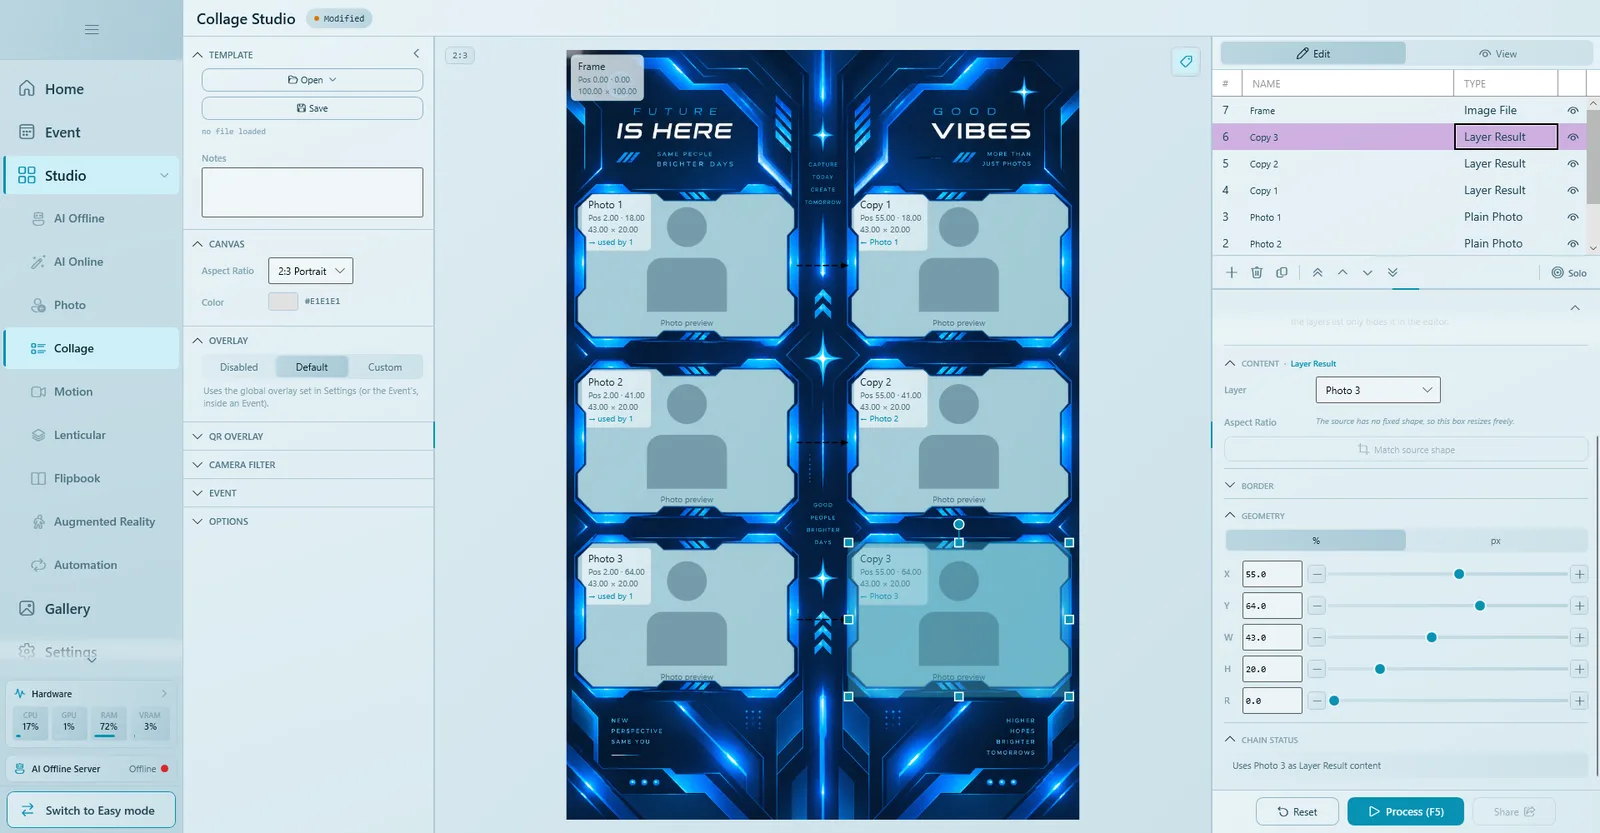
- Middle: the canvas. Each layer shows its name, position and size; drag it or its handles directly.
- Right: Edit / View tabs, the layer list (#, NAME, TYPE) with its toolbar, and the settings of the selected layer.
Set up the canvas first
- In Canvas, pick an Aspect Ratio (1:1, 2:3, 3:4, 9:16, 3:2, 4:3, 16:9), or Custom Size and type Width and Height in pixels.
- Pick the base Color of the canvas.
Changes apply immediately. A 4×6 inch print is 2:3 Portrait; a single 2×6 strip is Custom Size 600 × 1800.
Decide the canvas shape before positioning layers. Positions are stored as percentages, so changing the canvas shape later changes how every layer looks.
Work with layers
The toolbar under the layer list has: Add layer (+), Delete layer, Clone layer (duplicate), Move to top, Move up, Move down, Move to bottom and Solo. You can also drag rows to reorder them.
- + (Add layer) adds a new Image File layer at the top of the list and selects it.
- Solo shows only the selected layer on the canvas while you work.
- Edit is for arranging; View shows the finished result after Process.
Two kinds of "hide"
| Control | Effect |
|---|---|
| Eye icon on a layer row | Hides the layer in the editor only, while you work. Not saved, no effect on the print. |
| Visibility switch (Show / Hide) in Layer Settings | Really removes the layer from the final result, and is saved in the template. |
Layer types
| Type | What it does |
|---|---|
| Plain Photo | A photo of the guest, without AI. Can have its own background change and Face Restoration. |
| Studio Template | Runs a saved studio template inside the layer: Photo Studio, AI Online, AI Offline or Face Swap (Studio Type). |
| Faceswap | A photo with the face swapped onto a target picture you choose (requires a license that includes Face Swap). |
| Image File | A fixed picture that is the same on every print: your frame, a logo, a background. |
| Layer Result | Mirrors the finished result of another layer in this collage (for duplicate strips, before/after boxes). |
| Static Text | Fixed text, shown exactly as typed (event name, date). Has its own font settings. |
| User Input Text | The guest types (or picks) text at the kiosk, and it appears on this layer. |
| QR Code | The QR code guests scan to open their photos online. The link is created when the photo is processed; the layer is always square. Requires Web QR to be set up (see QR & sharing). |
Layer settings
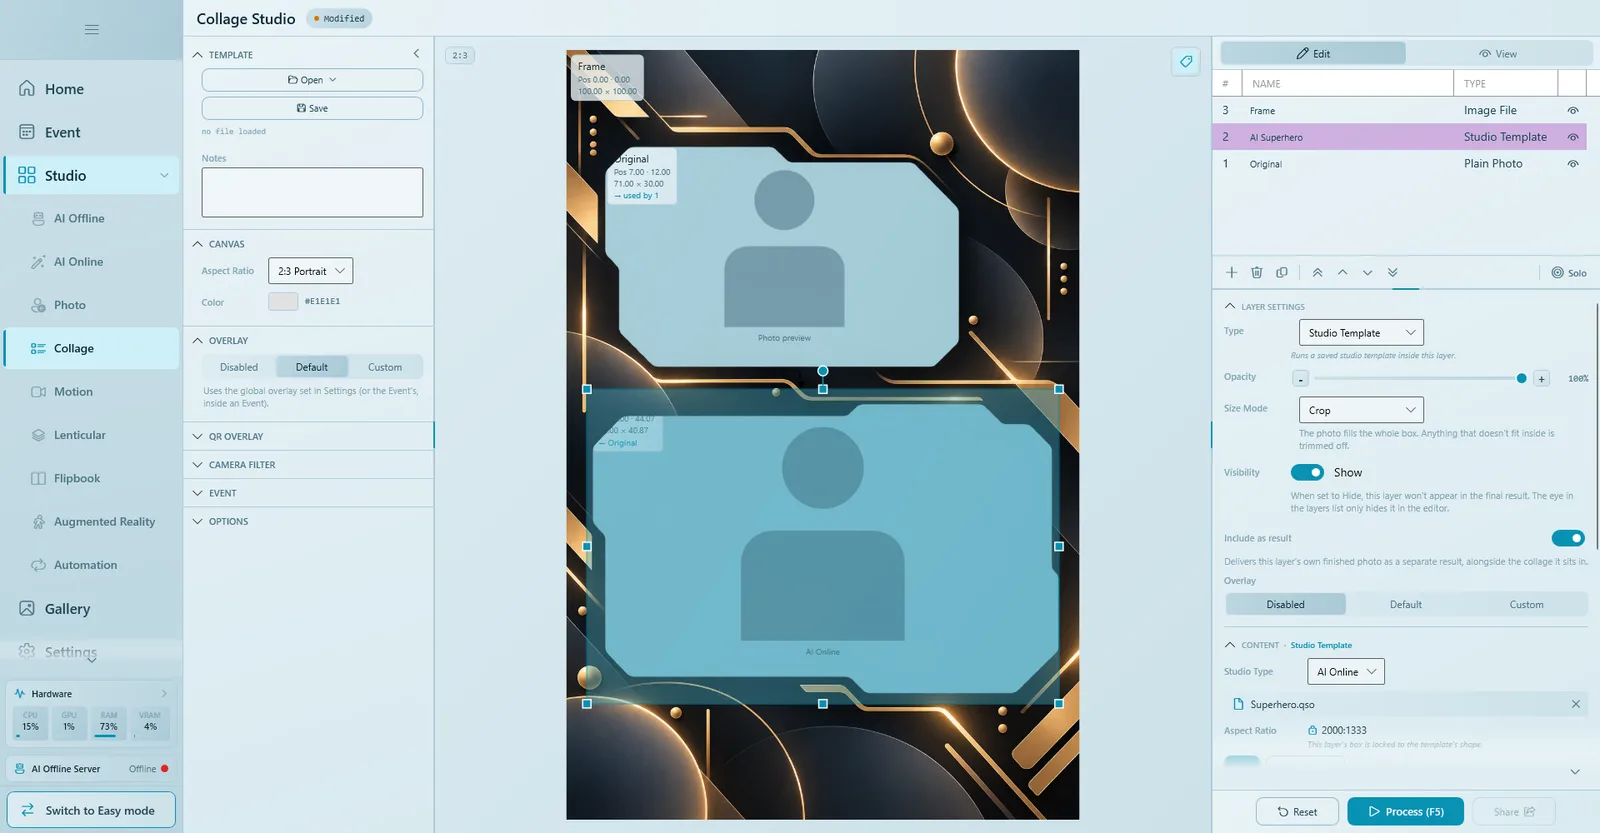
| Setting | What it does |
|---|---|
| Type | The layer type (see above). The Content section below changes with it. |
| Opacity | 0–100%. |
| Size Mode | Crop: the photo fills the whole box; what does not fit is trimmed. Fit: the whole photo is placed in the box; a different shape leaves empty edges. |
| Visibility | Show / Hide in the final result. |
| Include as result | (Photo layers) Delivers this layer's own finished photo as a separate result, next to the collage. It has its own Overlay choice. |
| Content | Depends on the type: an image picker for Image File, a text box for Static Text, Aspect Ratio, Background and Face Restoration for Plain Photo, and so on. |
| Border | Enabled, Size, Position (Inside / Outside / Center), Radius (rounded corners) and Color. |
| Geometry | X, Y, W, H and R (rotation), in % or px. Type values, use the sliders, or drag and rotate on the canvas. |
A layer with a fixed shape (a photo with a set aspect ratio, or a QR code) keeps its shape: typing the width also changes the height.
Where a photo layer gets its photo
Plain Photo, Faceswap and Studio Template layers have a Source Image section with Input Image:
| Input Image | Meaning |
|---|---|
| Independent | This layer takes its own fresh photo from the camera (one shot per layer). |
| From another layer Input | Uses the same raw photo as the layer you pick. One shot, two looks: for example the original photo and an AI version of it. |
| From another layer Result | Uses the finished (processed) result of the layer you pick, and processes it further. |
An Independent layer has no image picker in the editor. Its photo is asked for later: when you press Process in the studio, or when a guest uses the template at the booth.
Chain layers with Layer Result
- Make sure you have a starting layer: a Plain Photo, Faceswap or Studio Template with Independent input (or an Image File).
- Add a layer and set Type to Layer Result.
- In Content, pick the source in Layer. Layers that would create a loop are hidden from the list automatically.
- Optional: click Match source shape to copy the source layer's aspect ratio (a one-time action).
- Check Chain Status under Geometry: it shows what this layer uses and which layers use it.
Always check Chain Status before deleting a layer. If other layers depend on it, Q-Booth asks first and then fixes them: layers that used its photo switch to Independent, and Layer Result layers become Plain Photo layers.
Worked example: a 4-photo strip
A classic 2×6 strip with four photos, printed twice on one 4×6 sheet. You need a strip frame PNG (600 × 1800 or the same 1:3 shape) with four transparent holes.
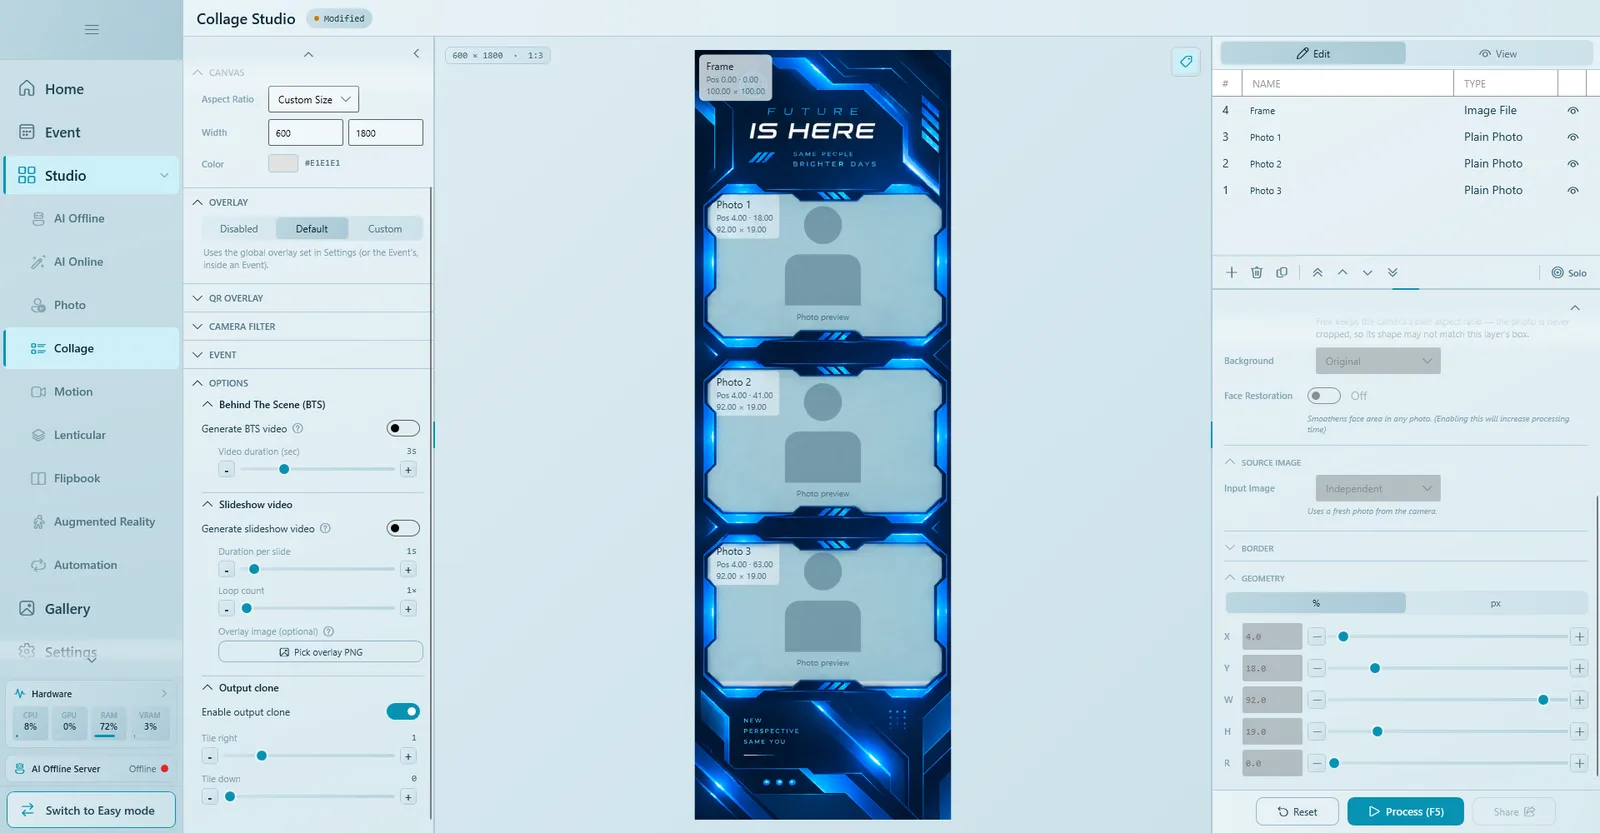
- Open Collage Studio. In Canvas, choose Custom Size and enter Width 600 and Height 1800.
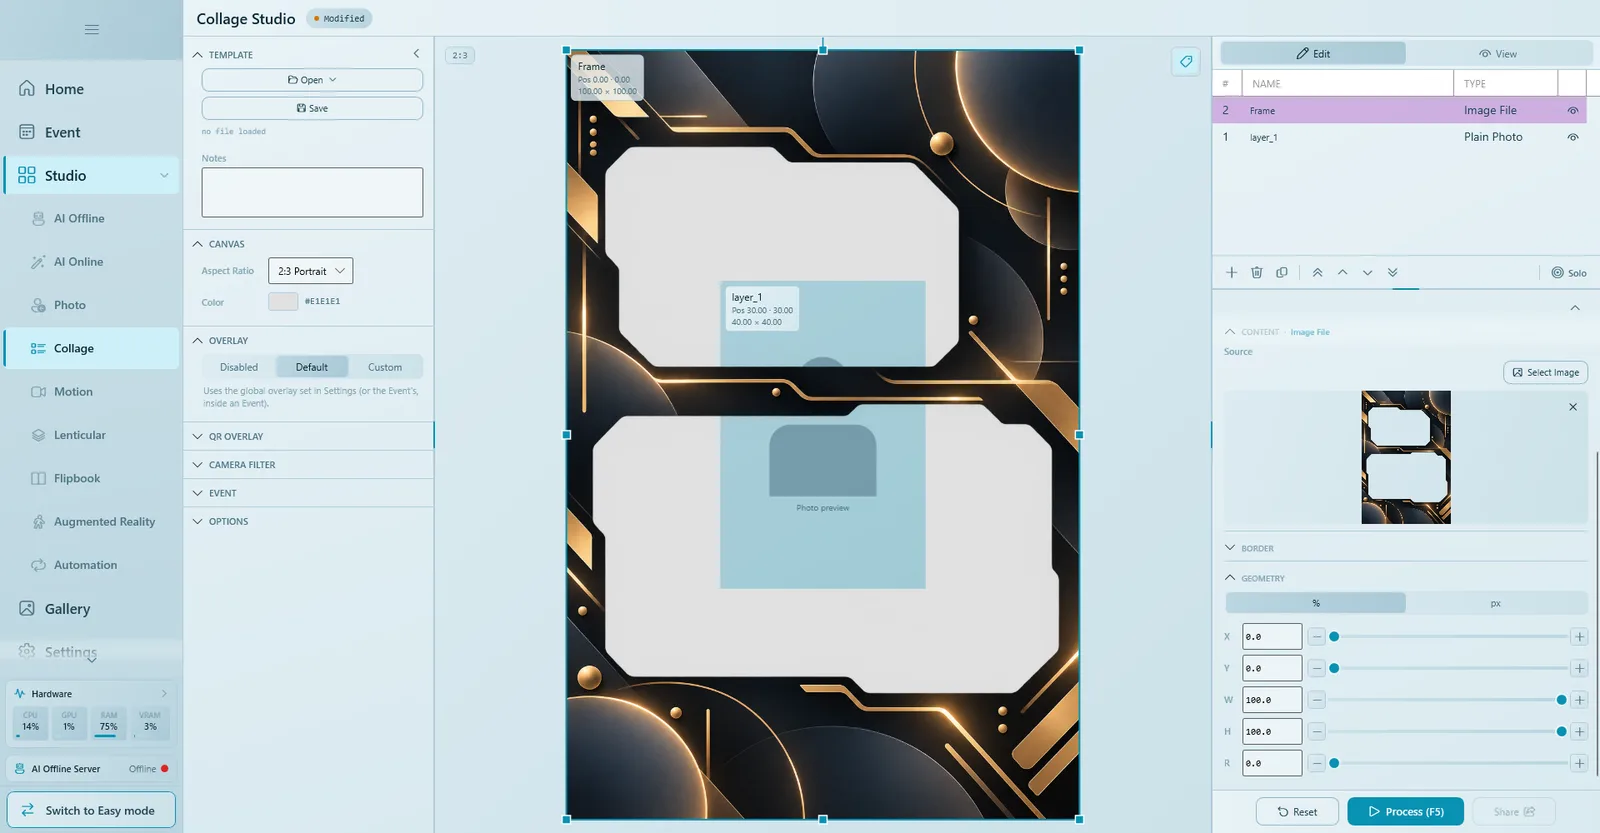
- Click + to add a layer. Keep Type = Image File, name it Frame, click Select Image and pick your strip PNG.
- Set the frame's Geometry to X 0, Y 0, W 100, H 100 so it covers the whole canvas. Keep it the top row.
- Select the existing Plain Photo layer, name it Photo 1, and drag or type its geometry so it fills the first hole (for example X 5, W 90, H 20; Y to match the hole). Choose Size Mode Crop.
- Use Clone layer three times to make Photo 2, Photo 3 and Photo 4, and move each copy down into the next hole by changing Y.
- Leave Input Image = Independent on all four, so each box is a separate shot.
- Make sure the frame is still above the four photos in the list (use Move to top if needed).
- Open Options › Output clone, turn on Enable output clone and set Tile right to 1. The output becomes 1200 × 1800: two identical strips side by side on a 4×6.
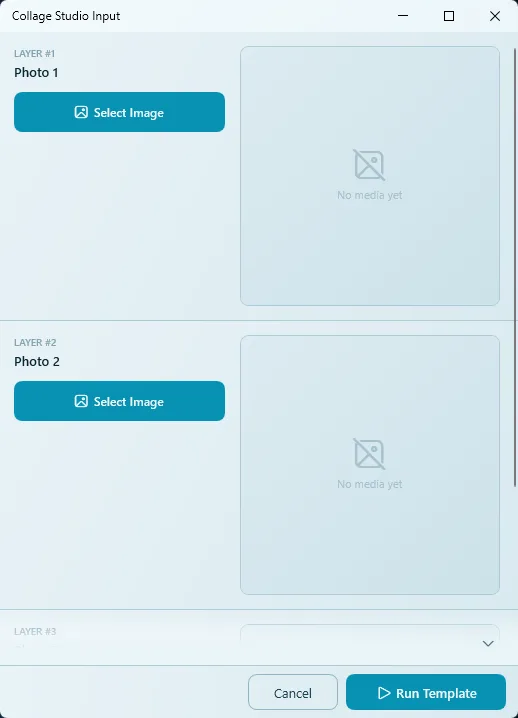
- Press Process (F5). The Collage Studio Input window asks for four photos, one card per layer. Use Select Image for each, then Run Template.
- Check the result in View, then Save.
If your frame has no printed edge around the holes, give each photo a thin white Border with a small Radius for the classic photo-strip look. Add a Static Text or QR Code layer in an empty margin if you like.
More layouts
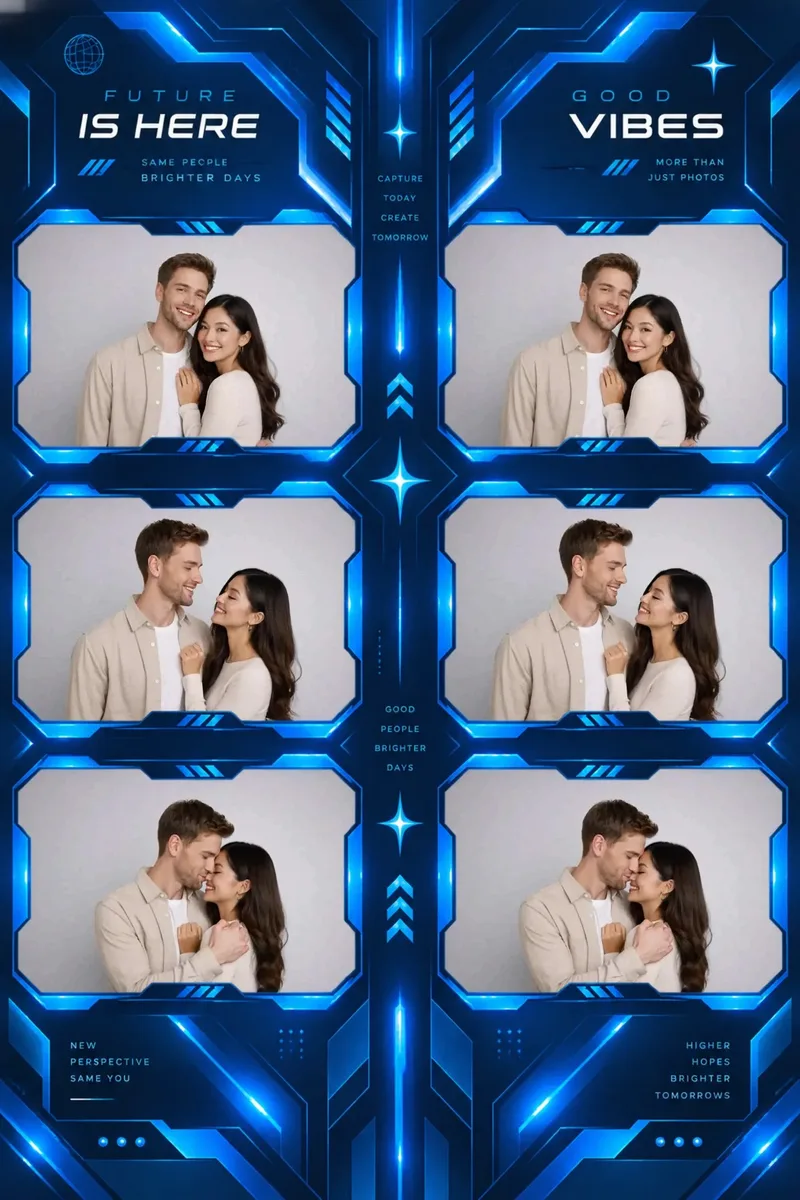
Two strips with Layer Result
Instead of Output clone, you can design both strips on a 2:3 canvas: three (or four) Plain Photo layers on the left strip, and the same number of Layer Result layers on the right strip, each pointing to the matching left photo. Process asks only for the left photos; the right strip mirrors them. Print one 4×6 and cut down the middle.
Original photo + AI version
- Frame PNG with two holes in the top Image File layer.
- A Plain Photo layer named Original in one hole.
- Clone it into the other hole, set Type to Studio Template and Studio Type to AI Online (or AI Offline).
- Click Open › From Gallery (tabs Local and Cloud) or Browse File..., choose a template and click Select Template. The layer box locks to the template's shape.
- Set Input Image to From another layer Input and pick Original. The guest takes one photo and gets both looks.
- Turn on Include as result if guests should also get the AI photo on its own.
Setting up AI Online itself (account, key, models) is covered in AI Online Studio.
Before/after or 2×2 grid
Use the same recipe on a square or landscape canvas and place the boxes side by side. If one box should show the result of another, use Layer Result or From another layer Result instead of Independent.
Options
| Option | What it does |
|---|---|
| Behind The Scene (BTS) › Generate BTS video | Records for the set Video duration (sec) while guests pose, and takes each layer's still from that clip. |
| Slideshow video › Generate slideshow video | A video cycling through the captured photos in the order they were taken. Set Duration per slide, Loop count and an optional overlay PNG. |
| Output clone | Enable output clone, then Tile right / Tile down to repeat the whole design. Clone variant: Same as original, Flip horizontal, Flip vertical or Rotate 180°. |
| Show layer info & chain lines | Shows layer labels and chain arrows on the canvas while editing. |
Overlay, QR Overlay and Camera Filter work the same as in Photo Studio.
Process and save
- Press Process (F5). If there are Independent layers, the Collage Studio Input window asks for one photo per layer (Open Image, Camera, Clipboard, gallery or recent), then click Run Template.
- The result opens in the View tab. Share exports, prints or shows a QR code.
- Under Event, add a Caption and a Cover image.
- Click Save. Collage templates are saved as
.qsc. From an event, use Save & Return.
Use it at an event
Add the .qsc to your event with Templates › Open File (see Templates). At the booth, the camera takes one shot per Independent layer, each with its own crop guide, fills the layout, and prints it with the QR code. In Easy Mode, the Strip / Collage card makes simple strips; Collage Studio gives you full control.
Tips
- Design the frame PNG at the exact canvas size (for example 1200 × 1800 for 4×6 at 300 dpi) so the holes line up.
- Give layers clear names (Frame, Photo 1, Photo 2…); the Process window and Chain Status use them.
- Use px in Geometry to type exact pixel positions taken from your design software.
- Keep the number of shots reasonable: every Independent layer is one more pose for the guest.
Common problems
The photo covers the frame.
The frame layer is not at the top. Select it and click Move to top. The top row is the front of the picture.
I cannot find where to choose the photo for a photo layer.
That is normal for Independent layers. The photo is asked for when you press Process, or taken by the camera at the event.
A layer is missing from the printed result.
Check its Visibility switch in Layer Settings. The eye icon in the list only affects the editor.
The QR Code layer is not printed.
Web QR is not set up yet. Set it up in Settings (see QR & sharing).
There are empty edges around a photo.
Size Mode is Fit. Switch to Crop, or set the photo's aspect ratio to match the box.
The layout looks stretched after I changed the canvas.
Positions are stored in percent. Set the canvas size first, then adjust the layers again.
Next steps
Still need help?
Our team answers on WhatsApp. Tell us your Q-Booth version and what you see on screen.