Automation Studio
Process every photo dropped into a hot folder with one template, automatically, with optional auto upload and auto print.
Automation Studio is a hot-folder processor. Point it at a folder, and every photo that lands there is run through one of your templates, one after another, without anyone touching the computer. It does not create templates; it applies one you already made.
Chapters (8)
Available in Advanced Pro
When to use it
- A camera or tethering app that saves photos into a folder.
- A roaming photographer whose photos arrive in a shared or network folder.
- Reprocessing a large batch of existing photos with the same template.
Automation runs on its own, outside any event. It is designed to take over the computer while it runs, so a dedicated PC works best.
Which templates work
| Works | Does not work |
|---|---|
Photo Studio (.qsp), Collage (.qsc), AI Online (.qso, image output only), AI Offline and Face Swap (.qsd) | Motion, Lenticular, Flipbook, Augmented Reality |
The template must also:
- need exactly one photo as input;
- need no typed text from the guest;
- produce an image, not a video (an AI Online template ending in video is rejected).
AI Online templates use credits for every file processed. Test your setup with a Photo Studio template first.
Set it up
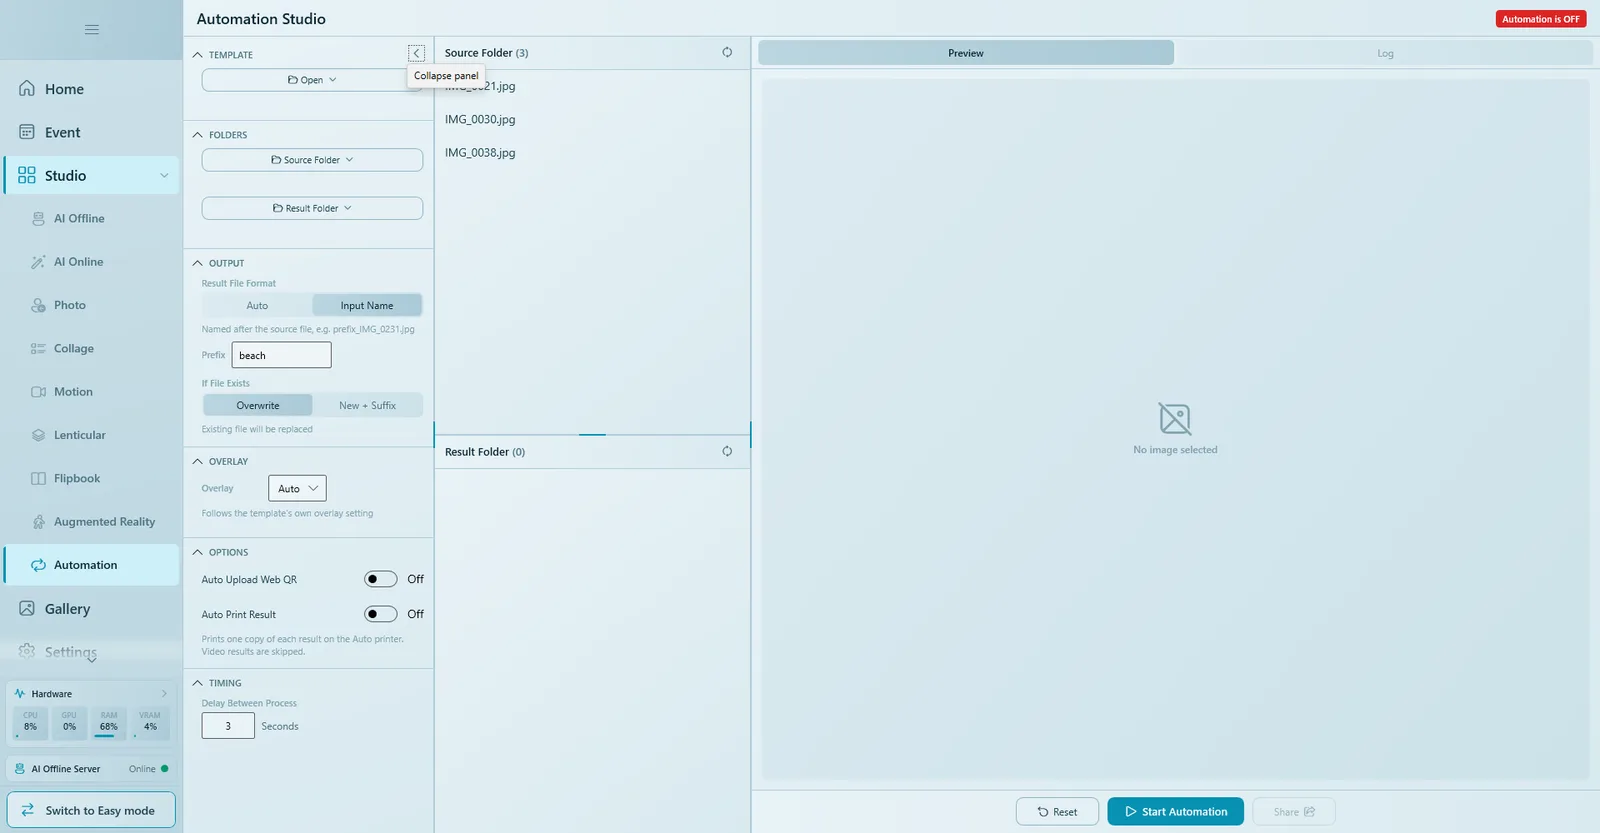
Open Studio › Automation. Settings are on the left, the Source and Result folder lists in the middle, and the Preview / Log tabs on the right. The badge at the top right shows Automation is OFF or Automation is ON.
1. Template
- Under Template, click Open.
- Choose From Gallery..., Browse File... or Recent Files.
- If the template does not meet the rules above, Q-Booth tells you why (for example "Template must need exactly one photo input to be used in Automation").
2. Folders
- Click Source Folder › Select Folder... and pick the folder where photos arrive. Recent Folders lists folders you used before.
- Click Result Folder › Select Folder... and pick where finished pictures go.
- Q-Booth reads
.jpg,.jpegand.pngfiles in the top level of the Source Folder, oldest first. - Each processed photo is moved into a
donefolder inside the Source Folder, so nothing is processed twice. A photo that fails is moved into anerrorfolder and the queue continues.
Automation moves your source photos. Always let it work on copies, never on your only originals.
3. Output (file names)
| Option | Result |
|---|---|
| Result File Format › Auto | A unique automatic name, for example event_1722244000_a3fd.jpg. |
| Result File Format › Input Name | Named after the source file with your Prefix, for example beach_IMG_0231.jpg. The prefix is required. |
| If File Exists › Overwrite | An existing file with the same name is replaced. |
| If File Exists › New + Suffix | A new file is created with a number suffix, for example beach_IMG_0231_1.jpg. |
4. Overlay
- Auto: follows the template's own overlay setting.
- Custom: replaces the template overlay with an image you pick (required in this mode).
- Off: no overlay at all, even if the template has one.
5. Options: auto upload and auto print
- Auto Upload Web QR: uploads every result for its QR link, using the upload method set in Settings › QR Share.
- Auto Print Result: prints one copy of each result on the Auto printer. Video results are skipped. Set up the printer first in printer settings.
Leave both switches off while you test. Auto Print uses real paper and Auto Upload really uploads, and Q-Booth remembers these settings.
6. Timing
Delay Between Process is the pause, in Seconds, before each photo is processed (minimum 1, default 5). A short delay keeps the computer from being overloaded and gives the operator time to pause.
Start Automation
- Click Start Automation. Q-Booth first checks your settings and refuses to start if the template, a folder, the prefix (for Input Name) or the custom overlay image is missing, or the delay is invalid.
- The badge turns green: Automation is ON.
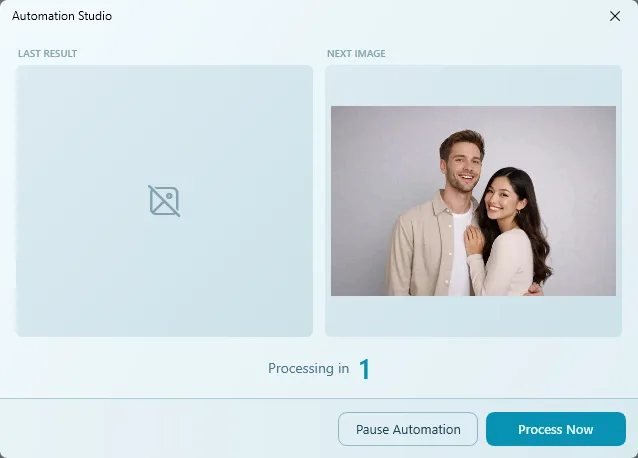
- Before each photo, a countdown window shows Last Result, Next Image and Processing in N. Click Process Now to skip the wait, or Pause Automation to stop.
- The photo then goes through the normal processing window, exactly as in the studio.
Watch it work
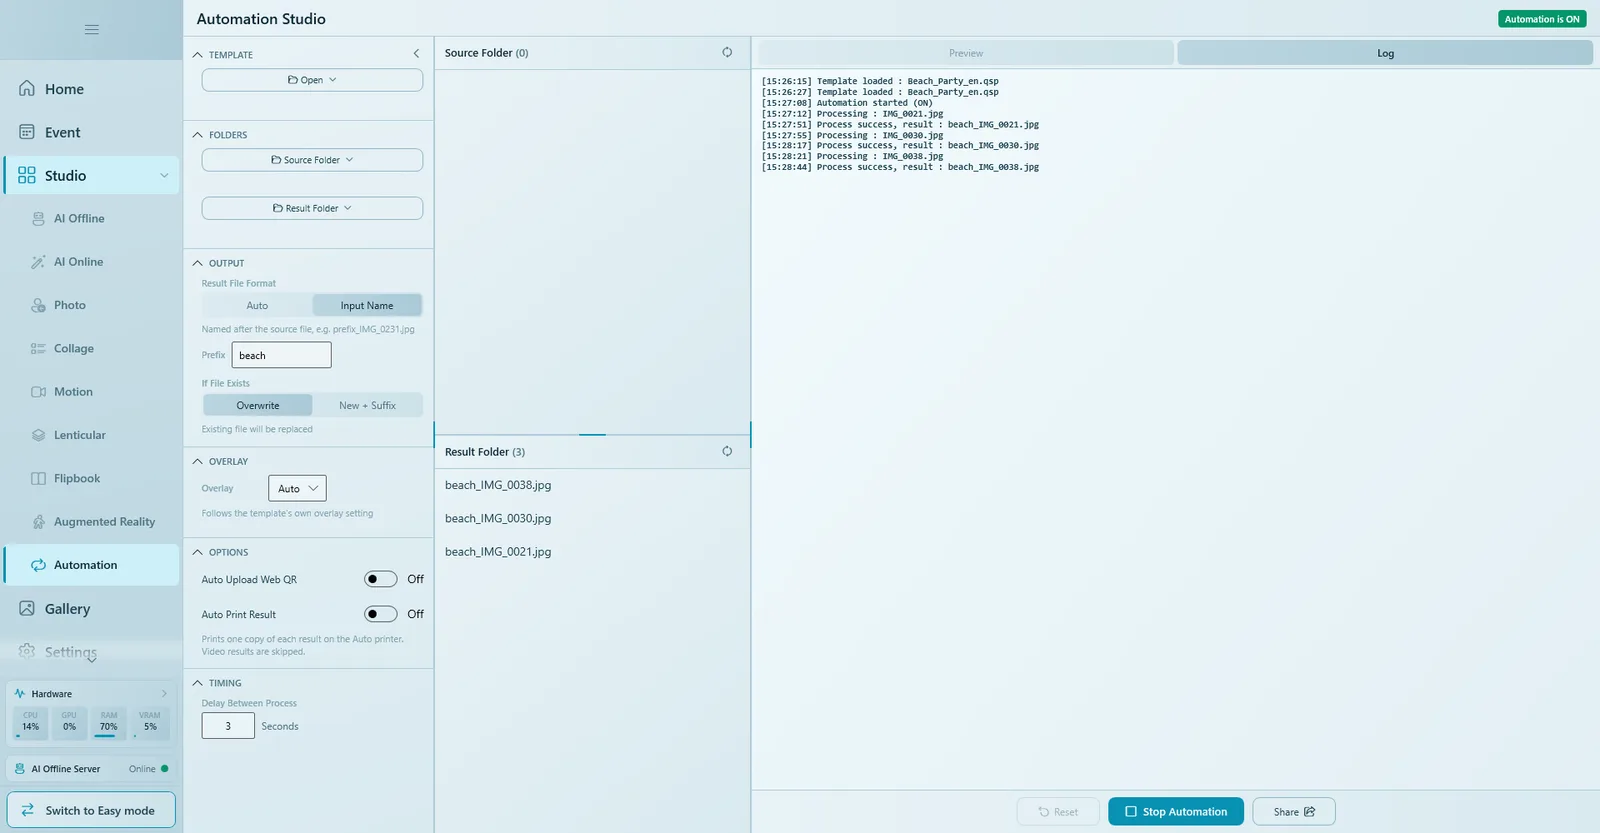
- One by one, photos leave the Source Folder list and their results appear in the Result Folder list. Each list shows its file count.
- The Preview tab shows the file you click, and jumps to the newest result after every successful process.
- The Log tab records every step with a time: template loaded, Automation started (ON), Processing, Process success, upload and print entries, errors, Automation stopped (OFF).
- When the folder is empty, Automation keeps watching. Drop in a new photo and it is processed right away.
Stop Automation
Click Stop Automation. Processing stops at the next safe point, not in the middle of a photo. The badge returns to Automation is OFF. Reset clears all Automation settings; Share opens the sharing window for the selected result.
If the app or the PC stops suddenly, just click Start Automation again. The Source Folder itself is the queue, so nothing is lost or done twice as long as a photo has not yet moved to done or error.
Tips
- Work on copies: the source photos are moved.
- Test with print and upload off, then switch them on.
- Use templates that need one photo and no typing.
- Use Input Name with a prefix when you need to match results to the original camera files.
- Check the
errorfolder and the Log after a run.
Troubleshooting
Start Automation does nothing or shows a warning.
Read the message: "No template is selected", "No source folder is selected", "No result folder is selected", "File prefix is required for this option", "Select an overlay image for Custom overlay" or "Delay must be at least 1 second". Fix that setting and start again.
My template is rejected.
It needs more than one photo, asks for text, outputs video, or comes from a studio Automation does not support (Motion, Lenticular, Flipbook, Augmented Reality). Use a single-photo image template.
New photos are not picked up.
Make sure they are saved as JPG or PNG directly in the Source Folder (not in a subfolder), and that Automation is ON.
"Auto print skipped — no printer is set up."
Set up a printer in Settings first, then turn on Auto Print Result.
"QR on result skipped — Web QR is not set up."
Configure Web QR in Settings › QR Share.
Next steps
Still need help?
Our team answers on WhatsApp. Tell us your Q-Booth version and what you see on screen.