Augmented Reality Studio
Let guests pose with characters that walk into the live camera view, from sample or green-screen clips, with an optional BTS video.
Augmented Reality puts characters next to your guests: a football star, a cuddly koala, your brand mascot. The character walks into the live camera view, waits, and poses with the guests. When the photo is taken, it freezes in place. Guests get the photo and, if you want, a behind-the-scenes video.

Chapters (11)
- 0:00Intro · how it works
- 0:35The studio · aspect ratio first
- 1:06Sample Characters
- 1:26Place the characters · when the clip ends
- 1:57Test photo
- 2:11Your own green-screen character
- 2:30Transparent WebM Converter
- 2:54BTS video · save the template
- 3:21Add it to an event · Easy Mode
- 3:49At the event
- 4:08Three things to remember
How it works
- A character is a short video of someone walking in and waiting, shot on a green screen or saved with a transparent background (WebM or MOV with alpha).
- It plays live over the camera at the booth, so guests can see where to stand.
- When the photo is taken, the character is frozen into the picture.
- You can also add still images on top: a frame, a logo or a prop.
Open Augmented Reality Studio
Open Studio › Augmented Reality.
- Left: template settings: Template, Aspect Ratio, Overlay, QR Overlay, Camera Filter, Event, Options, and the Transparent WebM Converter at the bottom.
- Middle: your layers, in the tabs Layers and Background, with Add Character and Add Image.
- Right: the Stage, where you see and arrange how it looks, and the Result tab. At the bottom: Reset, Camera and Share.
Set the aspect ratio first
Set Aspect Ratio to match your camera before you place any character. For an upright (portrait) camera, choose 9:16 Portrait.
A character's size is measured against the frame. If you change the aspect ratio later, or leave it on Auto with a portrait camera, characters come out stretched or squashed. Choose the ratio first.
Add a sample character
No character yet? Q-Booth has free sample characters to try (people, animals and cartoon characters).
- Click Add Character › Sample characters…. The Sample Characters window opens.
- Pick a character, for example Football, and click Download & Add. It downloads the first time (an internet connection is needed once), then appears on the stage.
- Add a second one the same way, for example the Koala for the other side.
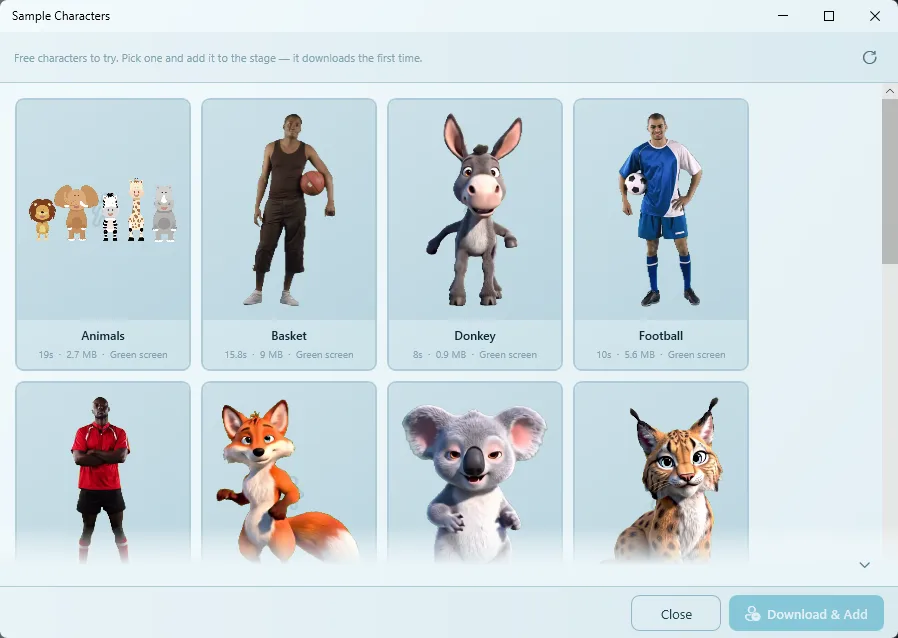
Downloaded characters keep working offline.
Place the characters
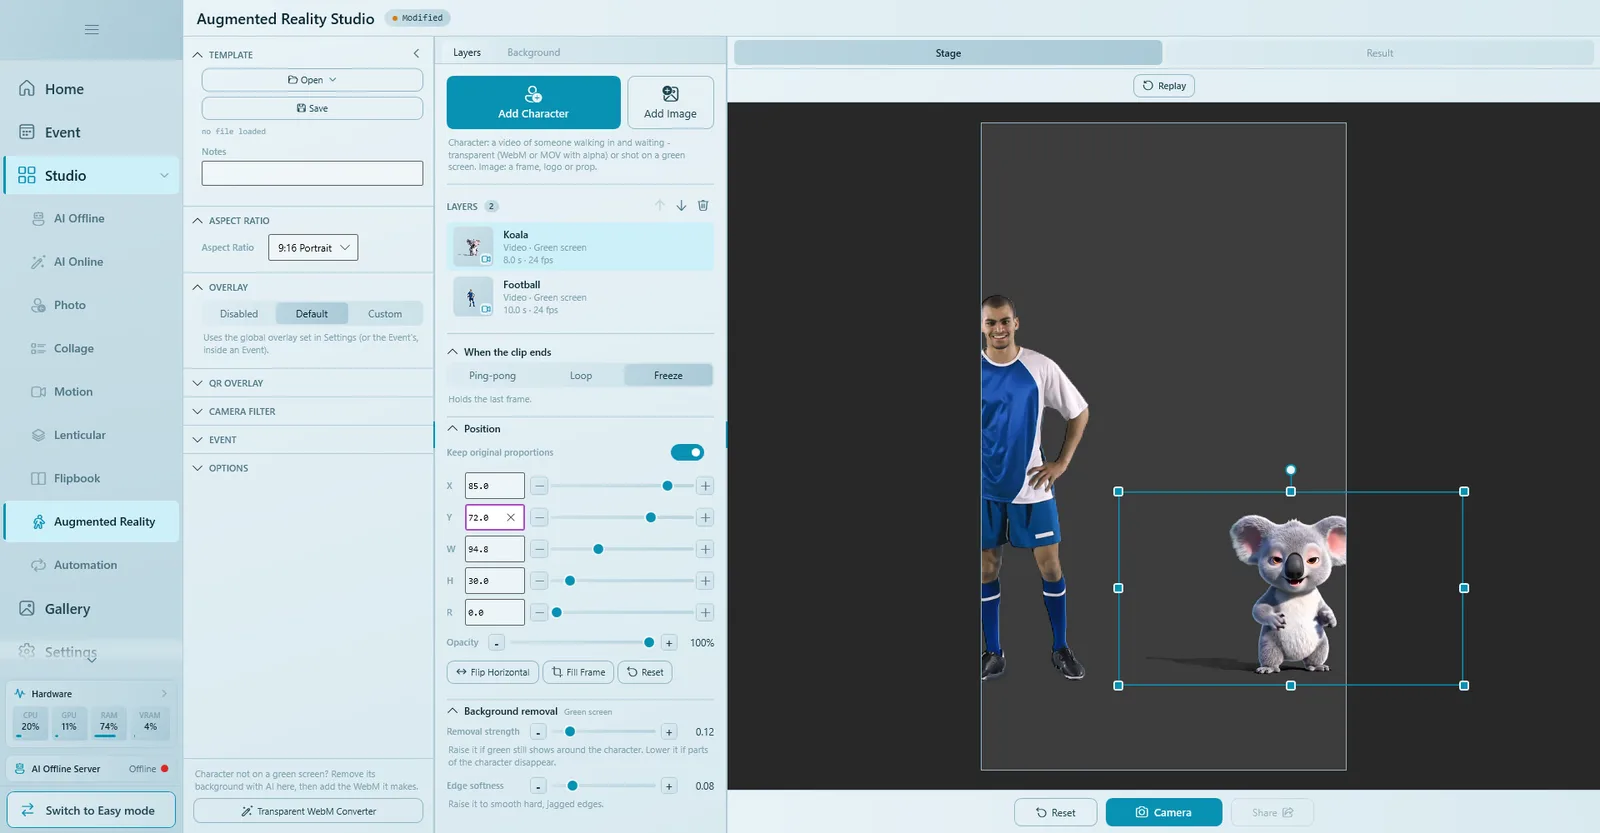
- Select a character in the Layers list (or click it on the stage).
- Drag it to move it, and pull a corner to resize it. Or type exact values under Position.
- Leave the middle of the frame free for your guests: one character on the left, one on the right.
- Flip Horizontal turns a character around so it faces the guests.
- Click Replay above the stage to play the walk-in again.
Position controls
| Control | What it does |
|---|---|
| Keep original proportions | On: width and height resize together. Off: stretch the width or height on its own. |
| X, Y, W, H, R | Position, size and rotation, typed or with sliders. |
| Opacity | How see-through the layer is. |
| Flip Horizontal | Mirror the layer. |
| Fill Frame | Stretch the layer over the whole frame (for frame images). |
| Reset | Back to the original size and shape. |
The arrows and bin above the layer list change the order of layers or delete one.
When the clip ends
A character clip has a fixed length. Under When the clip ends, choose what happens after it:
| Option | Behaviour |
|---|---|
| Freeze | Holds the last frame. The character stands still in its final pose. |
| Loop | Plays the whole clip from the start, again and again. |
| Ping-pong | Plays the clip once, then goes back and forth over the end so the character keeps moving. Ping-pong from sets where that back-and-forth starts (for example 9 s in a 10-second clip). |
Take a test photo
- Press Camera. The characters play live over the camera, exactly as guests will see them.
- Shoot, check the photo, and press OK.
- The finished picture appears in the Result tab.
Use your own green-screen character
- Choose Add Character › File and pick your video (a green-screen MP4/MOV, or a transparent WebM/MOV).
- For a green-screen video, the green is detected and removed automatically. The layer shows its type, for example Green screen.
- If some green still shows around the edges, raise Removal strength. If parts of the character disappear, lower it.
- Edge softness smooths hard, jagged edges.
A good character clip: the person walks in from the side, stops in a natural pose and waits. Light the green screen evenly and avoid green clothing.
Transparent WebM Converter
You can also turn a clip into a transparent WebM first, then add the WebM like any other character. Click Transparent WebM Converter at the bottom left.
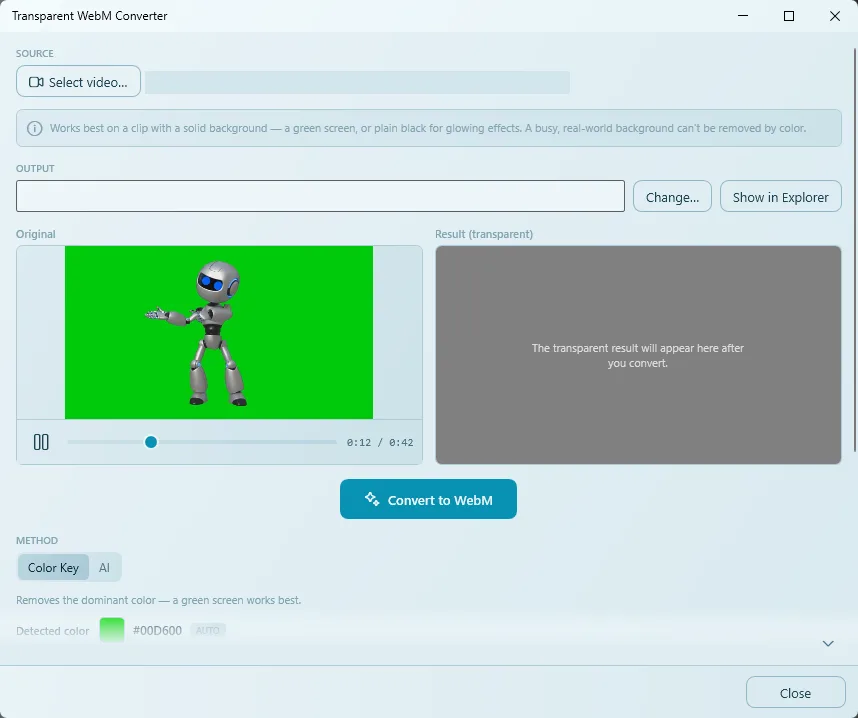
- Click Select video… and choose the clip. Check the Output location (Change… to choose another).
- Choose a Method:
- Color Key removes a solid background colour, such as green. The Detected color is found automatically. Adjust Tolerance (raise it if background still shows at the edges) and Softness (higher = smoother edges, good for hair).
- AI finds the person even without a green screen. It works frame by frame, so it is slow: a few minutes, much longer without a graphics card.
- Use Trim (Start / End) to convert only the part you need.
- Press Convert to WebM. The result appears under Result (transparent); Show in Explorer opens its folder.
- Add the WebM with Add Character › File.
Color Key works best on a clip with a solid background: a green screen, or plain black for glowing effects. A busy, real-world background cannot be removed by colour; use AI for that.
Images and background
- Add Image places a still picture (a frame, logo or prop) as a layer.
- The Background tab can replace the guest's background in the final photo; the characters are placed on top of the new background.
- Overlay, QR Overlay and Camera Filter work as in Photo Studio.
Options and the BTS video
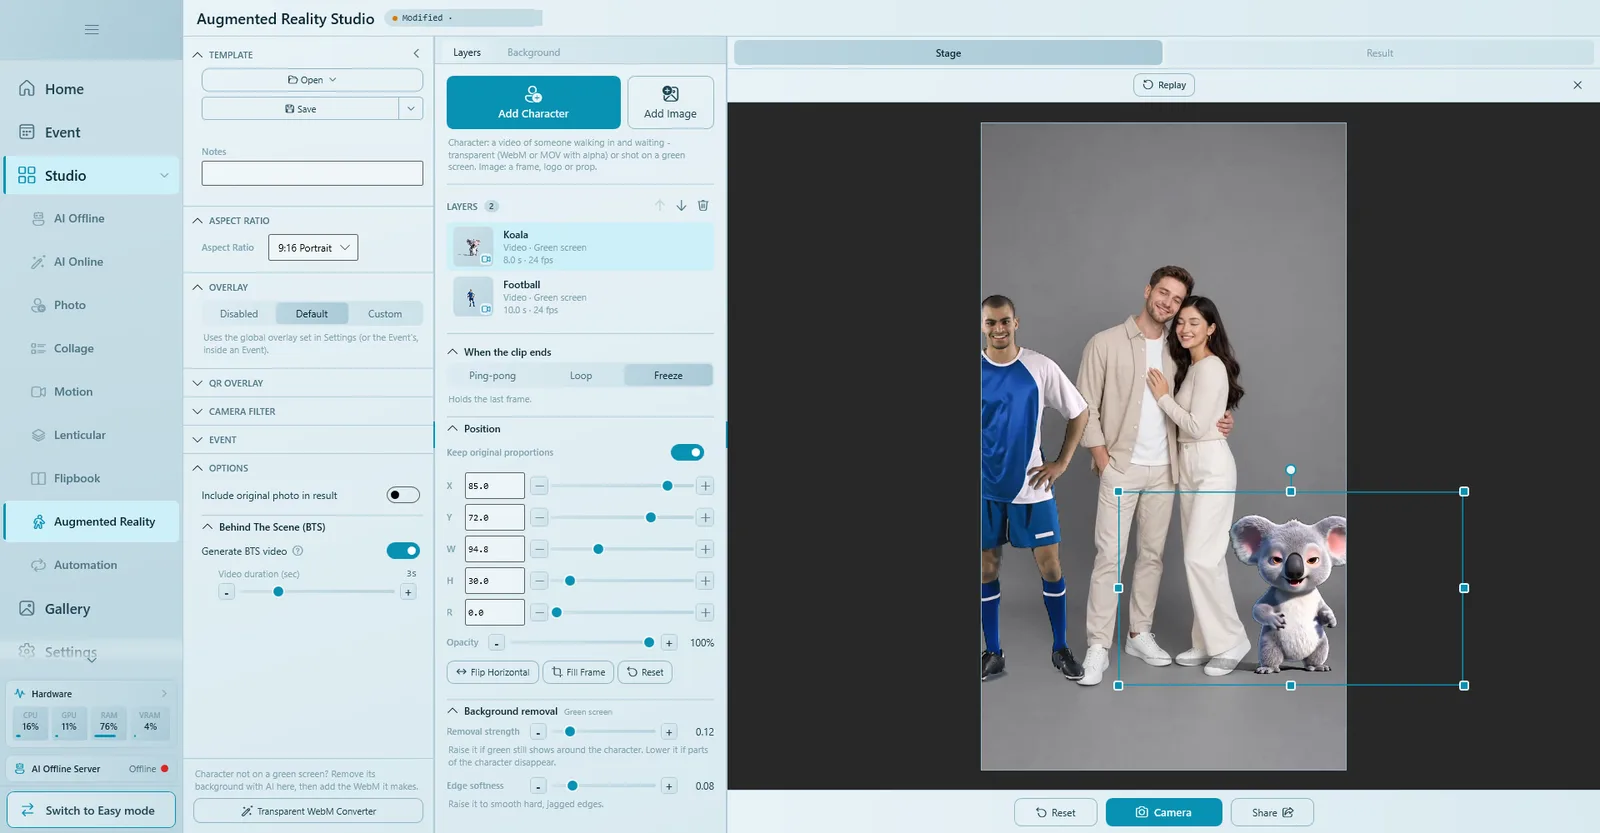
| Option | What it does |
|---|---|
| Include original photo in result | Also gives guests the picture without the characters. |
| Behind The Scene (BTS) › Generate BTS video | Records the live view, characters included, during the countdown, as an extra video result. The countdown lasts as long as the Video duration (sec). |
Caption, cover and save
- Under Event, give the template a caption and a cover image.
- Click Save. Augmented Reality templates are saved as
.qsg.
Add it to an event
In Expert mode
- Open your event and go to Templates.
- Click Open File and choose the
.qsgfile. - Or click Create in Studio, pick Augmented Reality, build it right there, and click Save & Return.
In Easy Mode
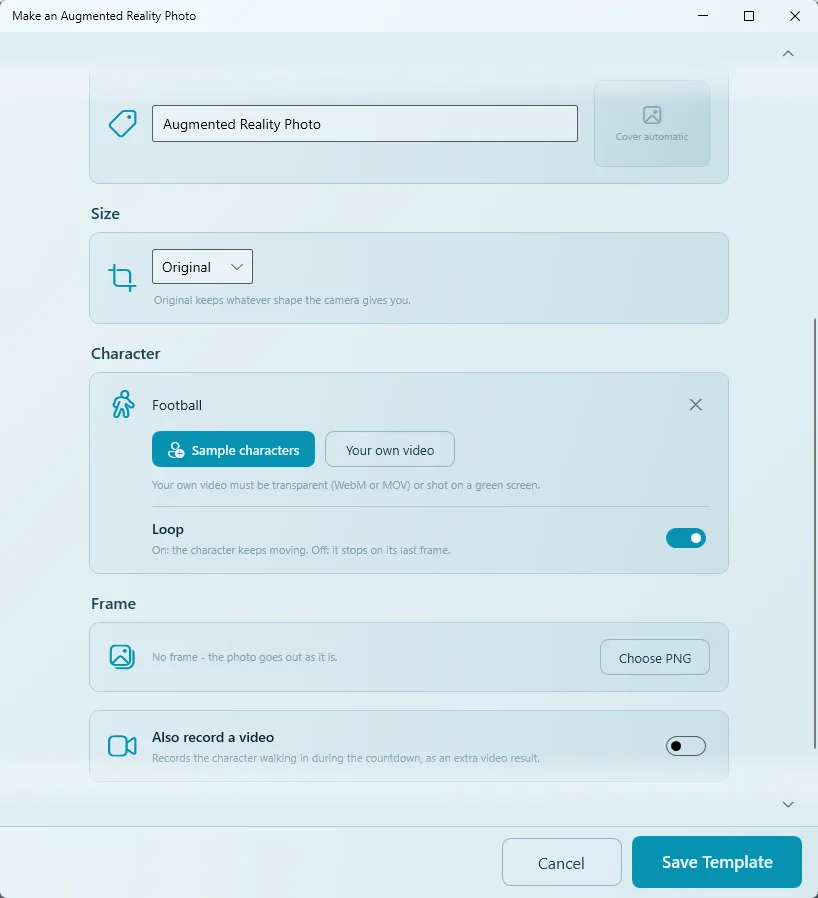
- In the event wizard, at Choose your templates, click the Augmented Reality card.
- Under Character, choose Sample characters or Your own video (transparent WebM/MOV or green screen).
- Drag the character into place on the preview; pull a corner to resize.
- Set Loop (on: the character keeps moving; off: it stops on its last frame), an optional Frame, and Also record a video for the BTS clip.
- Click Save Template.
Easy Mode uses one character. For more characters, images or the background tab, use the studio.
What guests see
- The guest picks the template.
- The characters walk in on the camera screen; the countdown runs.
- The photo is taken with everyone in the frame, the characters frozen in their pose.
- The result comes with the behind-the-scenes video (if enabled) and a QR code to take it home.
Tips
- Set the aspect ratio before you place characters.
- Keep the middle of the frame free for your guests.
- Use Freeze for a calm final pose, Ping-pong to keep the character alive while guests get ready.
- Always take a test photo with the real camera, at the venue, before the event.
Common problems
The characters look stretched or squashed on the event camera.
The aspect ratio did not match the camera when you placed them. Set the correct Aspect Ratio, then click Reset on each character and place it again.
A green line shows around the character.
Raise Removal strength a little and add some Edge softness. Or convert the clip with the Transparent WebM Converter and adjust Tolerance.
Parts of the character disappear.
Removal strength is too high, or the character wears something green. Lower the strength, or re-shoot.
"This video could not be read."
Try an MP4 or MOV file, or convert the clip to WebM with the converter.
The sample list does not load.
Samples need an internet connection the first time. Check the connection and try again; characters you already downloaded still work offline.
Next steps
Still need help?
Our team answers on WhatsApp. Tell us your Q-Booth version and what you see on screen.