AI Online Studio
Set up your fal.ai API key and build AI Online templates that turn guest photos into new scenes and short videos.
AI Online Studio sends the guest's photo and your prompt to an online AI model, and the finished picture (or a short video) comes back to the booth in seconds. You get the latest AI models without a powerful graphics card; in return you need a stable internet connection, and every generation is charged by the AI service.

Chapters (13)
- 0:00Intro · how AI Online works
- 0:29Built-in: no API key · tokens and prices
- 0:55Buy tokens on lumaqube.com
- 1:15Tokens added · refresh the balance
- 1:27Your own fal.ai or WaveSpeed key
- 1:45Build a template: output and model
- 1:59Test photo and a universal prompt
- 2:29Process and Compare
- 2:42From image to video
- 3:02Cover and Save to File
- 3:12Add it to an event
- 3:26Easy Mode · at the event
- 3:54Three things to remember
How AI Online works
- The guest takes a photo, Q-Booth sends it with the template's prompt to the AI model you chose, and the result is shown and shared like any other result.
- The AI runs online, so the booth computer does not need an RTX card. For AI on the booth computer itself, see AI Offline Studio.
- You choose how to pay under PROVIDER in the studio:
- Built-in: no API key and no extra account. It uses tokens from your Q-Booth account; the studio shows your balance and what one generation costs before you press the button. Top up with Buy tokens, which opens your account page on lumaqube.com.
- 3rd Party: your own account with an AI service such as fal.ai, connected with an API key (steps below). The service charges your account directly for each generation.
Costs are set by the provider and differ per model, quality, video length and options. Q-Booth shows the cost of one generation under the model, so you always know before you process. Video costs much more than a picture.
Get a fal.ai API key
Only needed for 3rd Party. You do this once per computer.
- Open fal.ai in your browser and click Login. The easiest way is to sign in with your Google account.
- Add credit to your fal.ai account (in fal.ai's billing page). Every image or video you generate uses credit from that account.
- Click API Keys in the menu, then Add key.
- Type a description if you like, for example Q-Booth Online Studio, and click Create Key.
- Copy the key immediately and keep it somewhere safe.
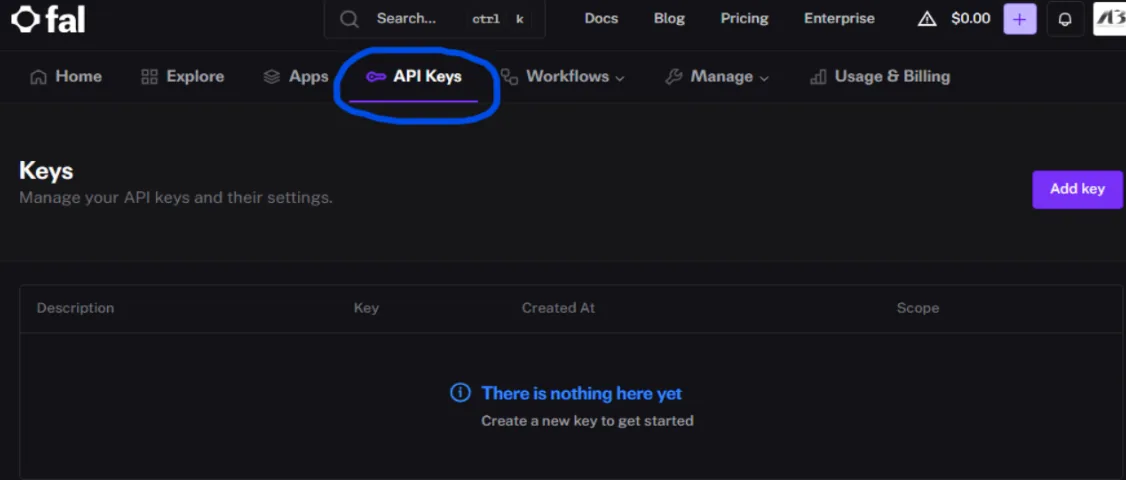
fal.ai shows the key only once. After you close the window you cannot see it again; if you lose it, create a new key. Treat the key like a password: anyone who has it can spend your credit.
Enter the API key in Q-Booth
- Open Settings › General and scroll to AI Online Service.
- In AI-Online API Provider choose fal.ai.
- Paste the key into API Key. Tick Show key if you want to check it.
- Click Save Settings.
- In AI Online Studio, choose PROVIDER › 3rd Party and the matching service.
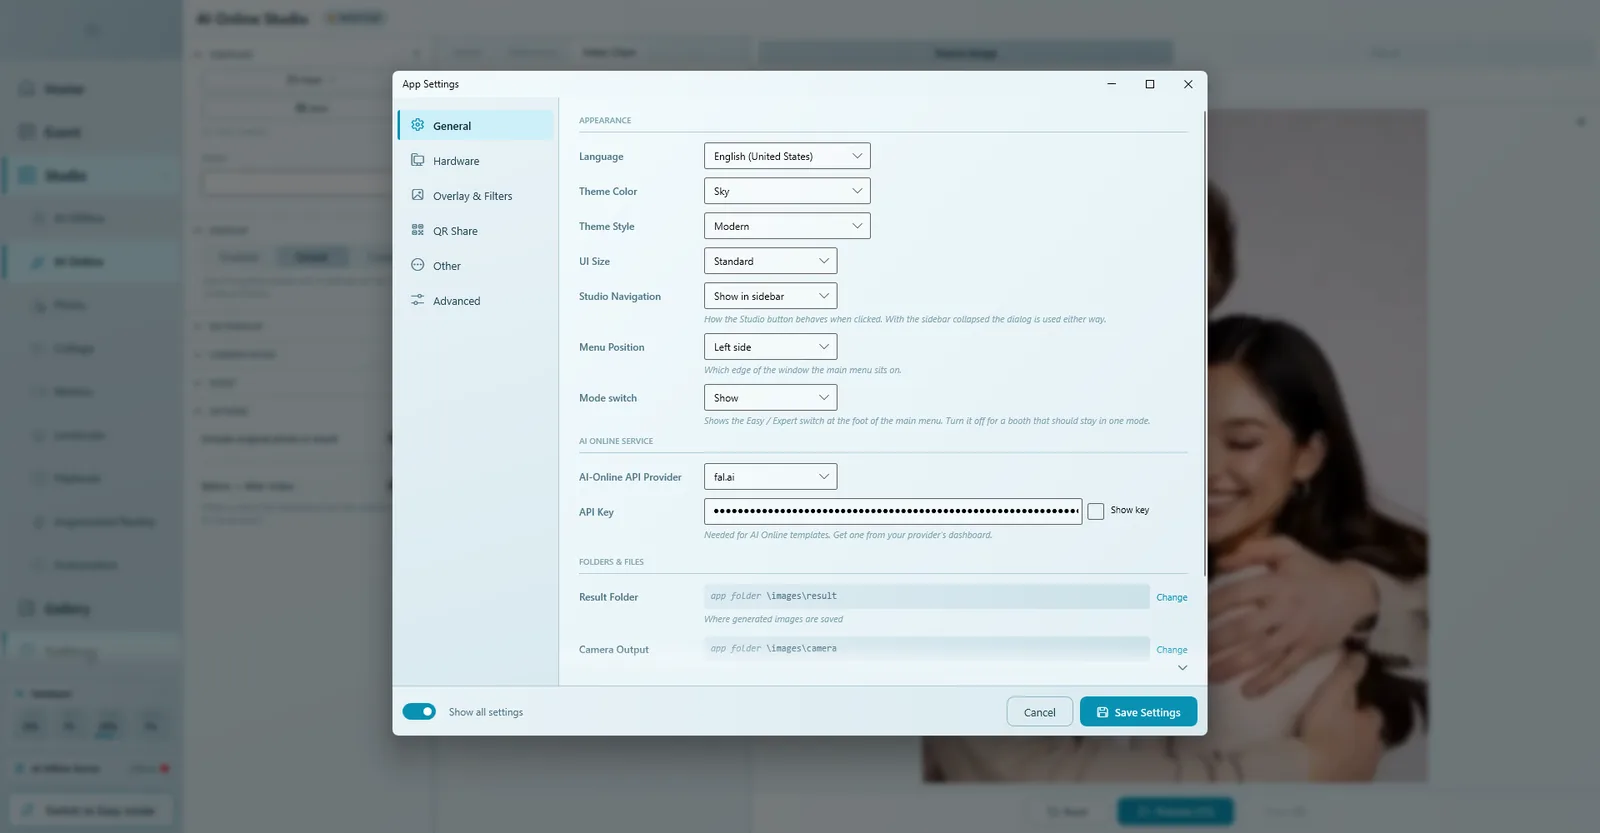
Keys are stored separately per provider. If a template uses a model from the other service in the list, enter that service's own key as well; otherwise processing stops with "API key for … is not set". When you open an event whose templates need a key that is missing, Q-Booth also asks for it before the event starts. See also General settings.
The studio tabs
The middle panel has up to three tabs; some only appear when the chosen model supports them.
Model
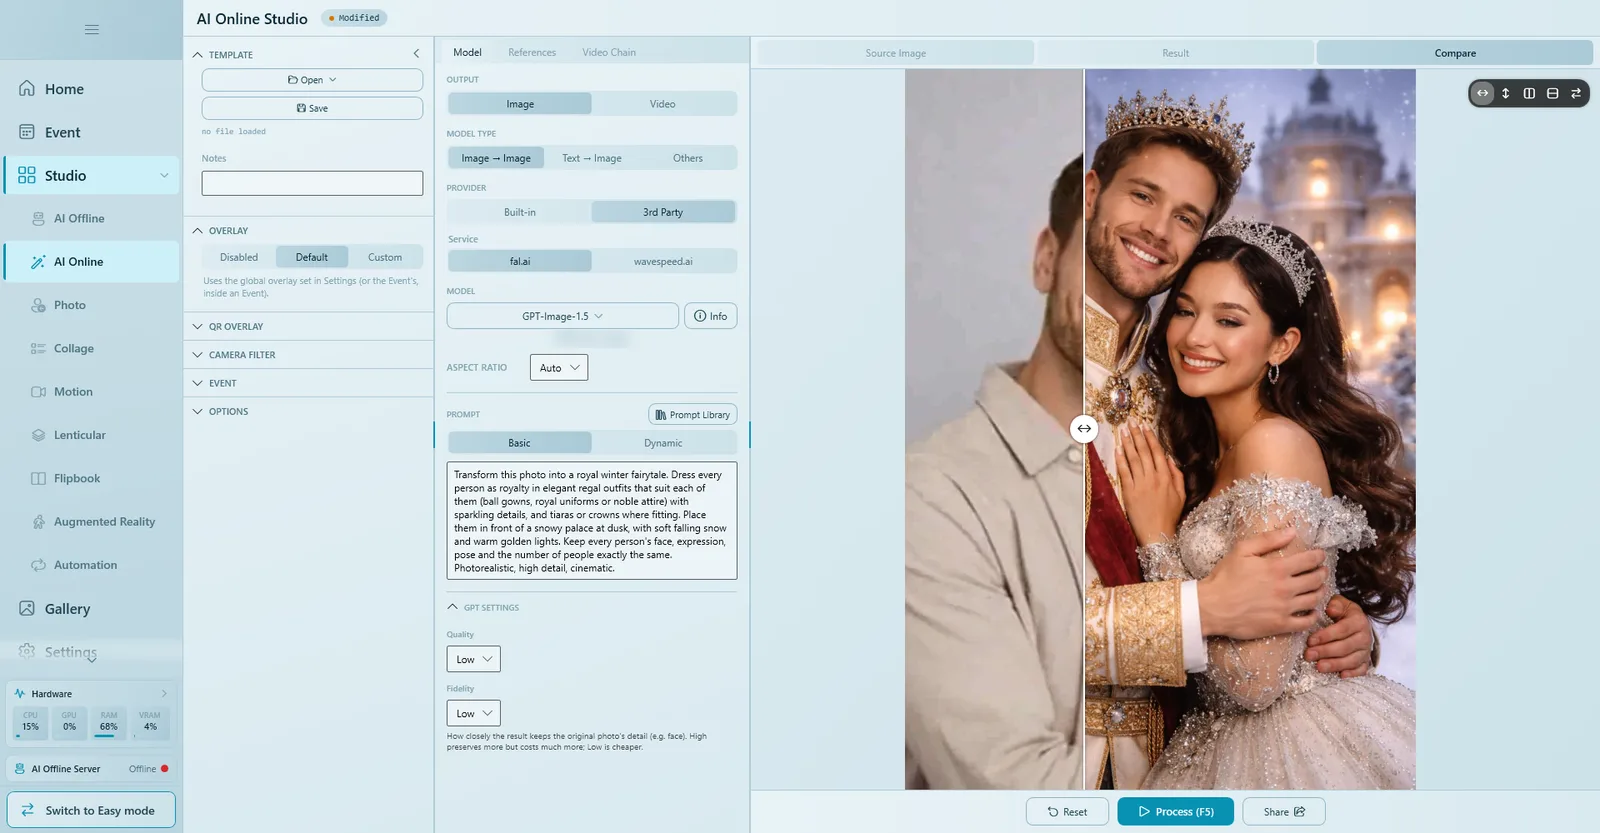
| Control | What it does |
|---|---|
| OUTPUT | Image or Video. |
| MODEL TYPE | For images: Image → Image (starts from the guest's photo), Text → Image, Others. For videos: Image → Video, Text → Video. |
| PROVIDER | Built-in (tokens) or 3rd Party (your own API key; choose the Service). |
| MODEL | Opens Select Model with a search box. Each model has its own look, speed and cost; Info shows its description and limits. The cost of one generation is shown under the model. |
| ASPECT RATIO | The shape of the result. Auto follows the source photo. |
| PROMPT | Basic (one fixed prompt) or Dynamic (guests fill in blanks, see Dynamic Prompt). Prompt Library stores prompts you want to reuse. |
| Model settings | Extra settings for some models, for example GPT SETTINGS with Quality (Low/Medium/High) and Fidelity (how closely the result keeps the original photo's details, such as faces). Higher values cost more. |
References
Shown for models that accept extra images. Click Add Reference Image one or more times to send images along with the photo, so the model follows a style, costume, product or composition. Some video models also accept reference videos or audio; the hint in the tab explains how to name them in the prompt.
Video Chain
Turns the AI picture into a short video in the same run.
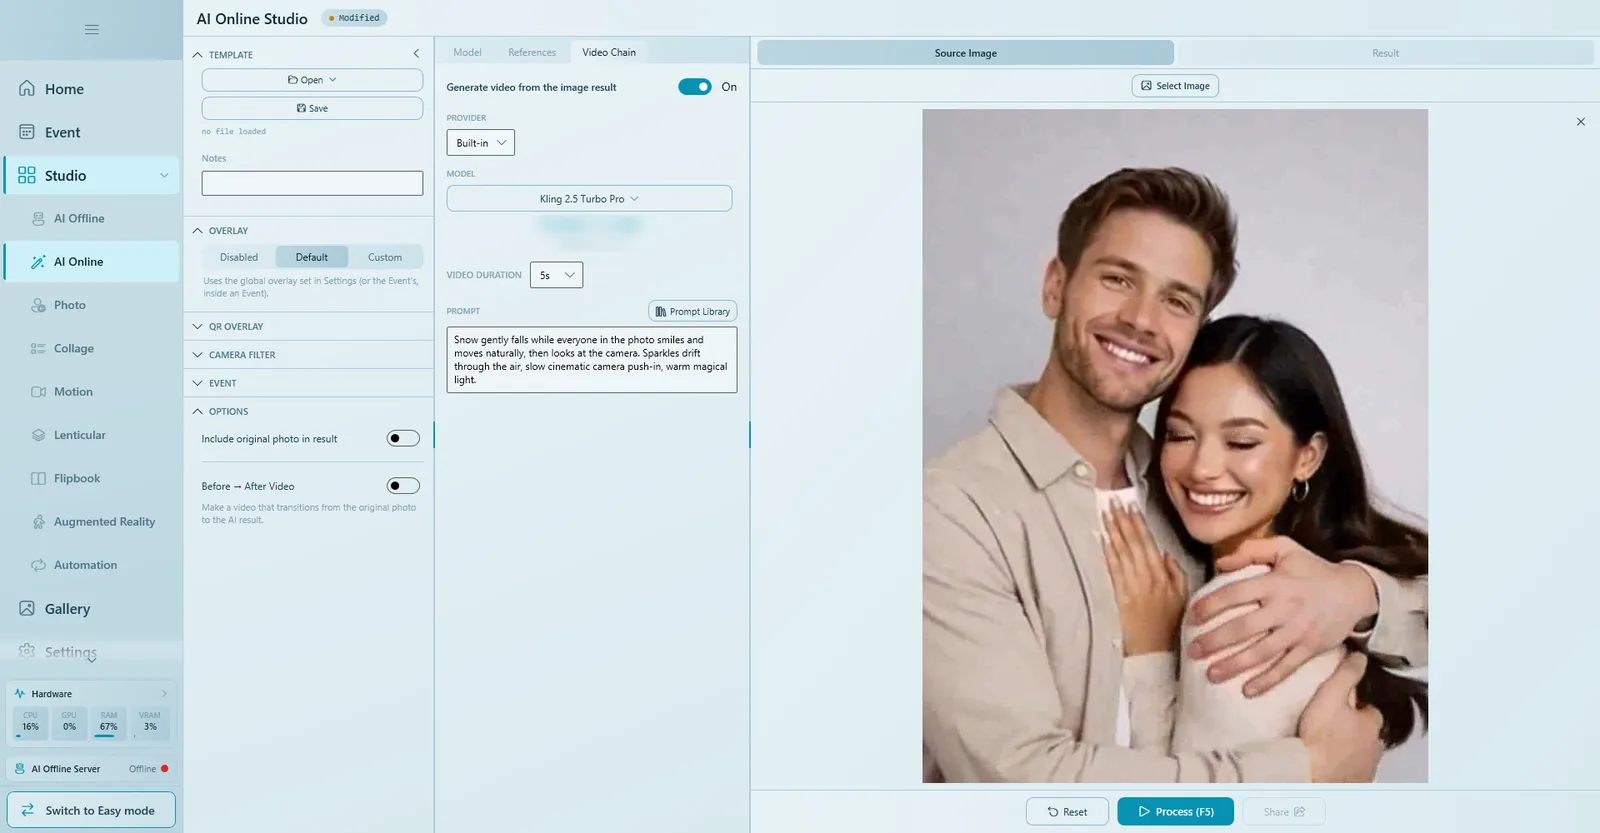
| Control | What it does |
|---|---|
| Generate video from the image result | Runs a video model after the image model. |
| PROVIDER / MODEL | The video model to use. |
| Video Duration | Length of the clip. You pay per second. |
| PROMPT | A short description of the motion. Some video models reject an empty prompt. |
Some models show other tabs: Background (Original or Change Background with a backdrop image) or Motion (a reference clip that supplies the movement).
Build a template step by step
- Open Studio › AI Online.
- In Model choose OUTPUT › Image and MODEL TYPE › Image → Image, so the guest's photo is the starting point.
- Choose the PROVIDER and click MODEL to pick a model. Note the cost shown under it.
- On the right, load a test photo in Source Image with Select Image (file, camera, clipboard or gallery).
- Write the prompt (example below) and set ASPECT RATIO.
- Press Process (F5). A few seconds later the result is in; check it with Compare.
- Optional: in Video Chain turn on Generate video from the image result, choose a video model, a duration and a short motion prompt, and process again.
- Optional: under Options turn on Before → After Video (photo hold, result hold and transition times can be set).
- Set a frame in Overlay, fill in Caption and Cover image in Event, and click Save. AI Online templates are saved as
.qsofiles.
Example prompt that works for one guest or a whole group:
Transform this photo into a royal winter fairytale. Dress every person as royalty in elegant regal outfits that suit each of them (ball gowns, royal uniforms or noble attire) with sparkling details, and tiaras or crowns where fitting. Place them in front of a snowy palace at dusk, with soft falling snow and warm golden lights. Keep every person's face, expression, pose and the number of people exactly the same. Photorealistic, high detail, cinematic.
Describe the scene, the clothes and the light, not the people themselves, and ask the model to keep every face the same. More in Writing good AI prompts.
Use it in an event
- Expert mode: in the event open Templates and click Open File, or Create in Studio › AI Online and finish with Save & Return.
- Easy Mode: the AI Photo online card: choose a model, write the prompt and use Try it on a photo before you save.
At the event the guest picks the template and takes the photo; the AI works for a few seconds and the result is shared as usual.
Waiting times and timeouts
- Most pictures take a few seconds; videos take longer. While the AI works, the screen shows progress such as "In queue" and "Generation in progress…".
- Max Timeout (default 180 seconds) and Cancel Button Delay (default 60 seconds) are in Settings › Other (turn on Show all settings if you do not see it). See Other settings.
- If a generation takes longer than usual, Q-Booth shows Still Generating: nothing has failed yet, and Keep Waiting lets it finish.
Troubleshooting
"API key for … is not set."
Enter the key for that provider in Settings › General › AI Online Service and click Save Settings. Remember that each provider has its own key.
"Not enough tokens."
You are using Built-in and the balance is too low for this model (with Video Chain, all steps together). Top up with Buy tokens on lumaqube.com, then refresh the balance in the studio. Nothing was charged for the failed attempt.
"Generation failed" or the service rejects the request.
Check the credit on your provider account, the internet connection and the prompt (some models refuse certain content or an empty prompt). Try again or choose another model.
"The server took too long to respond."
The internet connection is slow or unstable. Check the venue connection, have a backup ready (a network cable or a mobile hotspot), and try again.
Faces or the number of people change.
Add "Keep every person's face, expression, pose and the number of people exactly the same" to the prompt, and try a higher Fidelity if the model offers it.
Three things to remember
- Check your balance (tokens or provider credit) before every event.
- Test each template on a real photo first, on the venue's internet.
- Using your own account? The API key goes in Settings › General.
Next steps
Still need help?
Our team answers on WhatsApp. Tell us your Q-Booth version and what you see on screen.