Put the photo inside a frame
Photo Area: put the photo or video inside a frame's see-through window instead of under the whole overlay, in every studio, Settings, the event overlay and Easy mode.
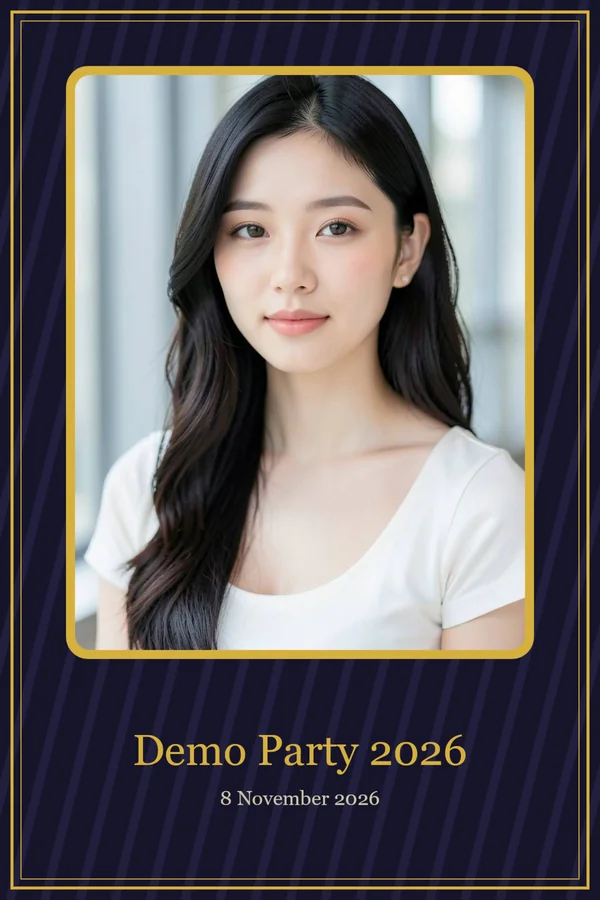
Some frames have a window in them: a picture frame, or a poster with a spot for the photo. Since 5.9.6.1 Q-Booth can put the photo inside that window, instead of laying the whole frame over the photo. The tool is called Photo Area. It is in every studio, in Settings, in the event overlay and in the Easy mode makers.
Inside the window, or over the whole photo
| Mode | What happens |
|---|---|
| Normal overlay (switch off) | The frame is stretched over the whole photo. The photo shows through the frame's transparent parts. |
| Photo Area (switch on) | The photo is placed in a box over the frame's window, and the frame is drawn on top. The finished photo takes the frame's shape and size, not the camera's. |
Prepare the frame
- The window in the frame must be transparent in the PNG. If it is painted black or white, the frame covers the photo.
- Make the frame at print size. A small frame is enlarged (up to 4000 px on the long side) so the photo stays sharp, but the frame itself may then look soft.
Set it up in a studio
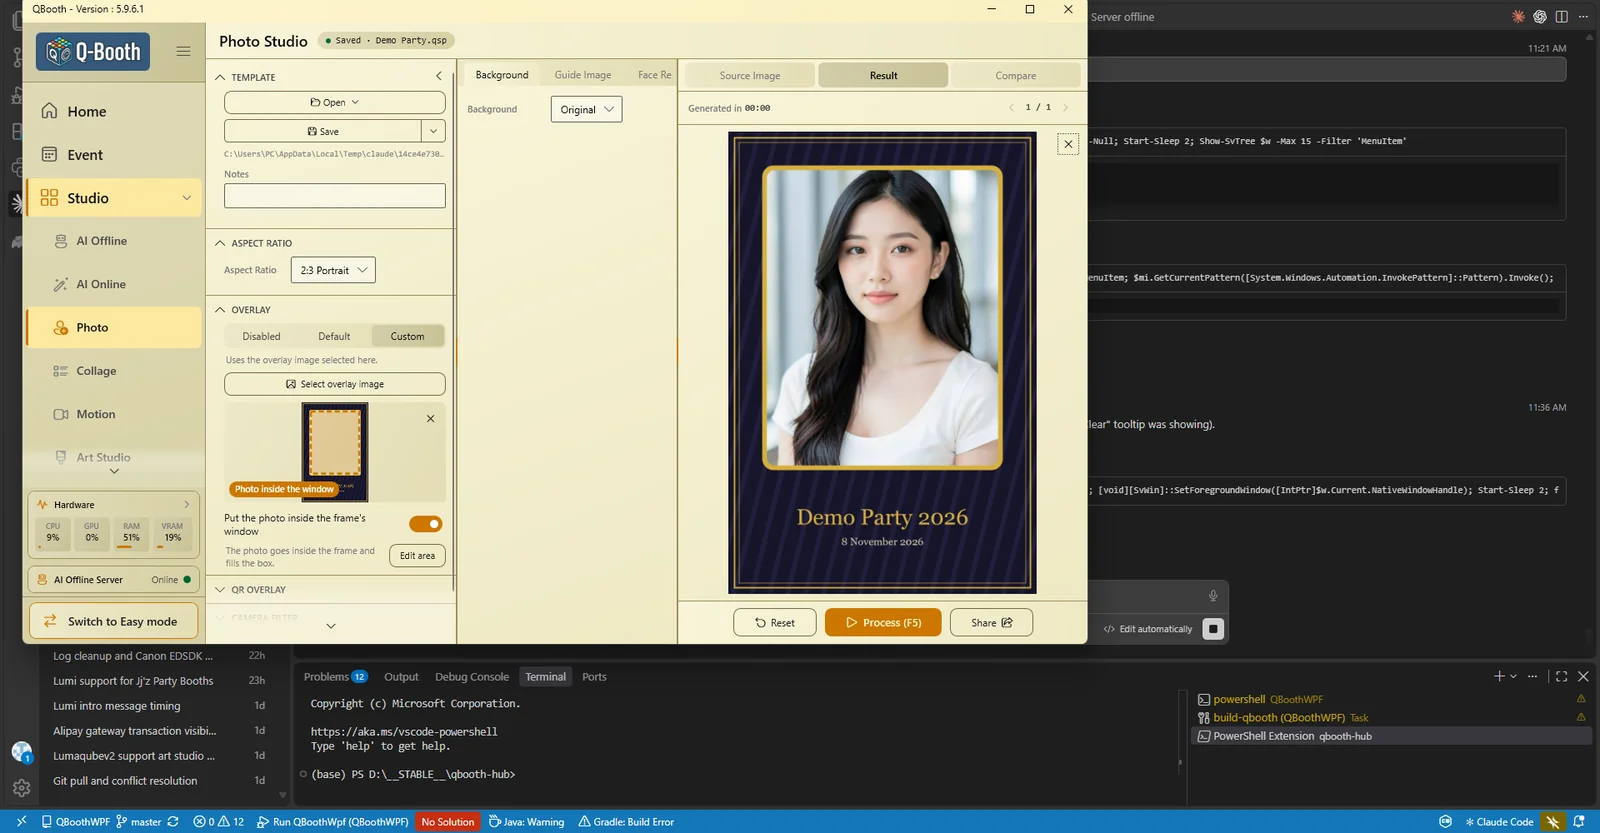
- In the studio's Overlay section, set Overlay to Custom and pick the frame.
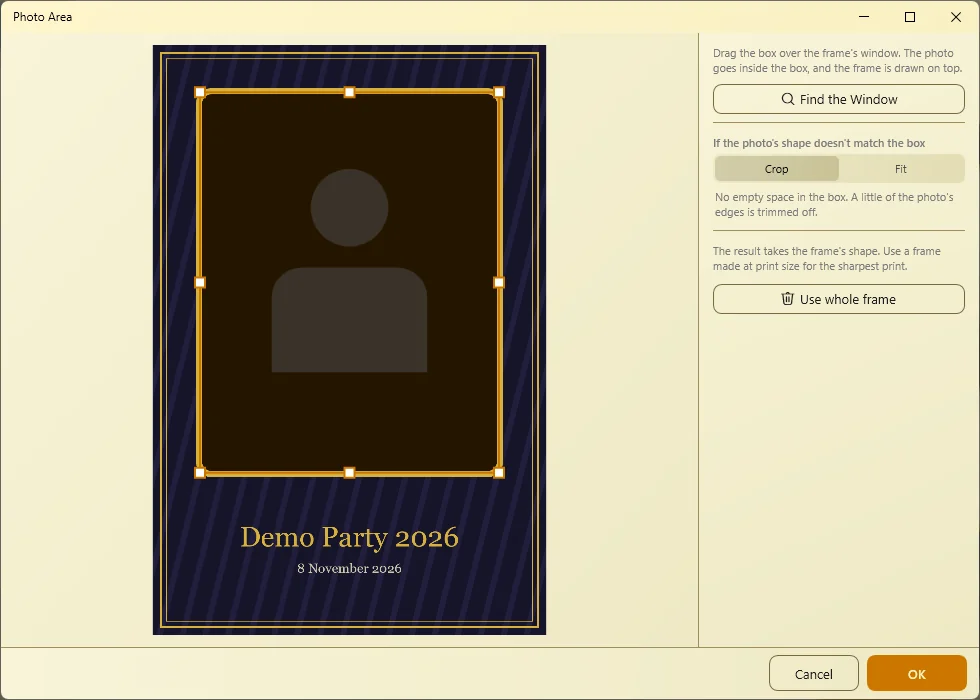
- Turn on Put the photo inside the frame's window, the switch under the frame preview. The Photo Area window opens with the frame and a box.
- The box starts over the frame's see-through window on its own. Press Find the Window to snap it back, or drag and resize it by hand.
- Under If the photo's shape doesn't match the box, pick Crop or Fit (see below).
- Press OK, then save the template. Cancel turns the switch back off.
Crop or Fit
| Choice | What you get |
|---|---|
| Crop | No empty space in the box. A little of the photo's edges is trimmed off. |
| Fit | Nothing is trimmed. Black bars fill the empty space in the box. |
It is the same Crop / Fit as a photo box in Collage Studio. The person shape in the box shows the photo at the template's Aspect Ratio, so you can see what gets trimmed or where the bars go. With Aspect Ratio Auto the shape isn't known yet, and the preview just fills the box.
See which mode is on
- The frame preview shows a badge: Photo inside the window (the box is drawn on the preview) or Covers the whole photo.
- Edit area reopens the box.
- Turning the switch off, or Use whole frame in the box window, goes back to the normal stretched overlay.
- Picking a different frame clears the box and turns the switch off.
Videos
Videos go in the box too. The result video takes the frame's shape (up to 1920 px on the long side), with the clip cropped or fitted into the window.
- Motion Studio: with a still Custom frame, the video goes inside the window. A moving overlay (WebM / MOV) can't have a Photo Area, so the switch hides.
- Flipbook Studio: with Custom, the picture goes inside the window on every sheet frame and in the video.
- Art Studio: the whole timelapse is drawn inside the frame, and the finished drawing too.
- AI Online and AI Offline: the Before → After Video goes in the box, and so does an AI Online video result.
Where the switch is
Every place where a Custom overlay can be picked has the same switch.
| Place | What goes in the window |
|---|---|
| Every studio's main Overlay | The result. In Collage Studio that is the whole finished collage (the strip video too); in Lenticular Studio every layer. |
| Options › Include original photo | The original photo. It has its own switch. The camera decides the original's shape, so its preview just fills the box. |
| Before → After Video (AI Online, AI Offline) | The reveal video. |
| A Collage / Lenticular layer's Include as result overlay | That layer's own copy. |
| The Collage / Lenticular Slideshow video overlay | Each slide. |
| Automation's Custom overlay | Every result, for this Automation session only. |
| Settings › Overlay & Filters and the event's Overlay | The result, with one box per shape row (see below). |
| The Easy mode makers | The result (see below). |
In Settings and in the event overlay
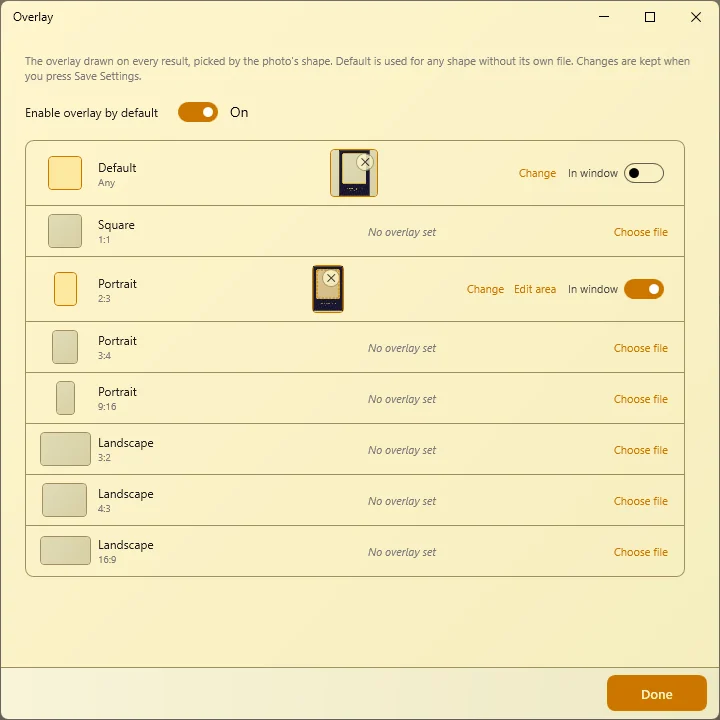
In Settings › Overlay & Filters and on the event's Overlay page, each shape row with a file has an In window switch, and Edit area once it is on.
- Each shape has its own box, used whenever that row's file is used.
- Picking or clearing a row's file clears its box.
- A template's own Photo Area wins over these.
In Easy mode
The Photo, AI Photo, Face Swap, Video, Augmented Reality and Art Drawing makers have it. Once a Frame is picked, the Put the photo inside the frame's window switch appears under it.
- Switch off means the frame covers the whole result, as before.
- Picking a different frame clears the box.
- The live preview in the maker still shows the frame over the whole shape. The box shows in the Photo Area window and in the result.
- A template made in Expert mode that Easy mode can open keeps its box, and you can change it there.
Lenticular: one frame for every layer
In Lenticular Studio, set Overlay to Custom with the frame, then turn on the switch. Every layer goes inside the frame's window. Design the frame at the lens shape.
This replaces the per-layer Custom Frame. That section is gone for new layers. It only shows on a layer that already uses one, so older templates keep working; switching it off there hides it for good.
A template with a Photo Area that is opened on an app older than 5.9.6.1 shows the normal stretched overlay instead.
Common problems
The photo doesn't show in my frame.
The frame's window isn't transparent. Cut the window out as transparent in the PNG. The Photo Area window warns about this ("Most of this box isn't see-through in the frame, so the frame will hide the photo there."), and Find the Window finds nothing.
There are black bars inside the window.
The box is set to Fit. Pick Crop to fill the box; a little of the photo's edges is then trimmed.
The frame looks soft on the print.
The frame file is small, so it was enlarged. Use a frame made at print size.
The result isn't the camera's shape any more.
That is how Photo Area works: the finished photo takes the frame's shape and size. Turn the switch off to get the camera's shape with the frame stretched over it.
I can't find the switch.
It appears only once a frame is picked (Overlay › Custom, or a file in a Settings / event row). In Motion Studio it hides for a moving WebM / MOV overlay.
My box is gone.
Picking a different frame, or picking or clearing a row's file in Settings or the event overlay, clears the box. Turn the switch (or In window) on again and set the box.
Next steps
Still need help?
Our team answers on WhatsApp. Tell us your Q-Booth version and what you see on screen.